That infuriating click on every pedal stroke isn’t just a noisy bottom bracket; it’s a symptom of ‘interface failure’ where parts no longer meet perfectly. This guide transforms you from a frustrated parts-swapper into a system diagnostician, teaching you methodical steps to isolate, identify, and permanently silence the true source of the creak using targeted solutions, often without spending a dime.
There are few sounds more maddening to a cyclist than a persistent, rhythmic creak accompanying every pedal stroke. It’s a sound that can turn a peaceful solo ride into a symphony of mechanical frustration and drive your clubmates to despair. The immediate suspect is always the press-fit bottom bracket, a component system notorious for its noise-making potential. The common advice is often a frustrating mix of « grease everything » or a resigned sigh to « just replace the bottom bracket. » This approach turns you into a perpetual parts-swapper, chasing the noise without ever truly understanding its origin.
But what if the problem isn’t the part itself, but the connection between the parts? The secret to silence lies in shifting your mindset from a parts-swapper to a system diagnostician. A creak is a cry for help from a ‘failed interface’—a microscopic space where two components are moving against each other when they should be static. This micromovement, often caused by contamination, poor tolerances, or improper installation, is the true villain. This article will not just give you a list of fixes; it will arm you with a methodical process to isolate the source, understand the cause, and apply a precise, lasting solution.
We will guide you through the process of elimination, explore the pros and cons of different bottom bracket standards, delve into workshop-grade solutions, and establish a maintenance schedule to keep your bike running silently for seasons to come. It’s time to end the guesswork and reclaim the sound of silence on your rides.
Summary: A Methodical Approach to Curing Your Bike’s Clicks and Creaks
- Pedals or BB: How to Isolate the Source of the Click?
- BSA Reliability: Why Mechanics Still Prefer Threaded Bottom Brackets?
- Loctite 609: Is Gluing Your Bearings in a Safe Solution?
- Drain Holes: Why a Blocked Frame Drain Kills Bottom Brackets?
- Creak or Click: How to Identify Worn Bushings Without Tools?
- Bearing Extractors: How to Remove Cups Without Hammering Your Carbon Frame?
- Pressure Washers: Why Spraying Your Chain Ruins Freehub Bearings?
- Maintaining Pivot Bearings: The Schedule for Muddy UK Winters
Pedals or BB: How to Isolate the Source of the Click?
The first step in becoming a system diagnostician is resisting the urge to blame the bottom bracket immediately. Sound travels through a bike frame in deceptive ways, making the source notoriously difficult to pinpoint by ear alone. Your mission is to systematically eliminate every other possibility before you even think about touching the BB. This process of elimination saves you time, money, and the frustration of replacing a perfectly good component. Think of your bike as a series of connected interfaces; the creak is coming from one of them, and your job is to find which one.
A professional mechanic’s insight is invaluable here. As one expert noted in a Road Cycling UK feature, the nature of human hearing can be a significant obstacle:
The human ear has difficulty discerning the height of sound. It evolved to adapt to a more horizontal perspective, so get someone to stand alongside you to identify a creak before jumping to conclusions.
– Professional bike mechanic interviewed, Road Cycling UK – What’s that creak article
This underscores the need for a structured diagnostic process rather than relying on auditory guesswork. By testing individual components under load while isolating others, you can methodically narrow down the culprit. The following checklist guides you through the most common non-BB creak sources, from the shoes on your feet to the hanger holding your derailleur.
Your diagnostic checklist for isolating bike creaks:
- Footwear First: Test ride the bike in non-cycling shoes. If the creak vanishes, the interface failure is likely between your cleats and pedals. Inspect cleats and bolts for wear, rust, or looseness.
- Saddle & Post Isolation: Coast with your feet unclipped and dangling. This loads the saddle and seatpost without stressing the drivetrain. If the noise persists, your focus should shift to the saddle rails and seatpost clamp.
- Chainring Bolt Check: A single loose chainring bolt can mimic a bottom bracket creak with maddening precision. Check the torque on every bolt. If in doubt, remove, clean, grease the threads, and reinstall them.
- Pedal Thread Prep: Dry or dirty pedal threads are a classic source of clicks. Remove both pedals, thoroughly clean the threads on the pedal and crank arm, apply a quality anti-seize compound, and reinstall securely.
- Derailleur Hanger Interface: The small connection point between the frame and derailleur hanger can be a sneaky noise source. Remove the hanger, clean both mating surfaces, and apply a small dab of grease before reassembly.
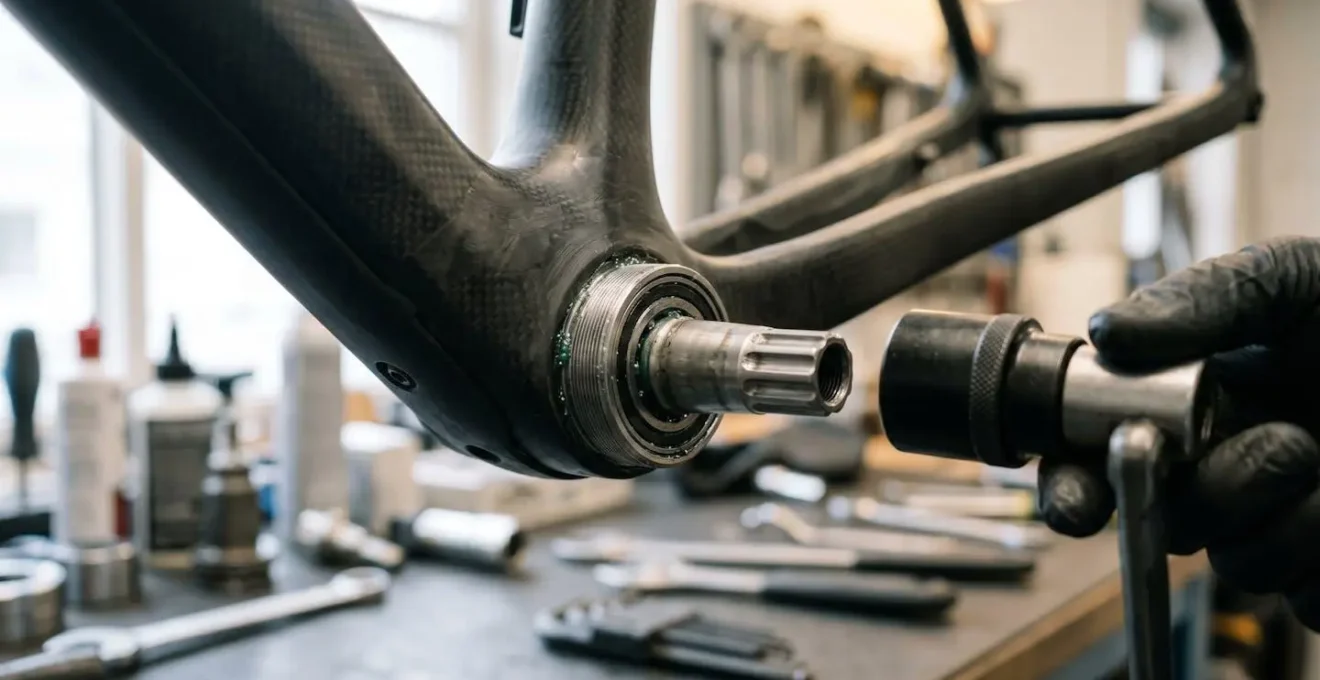
BSA Reliability: Why Mechanics Still Prefer Threaded Bottom Brackets?
After you’ve exhausted all other possibilities and the creak persists, it’s time to confront the bottom bracket. The rise of press-fit standards was driven by a desire for lighter frames and larger, stiffer crank spindles. However, this innovation came at a cost: reliability. The fundamental problem with many press-fit systems is their reliance on incredibly tight manufacturing tolerances. A tolerance stack—the accumulation of tiny, acceptable imperfections in the frame’s shell, the bearing cups, and the bearings themselves—can result in a fit that is either too tight, stressing the bearings, or too loose, allowing for the dreaded micromovement.
This is why many seasoned mechanics and riders still sing the praises of the threaded (BSA or English threaded) bottom bracket. A threaded system doesn’t rely solely on an interference fit. The threads provide a powerful mechanical lock, pulling the cups tight against the frame. This design is inherently more tolerant of minor imperfections in the bottom bracket shell. Furthermore, threaded systems allow for easy adjustment of bearing preload, a critical factor for smooth operation and longevity.
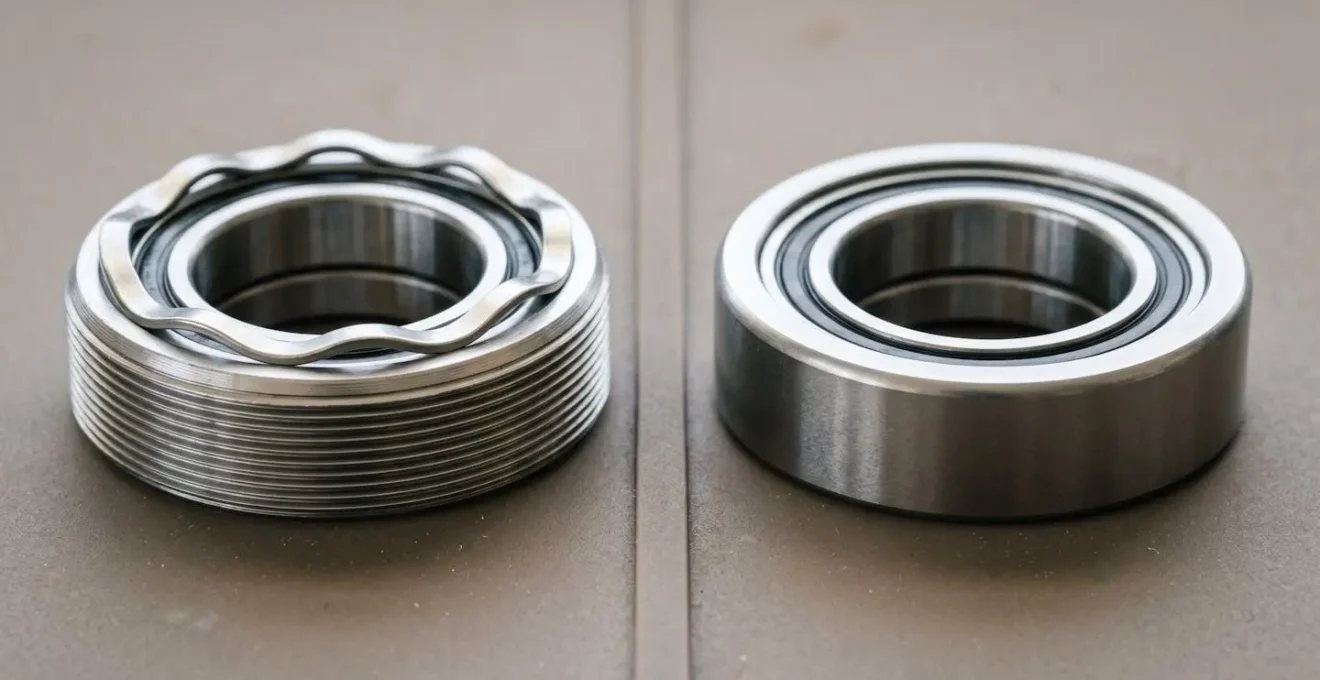
As the image above illustrates, the mechanical interface is fundamentally different. The threaded cup has a clear, robust mechanical connection, while the press-fit relies on friction and precise dimensions. This difference also extends to servicing. According to GearJunkie’s bottom bracket standards guide, installing or removing a threaded BB often requires a simple, inexpensive wrench, whereas press-fit systems necessitate specialized bearing press and extraction tools that can cost hundreds of dollars. This ease of service and inherent reliability are why the threaded bottom bracket remains the benchmark for a quiet, creak-free ride.
Loctite 609: Is Gluing Your Bearings in a Safe Solution?
When a press-fit bottom bracket shell is slightly oversized or worn, no amount of grease will silence the creak. The gap, however microscopic, will allow for micromovement. In this scenario, you need a solution that fills this gap and creates a solid, unified interface. This is where retaining compounds, often referred to by the brand name Loctite, come into play. It’s less like « gluing » and more like creating a perfect, custom-fit polymer shim. A retaining compound is a liquid that flows into the tiny space between the bearing cup and the frame, then anaerobically cures into a hard, tough solid, effectively locking the two parts together and eliminating movement.
Using such a compound can feel like a drastic step, but when used correctly, it is a safe, effective, and often permanent solution to creaking. It’s a standard workshop practice for dealing with tolerance issues. The key is choosing the right product for your frame and bottom bracket material and following the proper application procedure. A different compound is required for a metal cup in a carbon shell versus a metal cup in a metal shell. Proper surface preparation is also non-negotiable; all grease and oil must be removed for the compound to bond effectively.
The choice of compound and preparation is critical for success. According to instructions from manufacturers like Praxis, a specific protocol must be followed:
- For Metal BB Shells: Use a medium-strength retaining compound like Loctite 609, 603, or 638. The surfaces must be cleaned with a solvent to remove all grease. A thin coat is applied to the shell and the outer bearing race before pressing.
- For Carbon BB Shells: Do not use a standard retaining compound. Instead, a flexible adhesive like Loctite Superflex RTV Silicone is recommended. This provides a buffer and prevents chemical reactions with the carbon resin. It requires a 24-hour cure time.
- For Carbon-on-Metal Interfaces: To ensure proper adhesion on different materials, a primer like Loctite 7649 should be applied before the retaining compound.
- Removal: Despite its strength, these compounds are designed to shear when appropriate force is applied with hand tools, allowing for bearing removal without damaging the frame. A slow, steady application of torque is key. You can find detailed guides on this process, like this one for M30 bottom brackets.
Drain Holes: Why a Blocked Frame Drain Kills Bottom Brackets?
One of the most overlooked culprits in bottom bracket failure is water. When you ride in the rain or wash your bike, water can find its way inside the frame through the seat tube, head tube, or cable ports. If it can’t get out, it pools in the lowest part of the frame: the bottom bracket shell. This transforms your BB shell into a stagnant pond, submerging your bearings in a corrosive bath. No bearing seal is designed to withstand permanent submersion, and this constant exposure leads to grease displacement, contamination with grit, and ultimately, rapid corrosion and failure. This is a classic case of a blocked contamination pathway leading to catastrophic failure.
Most quality frames are designed with a small drain hole at the bottom of the BB shell precisely to prevent this. However, this hole can easily become clogged with mud, grit, or road grime. A blocked drain hole is a silent killer of bottom brackets. As part of your regular maintenance, you should make a habit of checking and clearing this hole. A simple poke with a small Allen key or a zip tie is often all that’s needed to ensure water has an escape route.
The size of the hole doesn’t need to be large to be effective, as long as the system is properly ventilated. Frame builders have studied this exact issue. In fact, according to controlled drainage experiments by a frame builder, a drain hole of only 2mm is sufficient for free drainage when the bottom bracket shell is also ventilated at the top (e.g., via an unsealed seat tube) with a 2.5mm hole. This demonstrates that even a tiny, clear opening is critical. If your frame inexplicably lacks a drain hole, some mechanics will carefully drill one, but this is a modification that should only be undertaken by a professional, as it can void your frame’s warranty and, if done incorrectly, compromise its structural integrity.
Creak or Click: How to Identify Worn Bushings Without Tools?
If you ride a full-suspension mountain bike, the diagnostic challenge multiplies. Every pivot point in your suspension linkage is a potential source of noise. These pivots use bearings or bushings to allow for smooth movement, but over time, they wear out. A worn bushing or a seized pivot bearing can produce a click or creak that sounds remarkably similar to a bottom bracket issue. The key to differentiating them is to isolate the movements that cause the noise. Does the noise happen when you’re pedaling, or when the suspension is compressing?
You can perform several simple, tool-free tests to diagnose suspension pivot issues. The goal is to load the suspension linkage independently of the drivetrain. One effective method is the compression test. Stand next to the bike and forcefully push down on the saddle to cycle the suspension. Listen carefully. If you hear the creak, the BB is almost certainly not the culprit. You can further pinpoint the source by placing your fingertips directly over the pivot axles while an assistant compresses the suspension. Often, you can feel the microscopic knock or vibration of a worn pivot before you can see any movement.
A structured diagnostic process can help you distinguish between the various noises your bike might make. Following a flowchart can save you from chasing ghosts in the machine.
- Acoustic Pattern Test: If the noise only occurs when pedaling while seated, investigate the seatpost and saddle first. If it happens when standing and pedaling, it’s more likely drivetrain-related.
- Cadence-Correlated Creaks: If the noise is perfectly in time with your pedal strokes, the prime suspects are the BB, chainrings, pedals, or cassette.
- Descending/Rough Terrain Test: If the creak only appears on descents or rough terrain (when you’re not pedaling), it’s almost certainly the headset, stem, or, most likely, a suspension pivot.
- The Water Drip Diagnostic: A clever workshop trick is to use a drip bottle to apply a single drop of water to a suspect pivot. If the noise temporarily disappears, you’ve found your source. The water acts as a momentary lubricant and confirms the point of interface failure.
Bearing Extractors: How to Remove Cups Without Hammering Your Carbon Frame?
Once you’ve diagnosed a faulty press-fit bottom bracket, the next challenge is removing it. The image of a mechanic using a hammer and a punch to knock out bearing cups is enough to make any carbon frame owner shudder. While this method can work on sturdy aluminum frames, it is a high-risk procedure on lightweight carbon. An errant hammer blow or uneven force can easily damage the delicate carbon layers of the BB shell, leading to a costly, if not terminal, repair. The key to safe removal is applying slow, controlled, and even pressure.
This is where dedicated bearing extractors and presses shine. These tools are designed to pull the cups out perfectly straight, distributing the force evenly around the cup’s edge and preventing any stress on the frame. However, professional-grade tools can be expensive. Fortunately, it’s possible to create a highly effective DIY press and extractor using common hardware for a fraction of the cost. This approach empowers the home mechanic to perform the job safely without a huge financial outlay.
Building your own tool is straightforward if you follow a few key principles:
- The Hardware Store Solution: The core of a DIY press is a length of 1/2-inch or M12 threaded rod, a few nuts, and a selection of large washers. This simple assembly can be used to both press in new bearings and extract old ones.
- Critical Washer Selection: The secret to a safe extraction is using washers or drifts that are correctly sized. For installation, the washer must be large enough to press only on the outer edge of the BB cup. For removal, you need a washer that fits inside the BB shell but catches the lip of the opposing cup to pull it through.
- Technique is Everything: When installing, always start threading the cups by hand to avoid cross-threading. When tightening with the tool, the force should be smooth and steady. Stop immediately when you feel the cup bottom out against the frame.
- Alignment Check: After installation, spin the cranks. If there is any binding, one of the cups is likely crooked. Don’t force it. Carefully remove the binding cup and reinstall it, ensuring it goes in straight. This simple guide from Mountain Bike Action is a great reference.
Pressure Washers: Why Spraying Your Chain Ruins Freehub Bearings?
A clean bike is a happy bike, but there’s a fine line between cleaning and destroying. The single most destructive tool in a home mechanic’s arsenal can be the pressure washer. While it’s incredibly effective at blasting away mud, that same high-pressure jet of water is a death sentence for your bike’s bearings. Bearing seals are designed to keep out low-pressure water and grime from a normal ride; they are not designed to withstand a 1,000+ PSI direct blast. The water forces its way past the seals, blasting out the essential grease and injecting water and fine grit directly into the bearing races.
The bottom bracket, headset, wheel hubs, and suspension pivots are all highly vulnerable. Perhaps the most susceptible component is the freehub body. A direct spray at the cassette can force water deep inside the intricate freehub mechanism, washing grease off the pawls and bearings. This leads to a grinding, unreliable freehub and, eventually, total failure. The rule is simple: never aim a high-pressure jet of water directly at any part of your bike that rotates or pivots.
A safe cleaning regimen involves low-pressure water (from a hose with no nozzle, or a bucket and sponge), a quality bike-specific degreaser for the drivetrain, and soft brushes. The following table outlines the critical « no-spray zones » and the risks involved.
| Component Zone | Risk Level | Why High-Pressure Water Damages | Safe Cleaning Method |
|---|---|---|---|
| Bottom Bracket | Critical | Forces water past seals, displaces grease, introduces grit into bearings | Gentle wipe with damp cloth, avoid direct spray |
| Headset | High | Water seeps between crown race and steerer, causing bearing corrosion | Wipe headset cups externally, never spray directly |
| Wheel Hubs | High | Blasts through hub seals into bearing races, washing out lubrication | Clean rims and spokes only, avoid hub area |
| Freehub Body | Critical | Penetrates freehub mechanism, removing pawl grease and introducing contaminants | Brush clean externally, no water penetration |
| Suspension Pivots | High | Compromises pivot bearing seals, accelerates bushing wear | Low-pressure rinse only, immediate re-lubrication |
Key Takeaways
- Isolate Before You Operate: A creak’s source is deceptive. Methodically test components to find the true cause before reaching for a wrench.
- Understand the Interface: Noise comes from micromovement between parts. The solution is to eliminate that movement through proper torque, cleaning, or retaining compounds.
- Prevention is the Best Cure: Proper cleaning, regular checks of drain holes, and proactive maintenance will prevent most creaks from ever starting.
Maintaining Pivot Bearings: The Schedule for Muddy UK Winters
Prevention is always better than cure. Once you have a silent, smooth-running bike, the goal is to keep it that way. This requires a proactive maintenance schedule, and that schedule must be adapted to your specific riding conditions. A bike ridden only on dry, clean roads will have vastly different service needs than one subjected to the relentless wet and grit of a typical UK winter. Mud and water are the primary enemies of bearings, acting as a grinding paste that accelerates wear and a corrosive agent that destroys metal.
For riders in consistently wet and muddy conditions, service intervals must be drastically shortened. Waiting for a noise to appear means the damage is already done. Instead, a preventative approach of regularly cleaning, inspecting, and re-greasing or replacing bearings is necessary to ensure performance and longevity. As a general rule, the worse the conditions, the more frequent the service. Exposure to road salt during winter is particularly destructive and demands the most aggressive maintenance schedule.
Creating a personalized schedule based on your riding environment is the key to long-term reliability. The following matrix, adapted from workshop guides like those from Mountain Bike Action, provides a solid starting point for planning your bottom bracket and pivot bearing maintenance.
| Riding Conditions | Mileage Factor | Recommended BB Service Interval | Warning Signs |
|---|---|---|---|
| Wet/Mud (UK Winters) | High stress | Every 3-6 months or 500-1000 miles | Dry gritty noise with every pedal stroke, worse under load |
| Dry/Dusty Trails | Medium stress | Every 6-12 months or 1000-2000 miles | Occasional clicking, slightly rough bearing feel when spinning |
| Road Salt Exposure | Very high stress | Every 2-4 months or 300-800 miles | Corrosion visible on crank interface, increased resistance |
| Dry Paved Roads | Low stress | Annually or 2000-3000 miles | Minor creaking that disappears with re-greasing |
| Frequent Pressure Washing | High stress | Every 3-6 months regardless of mileage | Standing water visible when BB removed, bearing contamination |
Stop letting that annoying click dictate the quality of your ride. By embracing a methodical, diagnostic approach, you can move beyond the frustrating cycle of guesswork and parts-swapping. Take these steps, arm yourself with knowledge, and transform your relationship with your bike from one of frustration to one of mastery and enjoy the simple pleasure of a silent, efficient machine.