Maintenance & Repair
Every cyclist, whether commuting through city streets or tackling mountain trails, shares a common reality: bikes are machines that demand care. Unlike cars with their warning lights and scheduled dealer visits, bicycles communicate through subtle sounds, slight resistance, or gradual performance decline. Learning to listen to these signals—and knowing how to respond—transforms cycling from a source of frustration into a deeply satisfying, reliable experience.
Bike maintenance isn’t about becoming a professional mechanic overnight. It’s about building confidence in a handful of essential skills that prevent roadside disasters, extend the life of expensive components, and keep you safer on every ride. From understanding why your brakes squeal to knowing which spare parts can save a ride, this foundation empowers you to ride further, spend less, and enjoy your bike more fully.
This resource introduces the core maintenance areas every cyclist should understand: frame integrity, brake systems, drivetrain care, suspension servicing, wheel health, bearing maintenance, and cleaning practices that help rather than harm. Whether you’re buying your first toolkit or deciding which tasks to tackle yourself, these fundamentals will guide you toward smarter, more confident bike ownership.
Why Regular Maintenance Protects Your Investment
A quality bicycle represents a significant investment, yet many riders unknowingly accelerate wear through neglect or well-intentioned mistakes. Think of maintenance as compound interest for your bike: small, consistent efforts multiply into substantial savings and performance gains over time. A chain cleaned every few rides lasts three times longer than one left to accumulate grit. Brake pads inspected regularly prevent rotor damage that costs ten times more to fix.
The hidden costs of deferred maintenance extend beyond replacement parts. A seized bottom bracket can damage frame threads, turning a simple bearing replacement into a frame-threatening repair. Ignored suspension bushings wear unevenly, creating play that destroys more expensive components. Understanding these cascading failures helps you prioritize the maintenance tasks that matter most.
Regular checks also reveal problems while they’re still minor. A small crack in a carbon frame detected early might be repairable; discovered mid-ride during a catastrophic failure, it ends your bike’s life. The coin tap test for carbon inspection takes thirty seconds but can save thousands. This preventive mindset—catching issues before they escalate—defines effective maintenance.
Essential Pre-Ride Checks That Prevent Breakdowns
Before any significant ride, three mechanical checks form your safety net: brake function, tire condition, and drivetrain security. Squeeze each brake lever firmly while pushing the bike forward—the lever should engage with clear resistance before reaching the handlebar. Spongy levers or excessive travel signal air in hydraulic systems or worn cables in mechanical setups, both demanding immediate attention before you’re halfway down a mountain descent.
Tire inspection goes beyond checking pressure. Run your fingers around each tire’s surface, feeling for embedded glass, thorns, or cuts that haven’t punctured yet but will. Check the sidewalls for cracks or bulges, especially on older tires where UV damage compromises structure. A tire that looks fine but has a weakened sidewall can blow catastrophically under load.
Drivetrain security means confirming your chain isn’t about to snap and your cassette lockring hasn’t loosened. Shift through all gears briefly, listening for any hesitation or grinding that suggests derailleur adjustment needs. For e-bike riders with high-torque motors, check for stiff links in your chain—these tight spots create stress concentrations that lead to premature failure, often in just a few hundred miles if ignored.
The Spares That Save Your Ride
Carrying the right spares transforms potential disasters into minor inconveniences. When you’re twenty miles from the nearest bike shop, a spare tube, tire levers, and a multi-tool become invaluable. A Presta valve core tool weighs almost nothing but turns a stuck valve into a fixable problem. CO2 cartridges provide quick inflation, but always carry a backup pump—cartridges can freeze valve cores if mishandled, leaving you stranded with unusable equipment.
Frame Integrity: Inspection and Protection
Your frame is the one component you cannot easily replace, making its care paramount. Carbon frames, now common across all bike categories, require different inspection techniques than metal ones. The coin tap test—gently tapping a coin across the frame’s surface while listening for changes in tone—reveals internal delamination before it becomes visible. A healthy carbon frame produces a consistent, sharp tap; a dull or dead sound indicates damage requiring professional assessment.
Even undamaged frames need protection from everyday wear. Cable housing rubbing against the frame during suspension compression will wear through paint and eventually into carbon or aluminum. Helicopter tape, originally designed for aircraft, provides nearly invisible protection at these friction points. Applied correctly, it preserves resale value and prevents damage that starts cosmetic but can progress to structural.
If you’re considering a second-hand bike or yours has suffered a crash, honest assessment is critical. Repaired carbon frames can be trustworthy—professional repairs using correct materials and techniques restore structural integrity—but amateur fixes or impact damage to critical areas like the head tube or chainstays may leave permanent weaknesses. When in doubt, professional inspection with ultrasound or X-ray equipment provides certainty that visual checks cannot.
Suspension Setup and Service Fundamentals
Suspension transforms rough terrain into rideable trails, but only when properly set up and maintained. The 25% sag figure—the amount your shock compresses under your weight alone—represents the sweet spot for most air shocks because it positions the shock in its midstroke, maximizing both upward bump compliance and downward travel availability. Too little sag leaves the shock harsh over small bumps; too much sacrifices travel for bigger hits.
Beyond initial setup, suspension requires regular service that many riders avoid due to cost or complexity. Lower leg services on forks—replacing the small amount of oil that lubricates the seals and bushings—can often be performed at home without voiding warranties, provided you follow manufacturer procedures precisely. This simple service, done every 50-100 hours of riding, prevents the dry bushings that cause stiction and uneven wear.
Identifying worn bushings before they fail saves money and maintains performance. A creak or click during compression, especially if you can reproduce it by pushing down on the handlebars while braking, often indicates bushing wear. Checking for play by removing the wheel and rocking the fork back and forth provides objective confirmation. Addressing this early prevents the worn bushings from damaging the stanchion coating, which turns a minor service into a major expense.
Brake System Care: From Pads to Fluid
Hydraulic disc brakes provide incredible stopping power but demand specific maintenance knowledge. The 1mm minimum pad thickness represents the safety threshold—thinner pads risk the backing plate contacting the rotor, destroying both components. Checking thickness doesn’t require wheel removal: shine a light from behind the rotor and look through the caliper gap, or use the shadow method where the pad’s silhouette reveals remaining material.
New brake pads require a bed-in process that many riders skip, resulting in glazed pads and weak, squealing brakes. Proper bed-in involves a series of moderate stops from moderate speed, generating enough heat to transfer a thin layer of pad material onto the rotor surface. This transfer layer is what creates friction; without it, stopping power drops by 30% or more, and the pads develop a hard, glassy surface that squeals constantly.
Contamination represents the most common brake problem. A single drop of chain lube, frame polish, or GT85 on a rotor ruins braking until removed completely. Clean rotors with isopropyl alcohol, not disc brake cleaner (which can leave residue) or degreaser (too aggressive for seals). If pads are contaminated, baking them in an oven at low temperature or careful sanding can sometimes restore function, but replacement is often more reliable.
Understanding Brake Fluid Types
Hydraulic brakes use either DOT fluid or mineral oil, and the two are completely incompatible. DOT fluid is hygroscopic, absorbing moisture from the air, which lowers its boiling point over time and demands periodic replacement. Mineral oil doesn’t absorb water but can still degrade. Mixing the two destroys all rubber seals in the system within hours, requiring a complete rebuild. Always verify your brake type before servicing.
When Spongy Levers Don’t Mean Air
Air in hydraulic lines is the common explanation for spongy levers, but it’s not the only cause. Contaminated or old fluid, leaking seals, or even rotor flex can create similar symptoms. Before bleeding, check for fluid weeping around caliper pistons or lever bodies—visible dampness indicates seal failure. Also verify that rotors meet minimum thickness specifications; thin rotors flex under pressure, creating sponginess that bleeding won’t fix.
Caliper Alignment and Pad Drag
Dragging pads waste watts and wear components prematurely. A bent spring or misaligned caliper can cost you 10 watts or more of power. Centering the caliper involves loosening the mounting bolts, squeezing the brake lever to self-center the caliper, then retightening—but this doesn’t always work if the mounting face is contaminated or the caliper body is bent. Sometimes shimming or facing the mount is necessary for perfect alignment.
Drivetrain Maintenance: Chains, Cassettes, and Lubrication
Your drivetrain converts every watt you produce into forward motion—or wastes it through friction if neglected. Chain maintenance represents the single highest-return maintenance task: a clean, properly lubricated chain improves efficiency by several percentage points and extends the life of your cassette and chainrings, which cost significantly more than chains.
The wet versus dry lube debate has a simple answer: match the lube to your conditions. Wet lubes resist water but attract dirt, making them ideal for rainy rides but poor choices for dry, dusty conditions where they create grinding paste. Dry lubes shed dirt but wash off in wet conditions. Many experienced riders keep both types and switch based on forecast, wiping the chain thoroughly when changing lube types to avoid mixing.
Chain cleaning tools promise efficiency, but a simple toothbrush and degreaser often work as well for less money and hassle. The critical step isn’t the tool—it’s the thoroughness. Clean between every roller, then rinse completely to remove all degreaser before lubricating. Degreaser left in the chain attracts dirt and can damage o-rings in certain chain designs. After applying lube, wipe the exterior thoroughly; lube inside the rollers reduces friction, but lube on the outside just collects grime.
The Economics of Chain Replacement
A quality chain costs far less than a cassette or chainrings, yet many riders delay replacement until the worn chain has destroyed these more expensive components. Chain wear gauges measure elongation from pin wear—once a chain reaches 0.5% elongation (0.75% for 11-speed and higher), it should be replaced to preserve the cassette. Wait until 1% and you’ll need to replace both chain and cassette, tripling your cost.
Wheel Maintenance: Spokes, Rims, and Truing
Wheels seem simple—a rim, spokes, and hub—but their circular shape relies on precise spoke tension balance. A small wobble noticed early can be corrected in minutes with a spoke wrench; ignored, it worsens until you’re replacing broken spokes or even entire wheels. The zip-tie truing method works remarkably well: attach a zip-tie to your frame as a reference pointer, then identify which spokes need tightening or loosening to remove the wobble.
When a spoke breaks, the instinct to replace just that one spoke is understandable but often problematic. Spokes typically break due to fatigue from stress cycles, meaning the other spokes of similar age are nearing failure too. Replacing one spoke restores the wheel temporarily, but expect more failures soon unless you address the underlying cause—often improper tension or a damaged rim.
Rim condition determines wheel longevity and safety. Concave wear on rim brake surfaces or cracks around spoke holes signal replacement time. For rim brakes, many rims include wear indicators—small dimples or grooves that disappear as the rim wears thin. On disc brake wheels, inspect for cracks radiating from spoke holes, especially after hard impacts. A rim failure during a fast descent can cause serious injury.
Understanding Wheel Dishing and Alignment
If your tire rubs one side of the frame despite the wheel being straight, the problem is likely dishing—the lateral offset of the rim relative to the hub flanges. This occurs when spoke tension is uneven between the drive and non-drive sides. Correcting dishing requires specialized tools and knowledge, making it a task best left to experienced wheelbuilders unless you’ve invested time learning the technique.
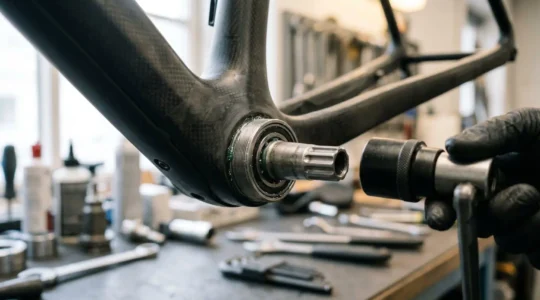
Bearing Care: Bottom Brackets, Hubs, and Headsets
Bearings enable rotation while supporting loads—in your bottom bracket, hubs, headset, and pedals. Modern sealed cartridge bearings require less frequent maintenance than older cup-and-cone designs, but they still need attention. The biggest bearing killer isn’t wear from use—it’s contamination from water entering through failed seals or poor frame drainage.
Many frames have drainage holes designed to let water escape from the bottom bracket shell. If these drain holes become blocked with mud or frame protector spray, water accumulates and corrodes bearings from the outside in. A simple check—holding your frame at different angles and looking for drain holes—can prevent premature bearing failure. Keep these clear, and consider whether your frame needs them drilled if it lacks them.
The ceramic bearing debate centers on whether their cost justifies their benefits. High-quality ceramic hybrid bearings (ceramic balls, steel races) do reduce friction slightly and resist corrosion better than all-steel bearings. However, they’re far less tolerant of misalignment—a frame with imperfect alignment will destroy ceramic bearings quickly through uneven loading, while steel bearings would survive. For most riders, quality steel bearings replaced more frequently make more economic sense.
Diagnosing Bottom Bracket Noises
A click or creak from the bottom bracket area has many possible sources: the BB itself, pedals, chainring bolts, or even the saddle. Systematic diagnosis involves isolating variables. Remove pedals and reinstall with proper grease; the threads create enormous clamping force that can generate clicks if dry. Check chainring bolt tightness. If the noise persists, the bottom bracket bearings or their interface with the frame becomes suspect.
Bearing Installation and Removal
Pressing bearings into frames without proper tools risks carbon damage or misalignment that kills bearings prematurely. Dedicated bearing extractors and presses distribute force evenly, preventing the point loads that crack carbon or deform aluminum. Some riders resort to Loctite 609 to secure loose bearings, which works but makes future removal difficult—heat and careful application of release agents become necessary.
Cleaning Practices That Preserve, Not Damage
Aggressive cleaning can cause more harm than dirt. Pressure washers force water past seals into bearings, hubs, and headsets, leading to corrosion and premature failure. The high-pressure jet can strip paint, damage decals, and even delaminate carbon fiber in extreme cases. If you must use a pressure washer, keep it on the lowest setting and at least 30cm away from any bearing interface or electronic component.
The most effective cleaning strategy isn’t deep cleaning after every ride—it’s the wipe-down rule. Spend two minutes after each ride wiping mud and road grime from the frame, chain, and critical areas. This prevents buildup from hardening and makes the occasional deep clean far easier. Pay special attention to the chain, cassette, and derailleur pulleys—these areas accumulate grime that directly affects performance.
When you do degrease components, proper disposal matters both legally and environmentally. Pouring used degreaser down drains can violate environmental regulations and contaminate water supplies. Many bike shops accept used degreaser for proper disposal, or check with local hazardous waste collection programs. For home use, biodegradable degreasers reduce environmental impact while cleaning effectively.
Re-proofing Water-Resistant Gear
Jackets, shorts, and bags gradually lose water resistance through wear and contamination. Wash-in re-proofers treat the entire garment but can affect breathability if over-applied. Spray-on treatments allow targeted application to high-wear areas while preserving breathability elsewhere, making them better for technical garments with varying fabric types. Always clean garments thoroughly before re-proofing—dirt prevents the treatment from bonding properly.
Small Parts That Prevent Big Problems
Certain small, inexpensive components can save a ride or prevent expensive damage. Cleat position affects more than pedaling efficiency—cleats positioned too far forward concentrate pressure on the ball of the foot, compressing nerves and causing numbness. Moving cleats rearward typically improves comfort, though optimal position varies by individual anatomy and riding style.
Power meter users gain accuracy only through regular zero-offset calibration, which accounts for temperature changes and frame flex variations. Meters can drift by several watts without calibration, enough to significantly skew training data. The calibration process takes seconds and should become as routine as checking tire pressure before important rides or races.
These fundamentals—from pre-ride checks to bearing care—form the foundation of confident bike ownership. Mastering even a few of these skills reduces dependence on shops for routine tasks, saves money on premature component replacement, and most importantly, keeps you riding safely and reliably. Start with the basics that match your riding style and comfort level, then expand your knowledge as your confidence grows.
Press-Fit Creaks: How to Silence Your Frame Without Buying New Parts?
That infuriating click on every pedal stroke isn’t just a noisy bottom bracket; it’s a symptom of ‘interface failure’ where parts no longer meet perfectly. This guide transforms you from…
Lire la suite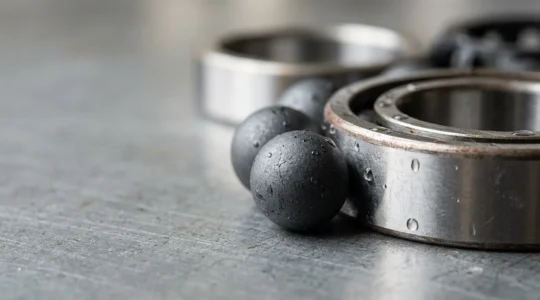
Ceramic Bearings: Are They Worth the High Maintenance in Wet Climates?
For cyclists in wet climates, ceramic bearings are a fundamentally flawed investment, offering marginal gains in a lab that evaporate or even become a liability on gritty, wet roads. The…
Lire la suite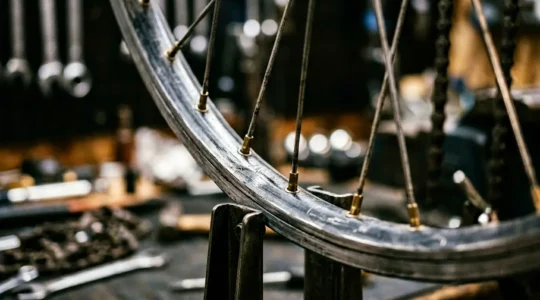
Spoke Tension: When Is a Buckled Wheel Too Far Gone to Save?
A wobbly wheel is more than an annoyance; it’s a critical sign of systemic stress that, if misdiagnosed, can lead to catastrophic failure. A single broken spoke is rarely an…
Lire la suite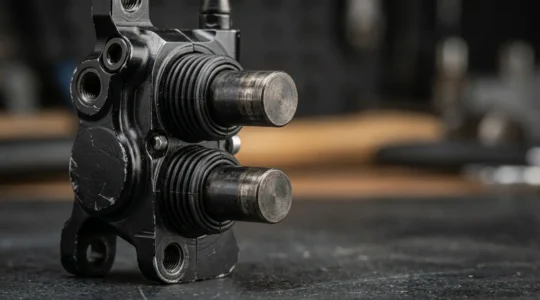
Sticky Pistons: How to Diagnose Uneven Braking Before It Ruins Rotors?
Uneven brake pad wear is almost never a caliper alignment issue; it’s a critical symptom of a deeper hydraulic imbalance. Sticky pistons are caused by contamination or seal degradation, not…
Lire la suite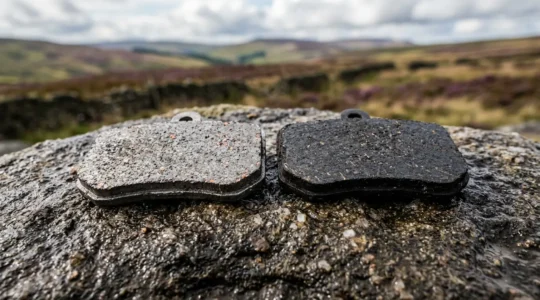
Sintered vs Organic Pads: Which Survives Grit Best in the Pennines?
In summary: For the gritty, wet conditions of the Pennines, sintered (metallic) pads offer superior durability and consistent performance over organic pads. Brake failure is often a system issue; success…
Lire la suite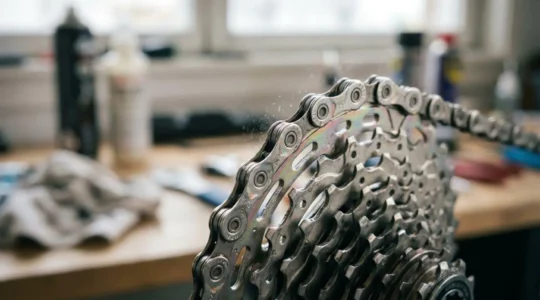
Chain Cleaning: How a £10 Degreaser Saves You £200 on Cassettes?
The single greatest performance and financial return in cycling comes from a clean drivetrain, not expensive upgrades. Regular, correct cleaning offers a 30-60x better Return on Investment (ROI) per watt…
Lire la suite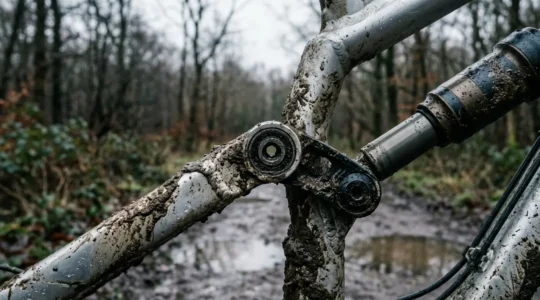
Maintaining Pivot Bearings: The Schedule for Muddy UK Winters
In summary: Your full-suspension bike’s worst enemy during a UK winter is water and grit getting into bearings, creating a destructive grinding paste. A proactive maintenance schedule focused on early…
Lire la suite