In summary:
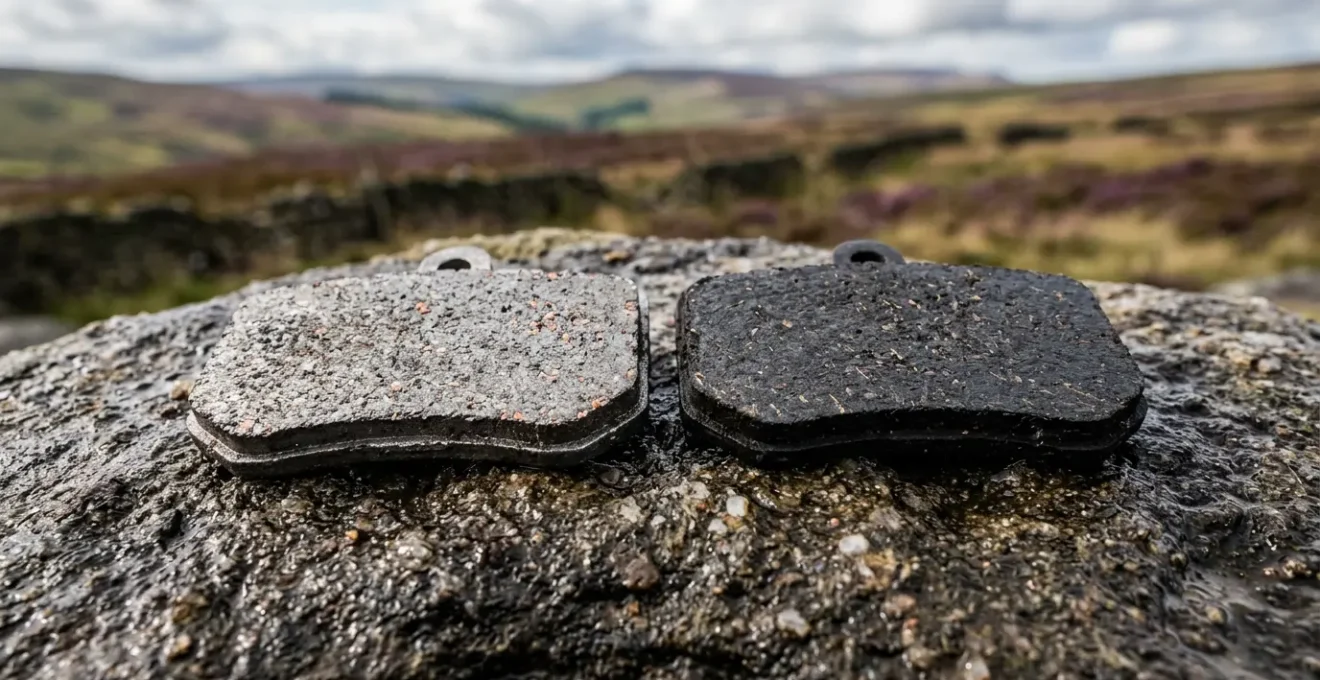
- For the gritty, wet conditions of the Pennines, sintered (metallic) pads offer superior durability and consistent performance over organic pads.
- Brake failure is often a system issue; success depends on understanding the entire chain, from pad bed-in to spring tension and piston health.
- Contamination from sprays like GT85 is often irreversible, especially on porous organic pads, making prevention the only cure.
- Regular, specific maintenance—like checking for pad wear, cleaning pistons, and inspecting springs—is non-negotiable for safety on hilly terrain.
The feeling is unmistakable. You’re descending a steep, rain-slicked track in the Pennines, the air thick with the smell of wet earth and ferns. You feather the brakes, but instead of a reassuring bite, you get a sickening squeal and a terrifying lack of deceleration. Your levers pull closer and closer to the bars with each passing corner. This is the moment every hilly-terrain rider dreads, a moment where equipment choice and maintenance move from a hobbyist’s debate to a critical safety issue.
Most advice is simple: use sintered pads for wet conditions and make sure to bed them in. While true, this advice barely scratches the surface. It overlooks the true enemy: the relentless, grinding paste of grit and water—an abrasive slurry—that characterizes UK riding. This slurry doesn’t just wear pads; it attacks the entire braking system, exploiting every tiny weakness from a bent spring to a contaminated rotor.
But what if the key to reliable braking wasn’t just about choosing ‘metal’ over ‘resin’? What if survival depended on understanding the specific failure modes that gritty terrain induces? This guide goes beyond the basic comparison. We will dissect the entire braking system through the lens of a Pennines rider. We will explore the physics of pad wear, the chemistry of contamination, and the mechanical failures that can turn a thrilling descent into a disaster. This is not just about which pad is better; it’s about building a robust braking system that you can trust, ride after ride.
This article provides a complete diagnostic approach to ensure your brakes are ready for the most demanding conditions. We will cover everything from visual inspection techniques to the hidden dangers of mismatched components, giving you the knowledge to maintain total control.
Summary: Sintered vs Organic: A Pennines Rider’s Braking Manual
- The 1mm Rule: How to Check Pad Thickness Without Removing the Wheel?
- Squealing Brakes: Why Skipping the Bed-in Process Ruins Power?
- Spray Contamination: How One Drop of GT85 Can Ruin Your Braking?
- Resin-Only Rotors: What Happens If You Use Metal Pads on Cheap Discs?
- Dragging Pads: How a Bent Spring Can Cost You 10 Watts?
- Rim vs Disc Brakes: Is the Extra Cost Worth It for Wet City Stopping?
- Rim Brake Fade: How to Descend Safely Without Overheating Your Wheels?
- Sticky Pistons: How to Diagnose Uneven Braking Before It Ruins Rotors?
The 1mm Rule: How to Check Pad Thickness Without Removing the Wheel?
The « 1mm rule » is a common workshop guideline stating that brake pads should be replaced when the friction material is 1mm thick. However, for a rider tackling the steep, gritty descents of the Pennines, this is cutting it dangerously fine. The intense wear caused by abrasive slurry means your safety margin can vanish in a single wet ride. For this reason, many professional mechanics advise that for harsh environments, you should consider 1.5mm of pad material as the absolute minimum thickness. This extra half-millimetre provides a crucial buffer against sudden failure.
Checking this thickness doesn’t always require removing the wheel. With a bright flashlight, you can often inspect the pads in situ. Shine the light directly into the caliper and look down from above. You’re looking for the contrast between the darker friction material and the brighter metal backing plate. This visual check is about assessing the remaining material before it reaches the critical wear point. The goal is to see a healthy, distinct layer of pad material, not a hairline trace.
While you’re looking, check for tapered wear—where one end of the pad is thinner than the other. This is a critical red flag. It indicates that the pad isn’t retracting or engaging evenly, often a symptom of sticky pistons or a bent spring, issues we will diagnose later. A healthy system shows a parallel gap between the rotor and the backing plates of both pads. If that gap forms a wedge shape, you have a problem that will lead to premature wear and inconsistent braking, no matter how thick your new pads are.
Squealing Brakes: Why Skipping the Bed-in Process Ruins Power?
That high-pitched squeal from a new set of brake pads isn’t just an annoyance; it’s the sound of lost potential. It’s often a direct result of skipping the bed-in process, a critical step that is widely misunderstood. Bedding-in is not simply « using the brakes a few times. » It is a specific, heat-driven process of creating a uniform friction interface by transferring a microscopic layer of pad material onto the rotor’s surface. This transfer layer is what provides powerful, consistent, and quiet braking.
When this process is skipped, the pad and rotor surfaces mate unevenly. The friction is generated by a chaotic scraping of the raw pad against the raw rotor, causing vibration—the source of the squeal. More importantly, this inefficient friction generates excessive heat in localised spots without effectively slowing you down. For sintered (metallic) pads, this is especially problematic. They are designed to operate at higher temperatures and require a more aggressive bed-in procedure to establish a durable transfer layer.
According to brake manufacturers, the harsh, gritty conditions of UK mountain biking demand a more thorough procedure. A recommendation of 20-30 bedding-in cycles is common, compared to just 15-20 for road riding. This involves a series of controlled, hard decelerations from a moderate speed (e.g., 15-20 mph) down to a walking pace, without ever coming to a complete stop. Coming to a halt with hot brakes can cause an uneven patch of pad material to deposit on the rotor, leading to a frustrating « pulsing » sensation. For a Pennines rider, performing this ritual on a dry day before exposing new pads to wet grit is essential for establishing a robust and resilient braking surface.
Spray Contamination: How One Drop of GT85 Can Ruin Your Braking?
In a cyclist’s toolkit, some products should never mix. The most dangerous combination is a lubricant spray like GT85 or WD-40 and your brake components. A single misplaced drop of spray, carried on the air, can land on your rotor and lead to catastrophic failure of your brake pads. This isn’t a temporary issue that can be easily wiped away; it’s often a terminal diagnosis for your pads, especially if they are the organic/resin type.
Organic pads have a porous, slightly softer compound. This structure makes them a « contamination sponge. » When a silicone-based lubricant soaks into the material, it becomes almost impossible to remove completely. You can try cleaning the pads with isopropyl alcohol or even sanding the surface, but the heat generated during braking will often cause the embedded lubricant to weep back out onto the surface, restoring the slick, powerless feel. As one rider on a public forum noted with frustration when discussing GT85 contamination:
If it is transferred to the pads then it is probably ‘game over’ for them. You can clean it all up and try, but the stuff seeps into the pad material then resurfaces once the brakes are back in use, giving poor brake power and lots of squealy noises.
– CycleChat Forum Member, GT85 on brake disc discussion thread
Sintered pads, being made of metallic particles fused under heat, are less porous and offer a slightly better chance of recovery. However, the risk is still immense. The only foolproof strategy is absolute prevention. When lubricating your chain or other parts, be meticulous. Apply lubricant directly from a dropper bottle, not a spray can. If you must use a spray, remove the wheel from the bike completely or use a dedicated cover or rag to shield the rotor and caliper entirely from any overspray.
Resin-Only Rotors: What Happens If You Use Metal Pads on Cheap Discs?
Not all brake rotors are created equal, and failing to recognize this can have dangerous consequences. Many entry-level or budget-friendly bikes come equipped with rotors stamped with a crucial warning: « Resin Pad Only. » This isn’t a suggestion; it’s a critical safety limitation of the material. These rotors are made from a softer steel alloy that is not designed to withstand the intense heat and friction generated by sintered (metallic) brake pads.
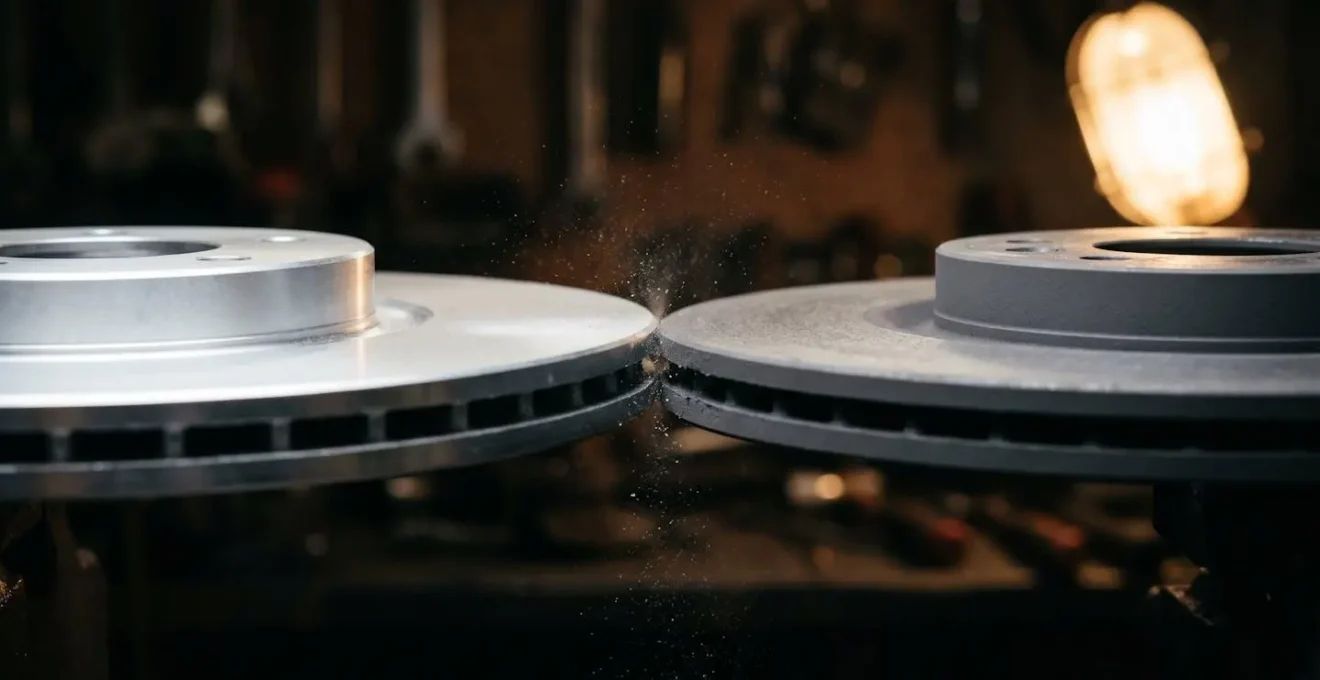
Using aggressive sintered pads on a soft « resin-only » rotor creates a perfect storm of failure. The hard metallic compound of the pad acts like a grinder, rapidly wearing down the softer rotor. But the more immediate danger is thermal warping. Sintered pads generate and transfer heat far more effectively than resin pads. A resin-only rotor, when subjected to this intense heat during a long Pennines descent, cannot dissipate it fast enough. The metal’s structure begins to fail, leading to warping and a distinctive blue or purple discoloration from thermal stress.
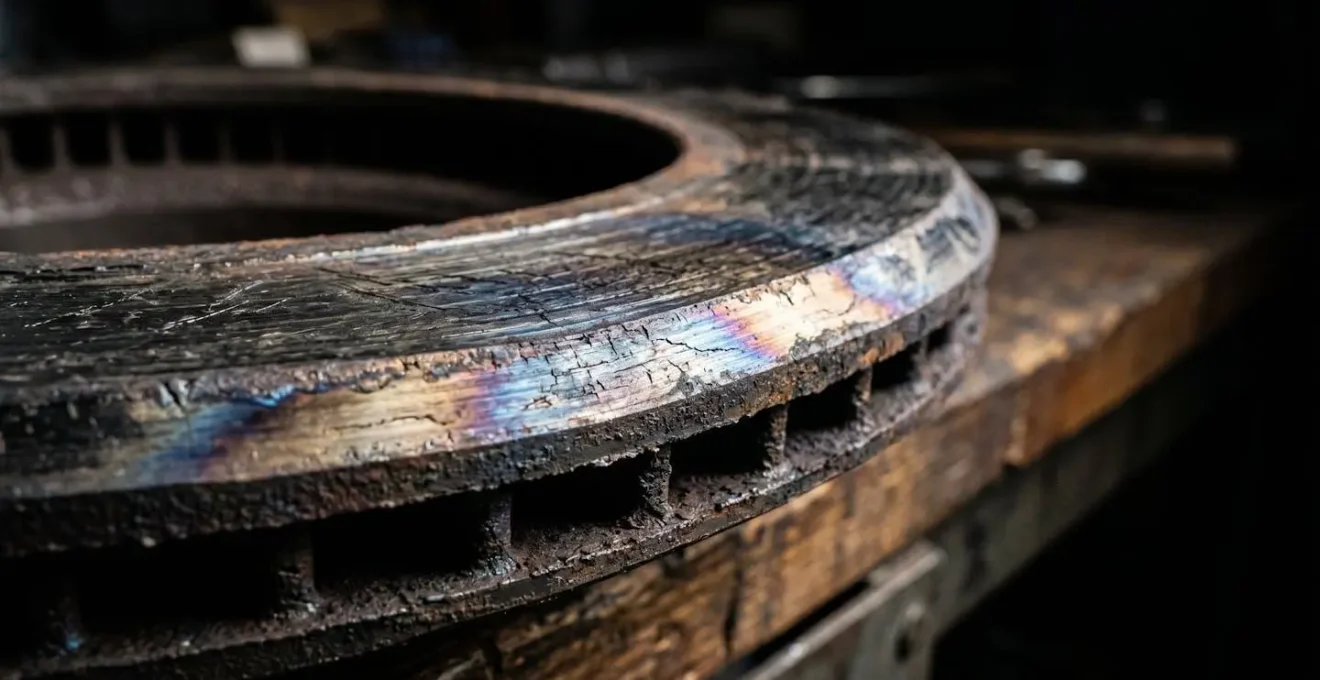
Once a rotor is warped, braking becomes dangerously inconsistent. You will feel a pulsing at the lever as the bent sections of the rotor grab and release the pads. In severe cases, the warping can be so extreme that it pushes the pads back, forcing the pistons into the caliper and leading to a total loss of braking power. Field tests and rider reports consistently confirm that resin-only rotors wear significantly faster and warp under heat when paired with the wrong pads. Always check your rotors for compatibility markings before upgrading pads. If there’s no marking, it’s safest to assume it’s compatible with both, but if it says « Resin Pad Only, » you must respect that limit.
Dragging Pads: How a Bent Spring Can Cost You 10 Watts?
In the complex system of a hydraulic disc brake, one of the smallest and simplest components can be a major source of frustration and power loss: the pad spreader spring. This small piece of metal is responsible for pushing the pads apart and away from the rotor when the brake is released. If it’s bent, fatigued, or installed incorrectly, the pads will fail to retract fully, leading to a persistent and costly drag. This isn’t just an annoying sound; it’s a constant drain on your energy, estimated to cost as much as 10 watts of power.
On a gritty Pennines ride, this problem is magnified. The constant light contact generates continuous friction and heat, and the tiny gap acts as a perfect trap for abrasive slurry, effectively grinding away your pads and rotor even when you’re not braking. A bent spring can single-handedly destroy a new set of pads on one long, muddy ride. The issue often stems from careless installation, such as forcing the wheel into the dropouts, or simply from metal fatigue after thousands of cycles. A new spring comes with every set of pads for a reason—it’s a critical wear item.
Diagnosing a faulty spring is a crucial part of brake maintenance. Before you suspect sticky pistons or a misaligned caliper, a quick check of the spring can save you a lot of time and money. It’s a simple process that ensures your braking system’s core mechanics are sound.
Your Action Plan: Spring Health Diagnostic Checklist
- Visual Deformation Inspection: Remove pads and examine the pad spreader spring for visible bends, kinks, or deformation compared to its original shape.
- Springiness Test: Compress the spring gently with your fingers. It should push back firmly and return to its original position without sticking.
- Orientation Verification: Confirm the spring is installed correctly. Many are installed upside down, preventing the tabs from allowing full pad retraction.
- Post-Ride Rotor Temperature: In gritty conditions, a dragging pad creates constant grinding, generating continuous heat. A hot rotor long after a descent is a red flag.
- Pad Lifespan Monitoring: If your pad lifespan is suddenly much shorter, a bent spring is a primary suspect, turning a minor issue into an expensive replacement.
Rim vs Disc Brakes: Is the Extra Cost Worth It for Wet City Stopping?
While the prompt mentions « wet city stopping, » the underlying physics are universal and even more critical in the hilly, gritty environment of the Pennines. For riders facing these conditions, the debate is largely settled: the extra cost of disc brakes is an essential investment in safety and performance. The primary reason lies in how each system handles the abrasive slurry of grit and water.
With rim brakes, your wheel’s rim is the braking surface. When wet and gritty, this rim gets coated in a liquid sandpaper that does two terrible things: it dramatically reduces braking power and it physically grinds away the structural material of your rim. Over time, this can wear the rim wall so thin that it can fail under tire pressure. Disc brakes, by contrast, isolate the braking function onto a separate, replaceable rotor. This protects your expensive wheel and allows for materials, like sintered pads, that are specifically designed to combat these conditions. As brake technology research shows, sintered disc brake pads handle dirt and damp conditions significantly better than any rim brake alternative.
The heat management is also fundamentally different and safer on disc brakes. A long descent on rim brakes heats the entire wheel rim, which in turn heats the air in the tire, creating a risk of a dangerous blowout. Disc brakes confine the intense heat to the caliper and a dedicated rotor, a system designed from the ground up to manage high temperatures away from the tire. The following table breaks down the critical differences in the context of abrasive, gritty conditions.
| Characteristic | Rim Brakes (Gritty Conditions) | Disc Brakes (Gritty Conditions) |
|---|---|---|
| Wear Surface Location | Structural wheel rim (expensive to replace) | Replaceable rotor (isolated from wheel) |
| Heat Management | Heats entire rim, tire, and tube (blowout risk) | Heat isolated to caliper and rotor (safer) |
| Grit Effect | Abrasive slurry grinds rim braking surface | Sintered pads resistant to grit contamination |
| Wet Performance | Severe power loss, water polishing effect | Consistent power, minimal fade |
| Long-term Cost | Wheel replacement when rim worn through | Inexpensive rotor replacement only |
Rim Brake Fade: How to Descend Safely Without Overheating Your Wheels?
If you are tackling hilly terrain on a bike with rim brakes, you are managing a higher level of risk. Brake fade on a long descent is a very real and dangerous possibility. This fade is caused by the rim and brake pads overheating, which glazes their surfaces and drastically reduces the coefficient of friction. The common but incorrect technique of « dragging » the brakes—applying light, continuous pressure—is the fastest way to induce this failure. It generates constant, inescapable heat with no chance for the system to cool.
To descend safely, you must adopt a technique of intermittent, hard braking. This approach is designed to manage heat and maintain control. Instead of constant dragging, you allow the bike to build speed on straighter sections, then apply the brakes firmly and decisively for a short period (2-3 seconds) before a corner or steep pitch. This sheds a large amount of speed efficiently. You then release the brakes completely, allowing the rims and pads several seconds to cool in the airflow before the next braking zone. This « on/off » cycle is far more effective at controlling both speed and temperature.
This technique also helps clear the abrasive slurry from the rim, providing a cleaner surface for the next braking application. It requires more focus than simply dragging the brakes, as you must anticipate the terrain and plan your braking points. However, it is the only reliable method to prevent overheating your wheels and facing a total loss of braking power. As one expert source puts it, while discussing the advantages of modern systems, the context of UK riding is paramount:
Sintered brake pads are chosen mostly by riders of a gravity persuasion but also those who want more effective braking in wet conditions, so they make a fine choice for the bulk of the UK’s riding.
– off-road.cc Technical Writer, Disc brake pads explained: Organic vs sintered vs semi metallic
This highlights the move towards systems better suited for the environment, but if using rim brakes, mastering the cooling cycle is your primary survival skill.
Key takeaways
- Braking is a system: A bent spring or a sticky piston can negate the benefit of the best pads and rotors.
- Material matters: For the UK’s gritty and wet conditions, a system of sintered pads on a compatible rotor is superior in durability and safety.
- Prevention is paramount: Contamination is often permanent, and wear is accelerated by grit. Proactive cleaning and inspection are non-negotiable.
Sticky Pistons: How to Diagnose Uneven Braking Before It Ruins Rotors?
Beyond pad wear and contamination, the health of your caliper’s pistons is the final pillar of braking reliability. After countless rides through Pennines grit and mud, it’s common for grime to build up around the piston seals. This causes one or more pistons to become « sticky, » meaning they don’t retract as smoothly or advance as evenly as the others. This single issue can set off a chain reaction of problems, starting with uneven pad wear, progressing to a warped rotor, and ending with compromised braking power.
A sticky piston causes the brake pad to sit at a slight angle, leading to the tapered wear we discussed earlier. This uneven pressure not only reduces braking efficiency but also puts asymmetric stress on the rotor with every revolution, eventually leading to damage. Before this happens, you can diagnose the problem with a simple but effective technique used by professional mechanics: the white paper test. This test makes it incredibly easy to spot uneven piston movement. By removing the pads and squeezing the lever with a piece of folded white paper in the caliper, the movement of the pistons against the white background becomes immediately obvious. A healthy system will show both pistons advancing simultaneously and equally.
Case Study: The White Paper Test for Sticky Piston Diagnosis
Professional mechanics recommend the white paper test for diagnosing sticky pistons before they cause rotor damage. The procedure is simple: remove the brake pads and insert a piece of folded white paper where the rotor would normally sit. Gently squeeze the brake lever while observing the piston movement against the white background. Healthy pistons advance evenly and simultaneously. A sticky piston will move noticeably slower, lag behind, or remain completely stationary while the other piston moves freely. This simple visual check allows for immediate diagnosis and intervention before uneven pad wear can ruin a rotor.
Once diagnosed, the solution is a meticulous cleaning ritual. By gently advancing the pistons, cleaning the exposed sides with isopropyl alcohol, and lubricating them with a minuscule amount of the appropriate brake fluid (mineral oil or DOT), you can restore their smooth action. This prevents the grit buildup that causes them to stick in the first place.
Make these diagnostic checks and preventative maintenance steps a core part of your post-ride routine. By treating your brakes as a complete system and understanding how to combat the specific challenges of gritty terrain, you ensure every descent is as safe and controlled as the last.