In summary:
- Your full-suspension bike’s worst enemy during a UK winter is water and grit getting into bearings, creating a destructive grinding paste.
- A proactive maintenance schedule focused on early diagnosis and protecting ingress points is far more effective than reactive, expensive repairs.
- You can perform most essential checks and even basic fork servicing yourself without voiding your warranty, saving hundreds of pounds.
- The correct cleaning technique (low pressure, targeted degreasing) is critical; high-pressure washers are the fastest way to destroy bearings.
The sound is all too familiar to any UK mountain biker: a persistent creak that starts after a few wet, gritty rides and slowly drives you insane. You wash your bike, lube the chain, but the noise remains, a constant reminder of the abuse your expensive full-suspension frame is enduring. This is the reality of riding through a British winter, where trails become a relentless assault of mud, water, and fine grit that works its way into every moving part.
The common advice to « clean your bike after every ride » is well-intentioned but fundamentally incomplete. It fails to address the specific failure mechanisms at play. The real battle isn’t against visible mud; it’s a strategic defence against microscopic grit and water ingress that targets the heart of your bike’s performance: the suspension pivots, seals, and bearings. Aggressive, misdirected cleaning can do more harm than good, forcing contaminants past the very seals designed to protect these components.
This guide moves beyond the platitudes. We will not just tell you *what* to do, but explain *why* components fail in these conditions and *how* you, as a home mechanic, can diagnose problems before they become catastrophic failures. This is about shifting from a reactive mindset of fixing what’s broken to a preventative one of protecting your investment. We will dissect the most common winter-related issues, from identifying worn bushings by feel to understanding the real-world economics of chain cleaning, giving you the knowledge to keep your bike running silently and smoothly, no matter how much mud the trail throws at you.
To navigate this essential winter-proofing process, this guide breaks down the core maintenance tasks and knowledge areas. The following sections provide a detailed, hands-on schedule to protect your investment and ensure peak performance throughout the wet season.
Summary: A Home Mechanic’s Winter Survival Guide
- Creak or Click: How to Identify Worn Bushings Without Tools?
- Can You Service Your Own Fork Lowers Without Voiding the Warranty?
- Mudguards for Shocks: Do They Actually Prolong Seal Life?
- Rebound Issues: How to Tell If Your Damper Oil Has Cavitated?
- Single Pivot vs 4-Bar: Which Design requires Less Maintenance in Grit?
- Drain Holes: Why a Blocked Frame Drain Kills Bottom Brackets?
- Pressure Washers: Why Spraying Your Chain Ruins Freehub Bearings?
- Chain Cleaning: How a £10 Degreaser Saves You £200 on Cassettes?
Creak or Click: How to Identify Worn Bushings Without Tools?
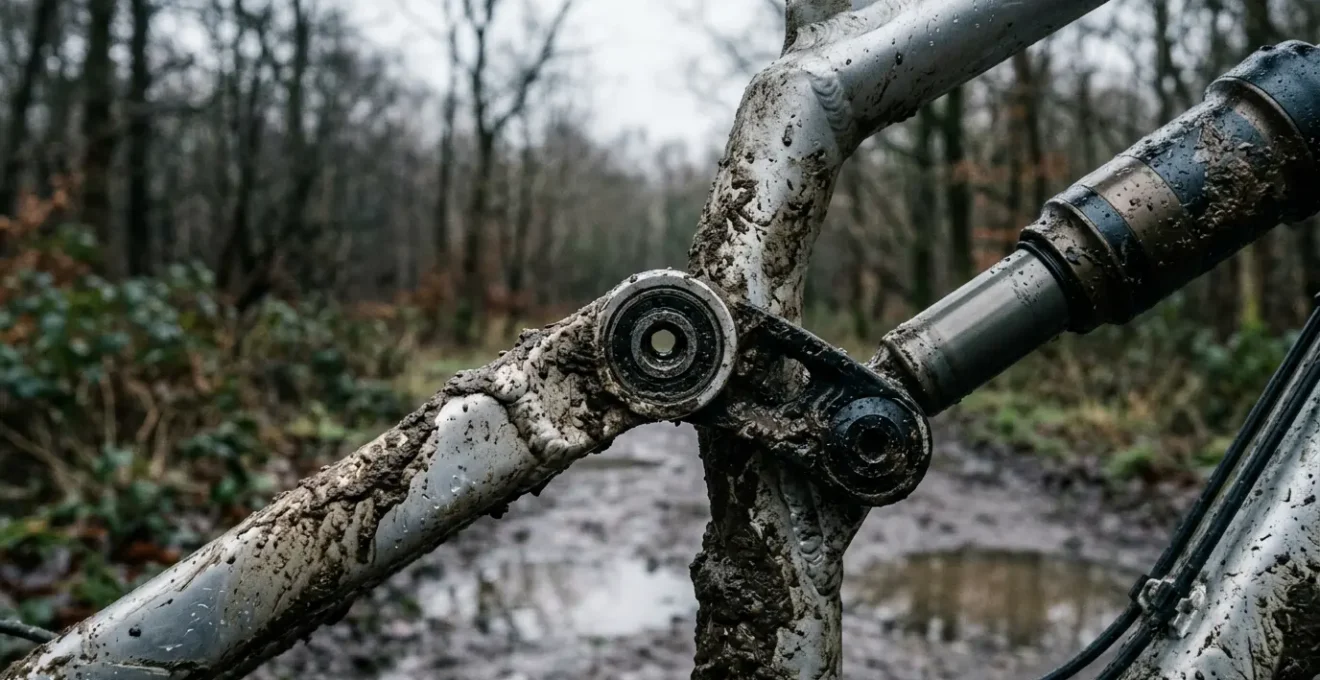
That persistent creak isn’t just an annoyance; it’s your bike’s way of telling you something is wrong. In 90% of cases, the culprit is a worn or contaminated pivot bearing. Before you reach for the tools, your hands and ears are the best diagnostic instruments you have. The goal is to isolate the source of movement or noise. Start by holding the bike steady and systematically trying to induce movement in different areas. Grab the saddle and the top tube and try to move the rear triangle side-to-side. There should be zero lateral play. Any clunking or visible side-to-side movement points directly to worn pivot bearings or bushings.
Next, isolate individual pivots. Remove the rear shock and cycle the suspension through its full range of travel by hand. Does it move freely and silently? Or do you feel a gritty, notchy resistance? That notchiness is the feeling of individual ball bearings grinding inside their race instead of rolling smoothly. This tactile feedback is a definitive sign that a bearing is failing and needs replacement. Remember that in the harsh, wet conditions of a UK winter, service intervals shorten dramatically. While a manufacturer might suggest a full pivot service annually, in reality, Fox recommends significantly more frequent maintenance, with as little as 30 to 50 hours of riding in muddy conditions being enough to warrant a check.
To confirm, you can also press on a specific part of the linkage, like the seat stay, while holding the chainstay. If you can feel movement between the two components, you’ve found your worn pivot. Ignoring these signs allows the bearing’s outer race to spin inside the frame, which can ovalise the bearing housing—a costly and sometimes terminal frame failure. Early, tool-free diagnosis is the key to prevention.
Can You Service Your Own Fork Lowers Without Voiding the Warranty?
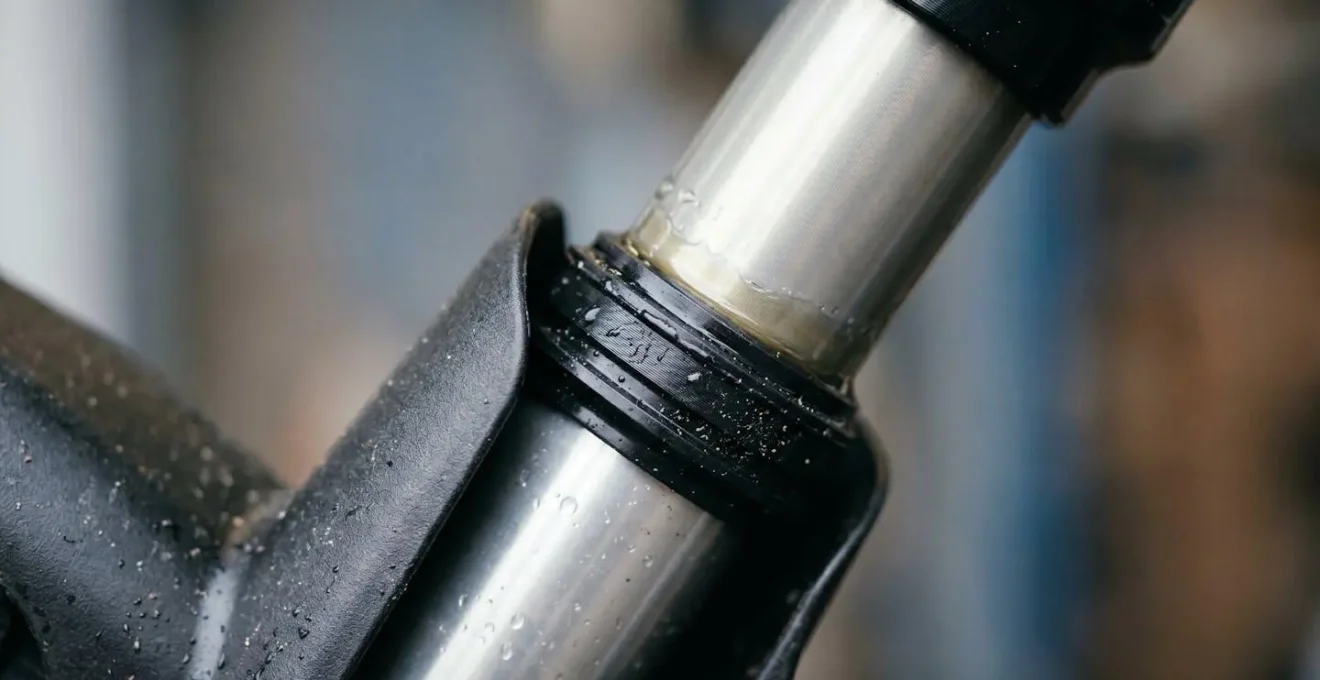
This is one of the most common fears for a home mechanic: will my DIY servicing void the warranty on my multi-thousand-pound fork? The answer, for most major manufacturers, is a resounding no—as long as you are performing the correct service. Brands like Fox and RockShox not only permit but actively encourage users to perform regular lower leg services. This involves replacing the splash bath oil and cleaning or replacing the foam rings and wiper seals. It is the single most effective thing you can do to maintain fork performance and longevity.
The key is understanding the distinction between a ‘lower leg service’ and a ‘full damper overhaul’. The former is considered routine maintenance, while the latter involves disassembling the sealed hydraulic or air spring cartridges, which absolutely should be left to a professional and *will* void your warranty if attempted at home. In their official documentation, FOX is explicit about this user responsibility. As they state directly:
To maintain high performance, product longevity, and preserve warranty rights, periodic end user maintenance is required.
– FOX Racing Shox, FOX Factory Official Warranty Documentation
This statement confirms that performing these basic services is essential *for* preserving your warranty, not a risk to it. The splash oil in your lowers is designed to lubricate the bushings and stanchions, but over time it becomes contaminated with dirt and water that gets past the seals. By replacing this oil every 30-50 hours, you are flushing out contaminants and ensuring your stanchions remain protected and slick.
Different brands have slightly different service intervals and user-serviceable parts, but the principle is the same. This overview provides a clear comparison for the major players on the market.
| Brand | Lower Leg Service Interval | Full Overhaul Interval | User-Serviceable Parts | Warranty Duration |
|---|---|---|---|---|
| Fox | 30-50 hours | 125 hours or annually | Lower leg oil & seals | 1 year (2 years EU) |
| RockShox | 50 hours maximum | 100-200 hours (model dependent) | Lower leg service, air spring | 2 years |
| Ohlins | Varies by model | Manufacturer specific | Consult manual | 1 year standard |
As this comparison of user-serviceable components shows, embracing the lower leg service is a smart, safe, and manufacturer-approved way to take control of your bike’s performance and health.
Mudguards for Shocks: Do They Actually Prolong Seal Life?
It seems almost too simple: can a small piece of plastic really protect a sophisticated, high-performance suspension component? When it comes to shock and fork seals, the answer is an emphatic yes. A well-placed mudguard is one of the most cost-effective upgrades you can make to defend your suspension against the onslaught of a UK winter. Its primary job is to prevent the high-velocity spray of mud and grit flung up by your front wheel from directly impacting the delicate wiper seals on your fork and rear shock.
Every time your suspension compresses, the stanchion slides past the wiper seal. If that stanchion is coated in a film of gritty mud, you are effectively dragging an abrasive paste directly across the seal’s edge. This action quickly wears down the seal, compromising its ability to keep water and dirt out and lubricating oil in. A mudguard acts as a physical barrier, significantly reducing the amount of contamination that ever reaches the stanchion in the first place.
The visual evidence is compelling. A simple guard drastically reduces the build-up of mud around this critical interface, keeping the stanchion cleaner for longer.
As you can see, the guard creates a protected zone, shielding the seal from direct bombardment. This isn’t just theory; it’s backed by extensive real-world testing that proves the effectiveness of this simple addition.
Case Study: ENDURO Magazine’s Mudguard Effectiveness Test
To quantify the benefits, ENDURO Magazine conducted long-term testing on eight different mudguard models during multiple wet seasons. Their findings were conclusive: even the smallest, most minimalist mudguards provided a significant protective benefit. Across all tested models, the researchers observed minimal dirt accumulation on fork seals, even after long rides in appalling conditions. The study highlighted that the primary function is to stop dirt from reaching the seals in the first place, thereby protecting expensive stanchions and bushings from damage caused by grit-impregnated oil.
Rebound Issues: How to Tell If Your Damper Oil Has Cavitated?
When your suspension starts to feel inconsistent or make strange noises, it’s often a sign of issues within the damper cartridge. One of the most common, yet misunderstood, problems is cavitation. In simple terms, this occurs when the damper oil is forced through the valve ports so quickly that the pressure drops, causing air bubbles to form. These bubbles then collapse, creating a loss of damping control and a characteristic noise. It’s the suspension equivalent of a boiling kettle, but with pressure changes instead of heat.
The symptoms can be subtle at first but become more pronounced as the air mixes further with the oil, effectively turning your damping fluid into a useless foam. This is especially common in winter when cold, thick oil struggles to flow, increasing the chance of pressure drops. As the experts at Vorsprung Suspension describe it, the feeling is distinct.
The typical symptom of cavitation is a sharp compression spike, followed by a knock as the damper changes direction between compression and rebound.
– Vorsprung Suspension, NSMB.com Technical Forum
This « knock » or « squelch » is a tell-tale sign that you have air where there should only be oil. The rebound will often feel erratic, with « dead spots » in the adjustment range, or it may top out harshly. For the home mechanic, identifying these symptoms early is key to knowing when a full damper bleed by a professional is required. The following checklist provides a simple, hands-on diagnostic routine you can perform in your workshop.
Action Plan: Field Diagnosis for Damper Cavitation
- Auditory Check: With the bike stationary, compress and release the suspension. Listen for a distinctive ‘squishing’ or ‘squelching’ sound, especially as the shock extends. This is the sound of air and oil mixing.
- Rebound Adjustment Sweep: Turn your rebound adjuster from fully slow to fully fast. Does the adjustment feel consistent through the clicks? An erratic or « empty » feeling in parts of the range suggests internal air.
- On-Trail Feel: Pay attention to the initial part of the travel on descents. A ‘pogo stick’ feeling or a harsh ‘top-out’ clunk that wasn’t there before indicates a loss of rebound control.
- Temperature Monitoring: After a long descent, carefully feel the shock body. An unusually hot damper can indicate increased friction and inefficiency caused by aerated oil.
- Consistency Test: Cycle the suspension by hand. A healthy damper feels smooth and controlled. A cavitated damper may feel inconsistent, with a sudden loss of resistance or a spongy feel.
Single Pivot vs 4-Bar: Which Design requires Less Maintenance in Grit?
The debate between suspension designs is as old as full-suspension bikes themselves. From a pure maintenance perspective in gritty UK conditions, the logic seems simple: fewer pivots should mean fewer bearings to service, and therefore, less work. A single-pivot design typically uses one main pivot and a swingarm, relying on just two or four large, robust bearings. In contrast, a 4-bar or multi-link system (like VPP, DW-Link, or Horst Link) uses a complex array of smaller linkages and bearings to fine-tune the suspension kinematics.
Theoretically, the single-pivot’s simplicity is its strength. With fewer entry points for water and grit, and larger, more durable bearings, it presents a smaller maintenance workload. The lower shock mount is often the most exposed point and the first to fail, and on a single pivot, this is often a simple bushing that is cheap and easy to replace. However, the reality on the trail is more nuanced. The complexity of a 4-bar system is often mitigated by better-sealed bearings and more sophisticated hardware designed to protect these smaller, more numerous pivots.
This side-by-side view highlights the difference in complexity and the number of potential failure points where mud can accumulate.
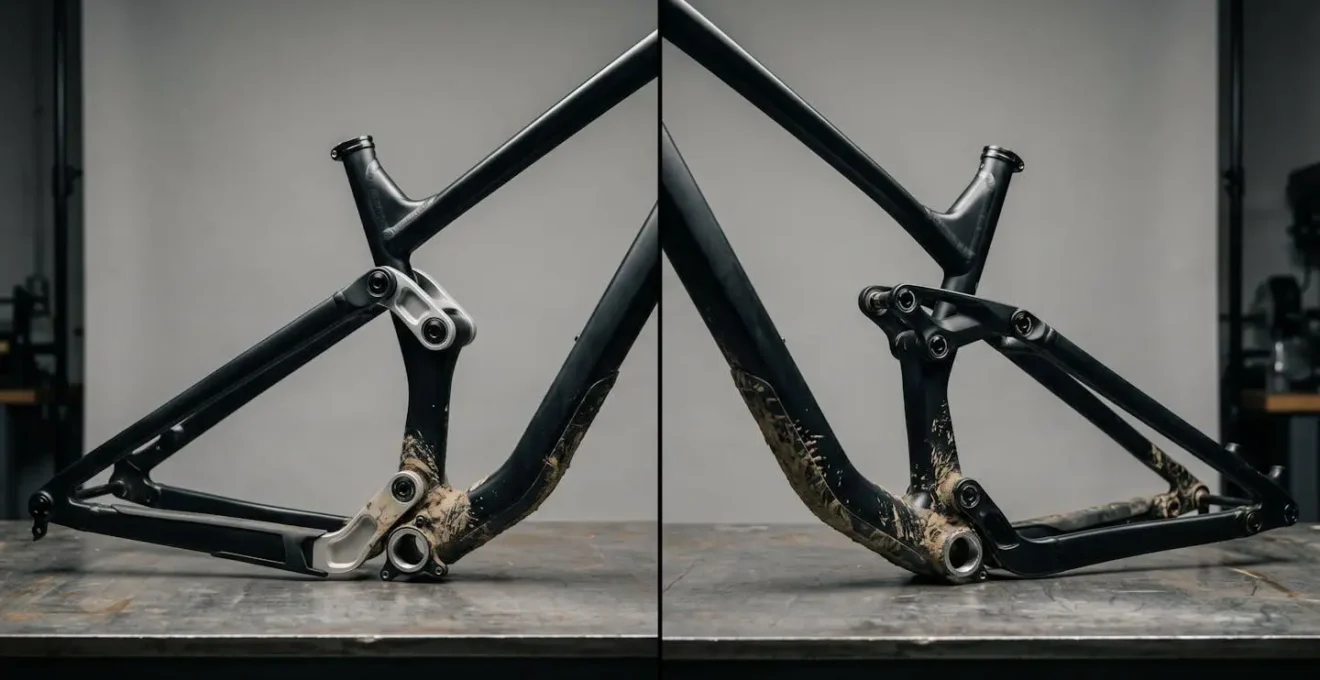
While the 4-bar design on the right has more bearings, what truly dictates maintenance frequency isn’t the design itself, but the rider’s habits and the quality of the bearing seals. As experienced technicians will attest, the environment and maintenance routine are the dominant factors.
A suspension tuning expert with years of experience notes that depending on dust and mud conditions, service intervals may need to be more frequent than manufacturer recommendations. Riders in extremely dusty or muddy environments tend to need more service, especially if they seldom or never wash the bike. The expert emphasizes that riding in very dusty conditions requires careful attention to bearing condition, regardless of suspension design complexity.
Ultimately, while a single pivot has a theoretical edge in simplicity, a well-maintained 4-bar with high-quality bearings can be just as reliable. The deciding factor is your commitment to cleaning and inspection, not the number of pivots.
Drain Holes: Why a Blocked Frame Drain Kills Bottom Brackets?
It’s one of the smallest, most overlooked features on your frame, but it plays a crucial role in its survival: the drain hole. This tiny aperture, usually located at the lowest point of the frame under the bottom bracket shell, is your frame’s last line of defence against internal water accumulation. During wet rides or when washing your bike, water inevitably finds its way inside the frame tubes through the seat tube, cable ports, or headset. The drain hole allows this water to escape, preventing it from pooling around your bottom bracket.
When this hole becomes blocked with mud and grime, the bottom bracket shell effectively becomes a bathtub. The bottom bracket bearings, even if they are a press-fit or threaded unit with its own seals, are not designed for full immersion. Water will eventually work its way past the seals, flushing out the grease and initiating corrosion. This creates the perfect storm for a seized and creaking bottom bracket. The situation is even worse with a carbon frame and an alloy BB shell, as the trapped water can accelerate galvanic corrosion between the dissimilar materials, potentially damaging the frame itself.
Given the consequences, keeping this tiny hole clear is a vital, yet simple, maintenance task. As maintenance experts strongly emphasize, you should clean your bike as quickly as possible after muddy rides to prevent mud from drying and hardening in critical areas like this. A two-second check before and after a ride is all it takes to prevent a major headache.
- Use a small zip tie or a thin piece of wire to gently probe the drain hole to ensure it’s clear.
- After washing your bike, tilt it to allow any trapped water to run out of the drain hole.
- If you hear water sloshing inside your frame, the drain hole is almost certainly blocked. Clear it immediately.
- Make this check a part of your regular pre-ride safety inspection; it’s as important as checking your tyre pressure.
Pressure Washers: Why Spraying Your Chain Ruins Freehub Bearings?
There’s nothing more satisfying than blasting away a thick layer of mud with a pressure washer, revealing a gleaming bike underneath. Unfortunately, this convenience comes at a very high cost. A pressure washer is one of the most destructive tools you can use on a bicycle if wielded improperly. The high-pressure jet of water is designed to strip dirt from surfaces, and it cannot distinguish between mud and the protective grease packed inside your bearings.
The most vulnerable areas are your pivots, headset, bottom bracket, and especially your hubs and freehub body. When you direct a high-pressure spray at these areas—even from a distance—the water can easily force its way past the rubber seals. Once inside, it displaces the grease, contaminates the bearings, and initiates rust. The result is a gritty, rough-feeling bearing that will fail prematurely. Spraying your cassette is particularly damaging, as it forces water directly into the delicate and expensive bearings of your freehub body.
The correct approach is to use low pressure and targeted cleaning. As the suspension experts at Vorsprung Suspension advise, a gentle approach is always better:
Use mild soapy water, rinse with a very light pressure water spray, and take care not to spray water directly at the seals and bearings.
– Vorsprung Suspension, Mountain Bike Suspension 101
If you must use a pressure washer, it’s essential to know the safe zones and techniques to avoid costly damage. Think of it as a fine mist, not a laser beam. The goal is to wet the bike for cleaning with a brush and sponge, not to blast the dirt off.
- Stand Back: Always maintain a distance of at least 1 meter from the bike.
- Use a Fan Setting: Never use a concentrated jet nozzle. A wide fan spray diffuses the pressure.
- Avoid Critical Areas: Never aim the spray directly at any bearing location. This includes wheel hubs, bottom brackets, headsets, and all suspension pivots.
- Identify Safe Zones: It is relatively safe to use light pressure on the centre of the main frame tubes and the rubber of your tyres.
- Protect the Drivetrain: The cassette and freehub are off-limits. Clean this area by hand with a brush and degreaser.
Key takeaways
- Proactive diagnostics—using your hands and ears to feel for play and listen for creaks—are far more effective than waiting for a component to fail.
- Water and grit ingress is the number one enemy of a full-suspension bike in winter. Your maintenance strategy must focus on defending seals, bearings, and drain holes.
- Smart, low-pressure cleaning combined with targeted degreasing protects your investment. Aggressive washing with a pressure washer is the fastest way to destroy it.
Chain Cleaning: How a £10 Degreaser Saves You £200 on Cassettes?
Your drivetrain is where the financial stakes of winter maintenance are highest. A modern 12-speed cassette and chain can easily cost upwards of £200-£300. Allowing your chain to run dirty is the fastest way to wear these components out. In wet and gritty conditions, the sticky lube on your chain combines with fine trail grit and water to create a highly effective « grinding paste ». This abrasive compound works its way between the chain’s rollers and pins, and then proceeds to wear down the teeth of your cassette and chainrings with every pedal stroke.
A chain that looks « clean » on the outside can be full of this grinding paste on the inside. The only way to remove it is with a proper degreaser that can penetrate the rollers and flush out the contaminants. Wiping the chain with a rag or simply re-applying lube on top of the old, dirty lube only makes the problem worse. As professional bike mechanics recommend, you must clean your drivetrain after every single ride in muddy or wet conditions to prevent this accelerated wear.
The economic argument for investing a few pounds in degreaser and a few minutes of your time is undeniable. A clean chain not only shifts better and runs quieter, but it dramatically extends the life of your entire drivetrain. Neglecting this simple task leads to a rapid and costly cycle of replacement. The financial breakdown clearly illustrates the return on investment.
| Maintenance Approach | Monthly Cost | Annual Cost | Component Lifespan | Total 2-Year Cost |
|---|---|---|---|---|
| Regular degreaser cleaning (weekly) | £3 degreaser + 10 min time | £36 | Chain: 2 years, Cassette: 3+ years | £76 (degreaser + 1 chain) |
| Neglected maintenance | £0 | £0 | Chain: 6 months, Cassette: 12 months | £310 (4 chains @ £40 + 2 cassettes @ £75) |
| Savings with regular cleaning | – | – | – | £234 saved over 2 years |
As this cost-benefit analysis demonstrates, the small upfront cost and time spent on regular degreasing yields huge savings. A £10 bottle of degreaser that lasts for months can genuinely save you over £200 in premature component replacement over the life of your bike.
By adopting this proactive and informed approach to maintenance, you transform winter riding from a battle against mechanical wear into a season you can fully enjoy. Start implementing these checks and routines today to ensure your bike is reliable, silent, and ready for any trail, whatever the weather.