
Effective night cycling isn’t about the brightest light, but the most controlled beam.
- German StVZO standards prioritise a sharp, anti-dazzle cut-off, illuminating the road ahead without blinding oncoming traffic.
- While not mandatory in the UK, using non-compliant, dazzling lights can create a legal risk of ‘contributory negligence’ in an accident.
Recommendation: Adopt a ‘layered lighting system’ with a shaped-beam primary light for visibility that is both effective and considerate.
For any commuter cycling after dusk, the dilemma is universal. You need enough light to see potholes and navigate dark roads, but the arms race for ever-higher lumens has flooded our streets and cycle paths with lights that cause dangerous glare for drivers, pedestrians, and fellow cyclists. The common wisdom suggests that more brightness equals more safety, leading many well-intentioned riders to inadvertently become a source of the very hazard they seek to avoid. We’re told to simply get the brightest light we can afford and maybe point it downwards.
But what if the fundamental principle of ‘more is better’ is flawed? What if the key to safe and courteous night riding isn’t raw power, but precise control? This is the philosophy behind Germany’s stringent StVZO (Strassenverkehrs-Zulassungs-Ordnung) lighting regulations. These standards aren’t just about being seen; they are an engineering solution to the problem of seeing clearly while respecting everyone else on the road. This article delves into the technical principles of StVZO, exploring why this German-engineered approach to ‘light control’ offers a superior blueprint for navigating UK roads safely and considerately, moving beyond the simple metric of lumens to a more sophisticated understanding of effective illumination.
This guide will deconstruct the key elements of a responsible lighting setup, from the physics of the beam pattern to the legal nuances of UK law. By understanding these principles, you can make informed choices that enhance your safety without compromising that of others.
Summary: StVZO Compliance: Why German Light Standards Are Safer for UK Roads?
- Beam Pattern: Why 1000 Lumens Is Useless If It Points at the Trees?
- GoPro Mounts vs Rubber Bands: Which Holds a Light Steady on Potholes?
- The « Hand Test »: How to Check If Your Beam Is Too High?
- Side Cut-Outs: How Important Is Being Seen from a Junction?
- High Mode Trap: Why You Should Only Use Max Brightness on Descents?
- Are Your Super-Bright lights Actually Illegal on UK Roads?
- White vs Black Helmets: Does Head Visibility Matter Above Traffic?
- Beyond Hi-Vis: How to Stay Seen on Dark Country Lanes at Night?
Beam Pattern: Why 1000 Lumens Is Useless If It Points at the Trees?
The most common metric for bike lights is the lumen, which measures the total amount of light emitted in all directions. This has led to a market where higher lumen counts are equated with better performance. From an engineering perspective, this is a deeply misleading simplification. The crucial factor for road cycling is not the total light output, but where that light is directed. This is measured in lux, which quantifies the intensity of light falling on a specific area. A light’s effectiveness is a function of its photometric design—the combination of the emitter, reflector, and lens that shapes the beam.
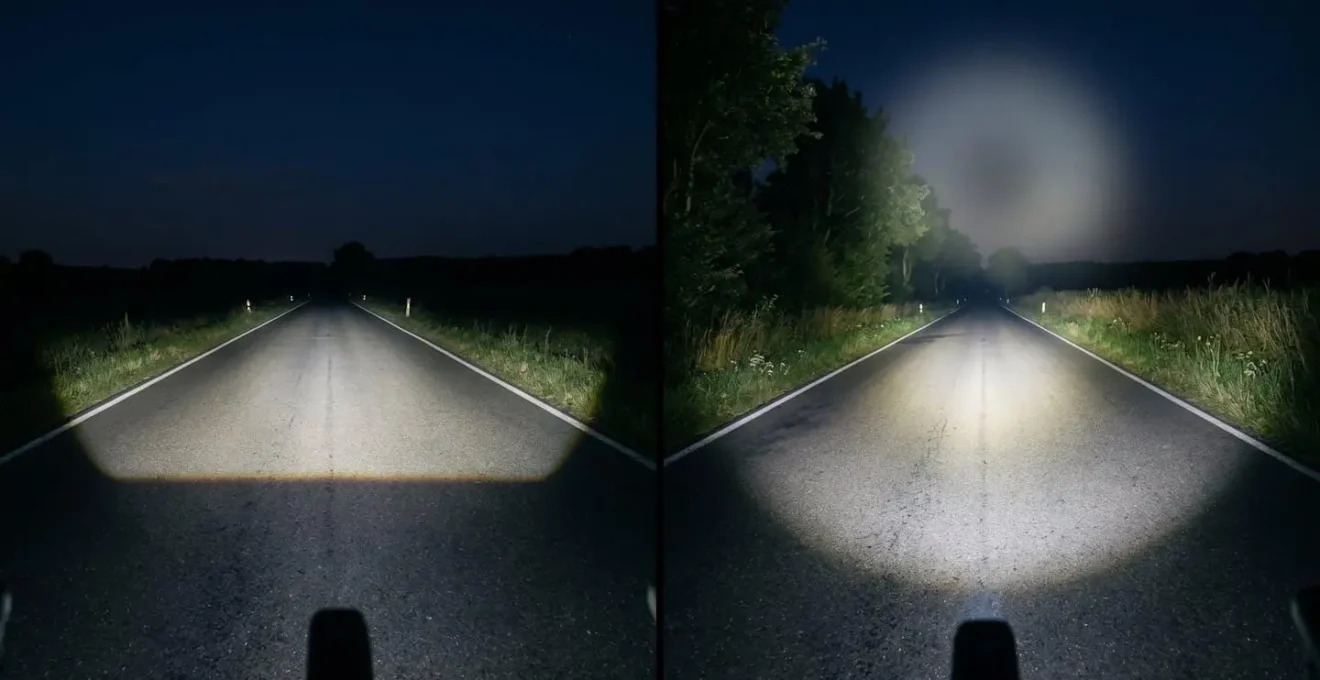
Standard bike lights often use simple conical reflectors, creating a bright, circular hotspot that fades at the edges. While powerful, much of this light is wasted illuminating the sky, treetops, and the eyes of oncoming road users. StVZO-compliant lights, by contrast, are engineered like modern car headlamps. They use complex reflectors and lenses to produce a wide, rectangular beam with a very sharp horizontal cut-off line. This creates a « carpet of light » that illuminates the road surface evenly and broadly, from just in front of your wheel to far in the distance, without any light spilling above the horizon to cause dazzle.
The efficiency of this approach is staggering. As explained by lighting expert Herrmans, lumens measure total output while lux measures targeted intensity. This means a well-designed StVZO light can feel far more effective on the road than a standard light with double or triple the lumen rating. In fact, according to comparative testing of beam patterns, a 500-lumen StVZO light can provide equivalent or superior road illumination to a 1500-lumen light with a basic circular beam. The extra 1000 lumens of the standard light are effectively just visual pollution.
GoPro Mounts vs Rubber Bands: Which Holds a Light Steady on Potholes?
A perfectly engineered beam is rendered useless if its mount cannot hold it steady. On the UK’s often poorly maintained roads, vibrations from potholes and rough surfaces can cause a light to droop, wobble, or shift, compromising illumination and potentially turning a well-aimed beam into a dazzling one. The choice of mount is therefore not a minor detail but a critical component of a reliable lighting system. The two most common types—strap-on mounts and bolt-on mounts—offer a clear trade-off between convenience and stability.
Silicone or rubber strap mounts are popular for their versatility and ease of use. They can be quickly attached to almost any handlebar. However, their flexibility is also their weakness. The elastic material, while good at absorbing some minor vibrations, can allow the light to drift or bounce on significant impacts. This « beam drift » is particularly problematic for StVZO lights, where even a few degrees of downward tilt can drastically shorten the beam’s reach, and an upward tilt can defeat the anti-dazzle cut-off entirely.
For maximum stability, bolt-on mounts are unequivocally superior. These are typically made from CNC-machined aluminium or robust polymer and clamp securely to the handlebar, often using a standard interface like the GoPro mount. This rigid connection ensures the light’s aim remains absolutely constant, regardless of road conditions. The most stable position of all, however, is often on the fork crown. This low position minimises the transfer of handlebar vibration and is unaffected by brake or shifter cables, providing the most consistent beam pattern possible.
- Fork crown (low position): Extremely stable, minimal vibration transfer, ideal for StVZO beam consistency, and unaffected by handlebar cable interference.
- Handlebar centre (bolt-mount): High stability with CNC aluminium brackets, providing good visibility, but with potential for cable obstruction.
- Handlebar ends (strap-mount): Moderate stability, as silicone straps absorb some vibration but allow beam drift on rough surfaces.
- Helmet mount: The beam follows your line of sight but creates a high risk of eye-level dazzle for pedestrians and amplifies head movement into a distracting beam flicker for others.
The « Hand Test »: How to Check If Your Beam Is Too High?
Even with a perfectly shaped StVZO beam, correct aiming is paramount to avoid dazzling other road users. A common but highly unscientific method is the « hand test »—crouching in front of the bike and checking if the beam hits you in the eyes. While better than nothing, this provides no repeatable or accurate measure. The official German methodology for type-approval offers a far more precise and reliable procedure that any rider can replicate at home with a wall and a tape measure.
The principle is based on ensuring the top of the beam has a slight downward angle. The StVZO standard requires that the brightest part of the beam is directed downwards, and according to official StVZO testing protocols, lux values are measured on a vertical screen at a distance of 10 metres. This precise setup ensures the beam cut-off is effective. You can simulate this test easily to guarantee your light is both safe and courteous.
The goal is to project a controlled beam that illuminates the road far ahead without ever rising to the eye level of an oncoming driver or cyclist. This simple check takes only a few minutes but is the single most important step in responsible light setup, transforming a potentially hazardous tool into a considerate and effective safety device.
Action Plan: The Garage Door Method for Perfect Beam Aiming
- Positioning: Place your bike on level ground exactly 10 metres from a vertical wall or garage door.
- Height Measurement: Measure the height of your bike light’s lens from the ground and mark this exact height on the wall.
- Beam Observation: Turn on the light. The sharp horizontal cut-off line of the StVZO beam should be clearly visible on the wall.
- Aiming Check: Adjust the light until the top edge of the beam’s cut-off line sits at least 10cm below the height mark you made on the wall.
- Dynamic Test: Sit on the bike with your full weight on the saddle. The bike’s suspension may compress slightly, changing the angle. Re-check to ensure the cut-off line remains below the required mark.
Side Cut-Outs: How Important Is Being Seen from a Junction?
While forward illumination is critical for seeing the road, a significant portion of cycling risk comes from the side. Junctions are statistically the most dangerous places for cyclists in the UK. Data from the Department for Transport is stark: while 37% of cyclist fatalities occur at junctions, this rises to 52% for serious injuries. This highlights the junction as the primary point of conflict, where being seen from the side is not a bonus, but a necessity.
Many high-powered front lights are designed purely for forward projection, making a cyclist approaching a T-junction virtually invisible to a driver looking left and right. This is where a key design feature of many modern lights comes into play: side visibility cut-outs. These are small, often amber-coloured windows on the side of the light’s housing that allow a portion of the light to spill out perpendicularly. This small detail creates a glowing profile that can be seen by drivers waiting to pull out from a side road, dramatically increasing the chances of being detected.

The effectiveness of this feature is rooted in tackling the primary cause of junction collisions: a driver’s failure of observation, often termed ‘looked but did not see’ (LBDNS).
Case Study: The ‘Looked But Did Not See’ Factor in UK Collisions
UK government road safety data shows that ‘ineffective observation’ is the most commonly assigned factor in serious or fatal collisions involving cyclists. Drivers often fail to register a cyclist in their visual scan because the cyclist does not present a sufficiently strong visual cue. Side visibility from lights breaks this pattern, providing a crucial signal of presence in a driver’s peripheral vision long before the cyclist is directly in front of them, giving the driver more time to make a safe decision.
High Mode Trap: Why You Should Only Use Max Brightness on Descents?
Modern bike lights often come with multiple modes, typically including low, medium, high, and a flashing setting. The temptation is to run the light on its highest setting at all times, following the « brighter is safer » logic. However, this falls into the « High Mode Trap, » a strategy that is inefficient, often unnecessary, and can be inconsiderate. From a technical standpoint, a light’s highest output should be reserved for specific, high-risk scenarios.
The primary reason is battery management. A light’s runtime is inversely proportional to its output. Doubling the brightness can more than halve the battery life. For instance, testing of popular bike lights reveals that battery life at maximum power (e.g., 400-600 lumens) is often only 2-3 hours. Relying on high mode for an entire commute risks the light dying before you reach your destination. A medium setting (e.g., 200-300 lumens with an StVZO beam) is more than sufficient for most urban and suburban riding, providing excellent illumination while extending battery life to 4-6 hours or more.
The only time maximum brightness is truly justified is on fast, unlit descents. At higher speeds, your braking distance increases, and you need to see further ahead to react to hazards. Switching to high mode in this context extends the reach of your beam, matching your visibility to your speed. On climbs or flat sections, this level of power is excessive. It also increases the potential for dazzling others, even with a cut-off beam if it’s aimed slightly too high. As Nico Jeczawitz of Lezyne states:
You don’t want to be riding around the city with a 1,800-lumen light, blinding everyone who passes.
– Nico Jeczawitz, Vice President of Sales and Marketing, Lezyne
Intelligent power management—using only the light you need for the speed and conditions—is the hallmark of an experienced and considerate cyclist. Save the high mode for when it truly counts.
Are Your Super-Bright lights Actually Illegal on UK Roads?
The legality of high-powered bicycle lights in the UK is a significant « regulatory grey area. » Unlike Germany, which has precise technical specifications for beam pattern and intensity, the UK’s Road Vehicles Lighting Regulations (RVLR) 1989 is much older and less specific. The law mandates that a bike used between sunset and sunrise must be fitted with a white front light and a red rear light, but it does not specify a maximum lumen output.
The RVLR 1989 does contain a clause against causing « undue dazzle or discomfort to other persons using the road, » but this is vaguely defined and rarely enforced by police for bicycle lights. This leads many cyclists to believe that as long as they have a light, they are compliant. However, this overlooks a crucial legal concept: contributory negligence. In the event of an accident, if it can be argued in a civil court that your excessively bright or poorly aimed light dazzled a driver and contributed to the incident, you could be found partially liable. This civil liability risk is the real, albeit hidden, legal danger of using anti-socially bright lights.
This contrasts sharply with the clarity of German and French regulations, which mandate type-approved lights with strict beam control. The following table, based on an analysis of international lighting laws, illustrates the difference.
| Regulation Aspect | UK (RVLR 1989) | Germany (StVZO) | France |
|---|---|---|---|
| Maximum Lumens | No limit specified | Regulated by lux output | Regulated |
| Beam Cut-off Required | No | Yes, mandatory horizontal cut-off | Yes, similar to StVZO |
| Flashing Mode Allowed | Yes (1-4 Hz) | No, steady beam only (with some exceptions) | Varies by use case |
| Dazzle Prohibition | Vague (‘undue dazzle’) | Precise technical specs | Technical specifications defined |
| Enforcement Clarity | Low (police discretion) | High (type approval required) | Moderate |
While you are unlikely to be fined for a bright light alone, choosing an StVZO-compliant light is a form of legal self-protection. It demonstrates a proactive effort to mitigate risk and act responsibly, strengthening your position should you ever be involved in an incident.
White vs Black Helmets: Does Head Visibility Matter Above Traffic?
While much of the focus on visibility is at the bike level, the highest point of a cyclist—their head—offers a unique opportunity to capture driver attention. The debate between white and black helmets often revolves around daytime conspicuity, but at night, the game changes. A brightly coloured helmet does little in the dark without a light source. However, mounting a small secondary light on your helmet introduces a powerful neurological trigger known as biomotion.
Our brains are hardwired to recognise the movement patterns of living things. A static light on a bike frame can sometimes blend into the complex visual noise of an urban environment. A helmet-mounted light, however, moves with the natural, subtle bobbing and turning of your head as you ride and scan for traffic. This movement pattern is instantly recognisable to the human brain as belonging to a person, not an inanimate object. It elevates your presence from a simple point of light to a recognized human road user.
Case Study: How Biomotion Triggers Driver Attention at Junctions
Research into driver-cyclist collisions reveals that the ‘looked but failed to see’ phenomenon is often due to static visual cues failing to register in a driver’s scan. Helmet-mounted lights leverage biomotion to overcome this. The dynamic movement created by the rider’s head acts as a powerful alert in a driver’s peripheral vision, signalling ‘human presence’ far more effectively than a static frame-mounted light. This is especially crucial at junctions, where a driver’s attention is divided and a quick, intuitive recognition of another human can be the difference between a safe pass and a collision.
A small, low-lumen helmet light is not intended to illuminate the road—that is the job of your main StVZO light. Its sole purpose is conspicuity. It ensures your presence is registered by drivers, especially when your main lights might be obscured by parked cars or other street furniture. Therefore, the colour of the helmet itself is less important at night than the act of placing a moving light source at your highest point.
Key Takeaways
- Control Over Power: A shaped StVZO beam (measured in lux) is more effective and safer than a high-lumen conical beam that wastes light and causes dazzle.
- Aiming is Non-Negotiable: Use the « 10-metre wall test » to aim your light correctly. A perfect beam aimed poorly is still a hazard.
- UK Law is a Grey Area: While there’s no lumen limit, causing dazzle can lead to ‘contributory negligence’ in an accident. Choosing a compliant light is a form of legal protection.
Beyond Hi-Vis: How to Stay Seen on Dark Country Lanes at Night?
While urban cycling presents challenges of visual clutter and junctions, rural riding introduces a different, more lethal set of risks: high speeds, a lack of street lighting, and a false sense of security. UK government data shows a disproportionate risk in these environments, where 56% of pedal cycle fatalities occur despite representing only 31% of traffic volume. On these dark lanes, a single hi-vis jacket or a basic front light is dangerously insufficient. Staying safe requires a comprehensive, layered lighting system.
This system approach moves beyond relying on one item and instead builds multiple layers of visibility, each serving a distinct purpose. It combines powerful, controlled illumination for seeing with attention-grabbing elements for being seen from all angles. No single light can do everything, but a combination of lights and reflective elements creates a robust safety net.
The foundation is a powerful, road-legal primary light. An StVZO-compliant light of 300-600 lumens provides the controlled, long-reach beam needed to see hazards at speed on unlit roads. This is your « seeing » light. To this, you add « being seen » layers. A small, secondary flashing light on your handlebars grabs attention. A powerful rear light with a disruptive flash pattern ensures you are seen from a great distance by fast-approaching traffic. Finally, biomotion comes into play with a helmet light and, crucially, reflective material on your ankles, shoes, or pedals. The circular motion of your feet is a uniquely human movement that is highly visible in headlight beams from hundreds of metres away.
This layered system ensures that even if one component is obscured or fails, other layers continue to signal your presence. It’s a holistic strategy for tackling the high-stakes environment of night-time rural cycling.
- Primary Light: StVZO-compliant front light (300-600 lumens) with a horizontal cut-off for controlled road illumination.
- Secondary Conspicuity: A small flashing front light (50+ lumens) mounted separately to grab attention.
- Rear Visibility: A powerful rear light (100+ lumens) with a disruptive flash pattern to maximise detection distance.
- Helmet Light: An auxiliary light that follows your line of sight, creating biomotion.
- Reflective Biomotion: Reflective tape on ankles, shoes, or pedals to create a highly visible circular pedalling motion.
Ultimately, embracing the principles of controlled illumination is not just about adhering to a German standard; it’s about adopting a mindset of responsibility and courtesy on the road. By choosing the right equipment and using it correctly, you can ensure your own safety while contributing to a safer environment for everyone. Your next step is to audit your current lighting setup against these principles.