CO2 inflators are not a reliable primary tool for winter cycling; they are a high-risk, single-use gamble where failure is the most likely outcome.
- In freezing conditions, CO2 cartridges cause instant freeze burns, cannot be partially used, can damage tubeless sealant, and the gas rapidly leaks from inner tubes.
- Fumbling with a CO2 inflator with numb fingers is a primary cause of secondary failures, like unscrewing a valve core and leaving you permanently stranded.
Recommendation: True self-sufficiency in winter is not a choice between CO2 or a pump. It is a system of redundancy. Always carry a reliable mini-pump as your foundation, with CO2 serving only as a potential, high-risk luxury for speed.
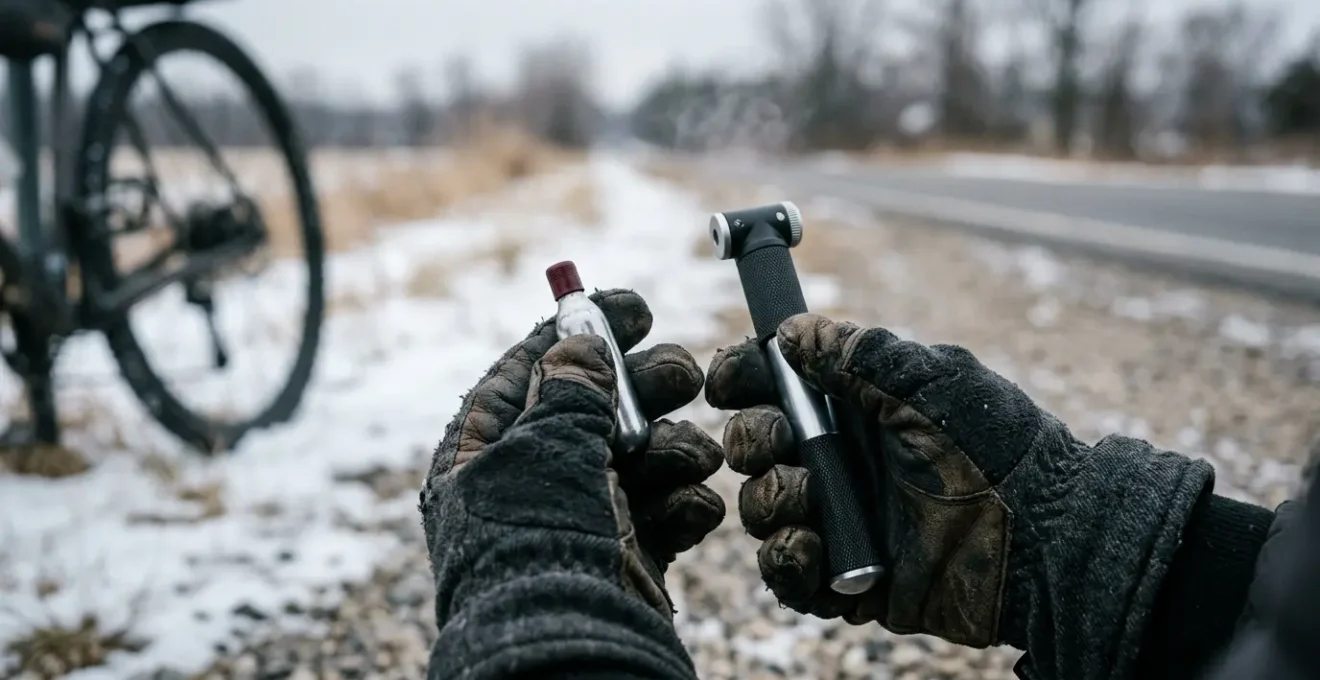
The hiss of a puncture is a sound every cyclist dreads, but in the biting winter wind, miles from warmth, it’s a sound that signals a genuine survival situation. Your fingers are already numb, the light is fading, and every second of exposure drains precious heat. In this moment, the debate between carrying a CO2 inflator for speed versus a mini-pump for reliability ceases to be theoretical. It becomes a critical risk assessment.
The common wisdom frames it as a simple trade-off: speed vs. effort. But this simplistic view is dangerously flawed for the winter rider. It fails to account for the harsh reality of the cold—the « unforgiving variable » that amplifies every weakness of your equipment and your ability to use it. Relying solely on a CO2 inflator is not just a choice; it’s a bet. You are betting that everything will go perfectly on the first and only try.
This article rejects that gamble. We will adopt the mindset of a survivalist, where redundancy and guaranteed function are paramount. The truth is that a CO2 inflator is not a tool; it’s a single-shot emergency flare with numerous, interconnected ways to fail. These aren’t isolated issues; they are a chain reaction of ‘cascading failures’ waiting to happen when you are at your most vulnerable.
We will dissect each of these failure modes, from the physical danger of the cartridge itself to the hidden chemical reactions inside your tyre. We will then build a truly resilient and redundant roadside repair system, one that ensures the question isn’t *if* you get home, but simply *how*.
This guide dives deep into the critical trade-offs between CO2 and mini-pumps specifically for winter riding. We will explore the hidden dangers and practical realities of each, helping you build a repair kit that won’t leave you stranded in the cold.
Summary: CO2 vs Mini Pump: The Winter Cyclist’s Dilemma
- Freeze Burns: How to Use CO2 Without Injuring Your Fingers?
- The « Half-Full » Cartridge: Can You Save CO2 for Later?
- Presta Valve Core Removal: The CO2 Error That Leaves You Stranded?
- CO2 Permeability: Why Your Tyre Goes Flat 24 Hours After Using Gas?
- Recycling Cartridges: Is CO2 Convenience Worth the Metal Waste?
- The 5 Spares You Must Carry When You Are 20 Miles from a Bike Shop?
- Chain Scrubbers vs Toothbrush: Is the Gadget Worth the Faff?
- Saddlebag Aesthetics: How to Carry Spares Without Ruining Your Bike’s Lines?
Freeze Burns: How to Use CO2 Without Injuring Your Fingers?
The primary appeal of CO2 is speed, but this speed comes at a dangerous physical cost. As the compressed liquid CO2 rapidly expands into a gas, it triggers a process called adiabatic expansion. This causes a dramatic temperature drop, a phenomenon confirmed by thermodynamics research on CO2 phase changes, instantly frosting the metal cartridge to well below freezing. Touching this bare metal with unprotected skin, especially moist skin, doesn’t just feel cold—it causes an instantaneous freeze burn, sticking to your flesh and tearing it away.
In a winter scenario, where your hands are already cold and your dexterity is compromised, the risk of a clumsy grip is magnified. A severe freeze burn to your fingers is not just painful; it’s a debilitating injury that ends your ability to perform any further repairs, turning a simple flat into a full-blown emergency.
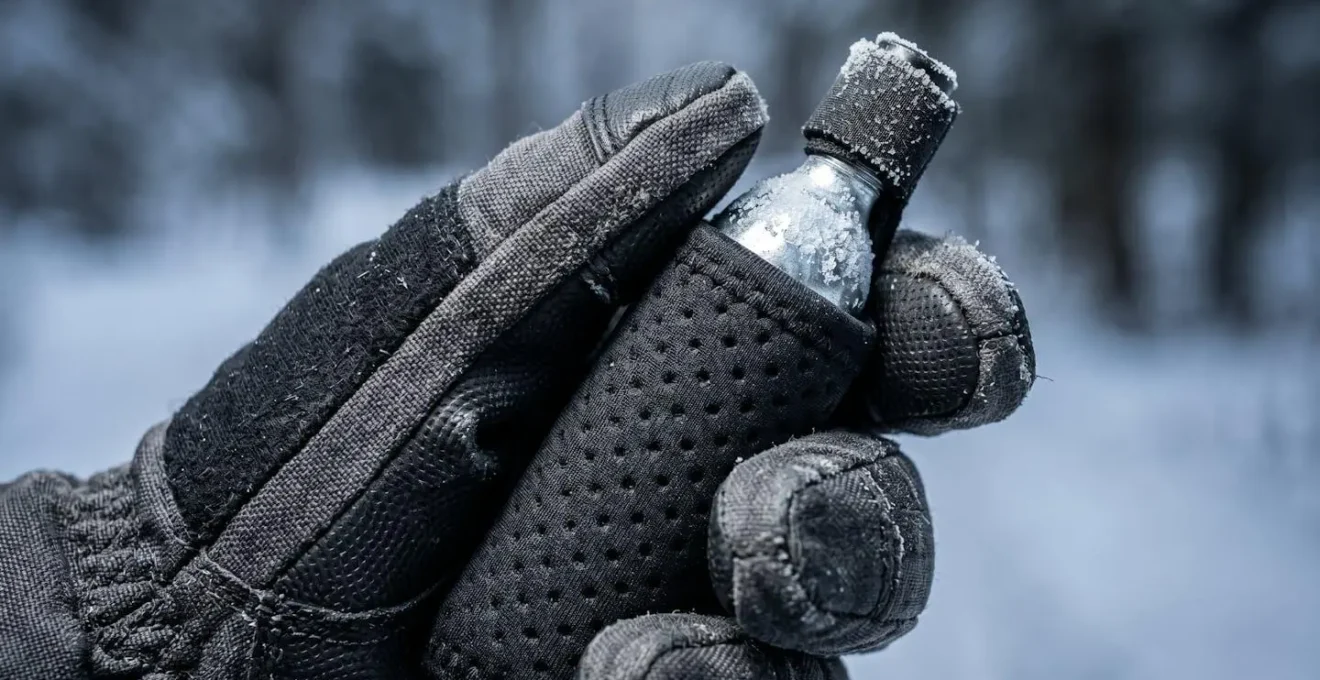
The only way to mitigate this risk is through unwavering discipline and practice. Never, under any circumstances, handle the cartridge without thick gloves and a protective sleeve. The inflator head itself can also become frigid, so a controlled-flow mechanism is essential to prevent a sudden, uncontrolled discharge. You must treat a CO2 cartridge with the same respect you would any other pyrotechnic device: it’s a controlled explosion, and you are in the blast radius.
The « Half-Full » Cartridge: Can You Save CO2 for Later?
The idea of using half a CO2 cartridge to top off a tyre and saving the rest for later is a tempting, but deeply flawed, piece of logic. In the survivalist’s calculus, a tool must be predictable. A partially used CO2 cartridge is the opposite of predictable; it’s a promise that will almost certainly be broken when you need it most. The reliability depends entirely on the seal created by the inflator head, a seal that is rarely perfect and always temporary.
Inflators with a trigger or twist-to-inflate mechanism are designed to hold pressure, but this is a short-term solution. The rubber O-rings that form the seal are subject to hardening in the cold, material fatigue, and microscopic debris. Over a period of hours or even minutes, the remaining gas will inevitably leak out, leaving you with a useless cartridge the next time you reach for it. Unthreaded cartridges are even worse, relying on a simple puncture-and-hold mechanism that offers no realistic chance of preserving pressure.
I have an unthreaded setup, and I’ve experienced that it NEVER keeps the pressure for more than a few hours before dissipating.
– Experienced cyclist on DC Rainmaker forum, User experience discussion on CO2 inflator reliability
This transforms CO2 from a tool into a single-shot liability. Once a cartridge is pierced, you must assume it is fully expended. Any gas you « save » is phantom pressure, a ghost in the machine that will vanish before your next ride. A mini-pump, by contrast, has an infinite supply of air. Its capacity is limited only by your willingness to work—a far more reliable metric than the integrity of a 5-cent O-ring in sub-zero temperatures.
Presta Valve Core Removal: The CO2 Error That Leaves You Stranded?
Here we encounter a perfect example of a « cascading failure »—where one small problem, amplified by the cold, triggers a catastrophic and unrecoverable situation. The scenario is dangerously common: you’ve fixed a puncture, your hands are frozen, and you’re rushing to inflate the tyre. You press the CO2 inflator head onto the Presta valve, often with more force than necessary due to numb fingers. The tyre inflates in a sudden, violent rush. Now, you try to pull the inflator off.
The rapid cooling can cause the inflator’s rubber gasket to shrink and grip the valve with incredible force. In your haste and with a clumsy, gloved hand, you start to wiggle and twist the inflator to break it free. In doing so, you inadvertently unscrew the removable valve core from the valve stem. It comes away inside the inflator head, followed by a final, deafening hiss as every molecule of gas you just put in escapes back into the frozen air. You are now left with an open, un-inflatable valve and no way to fix it. This is a walk-home failure.
This single error is one of the most common ways a simple flat repair turns into a disaster. It is a direct consequence of the CO2 system’s design, combined with the physiological effects of cold on the rider. A mini-pump, with its more secure screw-on or lever-lock chuck and slower, controlled inflation, almost entirely eliminates this specific risk. The force applied is more gradual and is never accompanied by the thermal shrinkage that locks an inflator head onto the valve.
Before every ride, you should use a small tool to ensure your valve cores are snug. But in a roadside situation, the only true prevention is to use a technique that doesn’t create the problem in the first place. That technique is using a pump.
CO2 Permeability: Why Your Tyre Goes Flat 24 Hours After Using Gas?
A CO2 inflation feels like a success. The tyre is hard, you’re back on the bike, and you’ve beaten the cold. But the victory is temporary. The CO2 molecules you’ve just forced into your inner tube are significantly smaller than the nitrogen and oxygen molecules that make up the air you’d get from a pump. This means they can migrate directly through the porous structure of the butyl rubber inner tube.
The result? A tyre inflated with CO2 will lose pressure at a dramatically accelerated rate. It is not a slow leak; it is a fundamental property of the gas. It’s so predictable that field testing by cycling equipment specialists shows tires inflated with CO2 often become significantly underinflated within 24 hours. You will wake up the next morning to a soft or completely flat tyre.
For tubeless users, the problem is even more insidious. Multiple cyclists report that the ultra-cold blast of expanding CO2 can cause the liquid latex sealant inside the tyre to instantly coagulate. The freezing gas essentially « shocks » the sealant into solidifying, creating useless rubber balls (« stanimals ») that rattle around inside your tyre instead of sealing punctures. To mitigate this, you must always inflate with the valve at the 12 o’clock position, allowing the liquid sealant to pool at the bottom, away from the freezing gas stream. It’s another complex procedure to remember under stress.
CO2 will leak out. Plan to air up your tires before your next ride. If you’re really anal like me, let the CO2 out and refill with air.
– Experienced cyclist contributor, Road Bike Rider community best practices
This means a CO2 inflation is never a permanent fix. It’s a « get me home » patch. A survivalist understands that the job is not done until the system is returned to a stable, reliable state. This means taking the time later to deflate the tyre completely and re-inflate it with air from a floor pump.
Recycling Cartridges: Is CO2 Convenience Worth the Metal Waste?
In a survival situation, your immediate priority is getting back to safety. But a true survivalist mindset also includes a sense of responsibility for your impact. The convenience of CO2 inflators comes with an environmental cost: a small, single-use steel cylinder for every flat tyre. While steel is highly recyclable, the process for CO2 cartridges is not as simple as tossing them in your home recycling bin.
Because they are pressurized containers (or resemble them), they are often rejected by automated sorting facilities at municipal recycling plants for safety reasons. This means they are likely to end up in a landfill unless you take specific steps to dispose of them correctly. This adds another layer of « faff » to the CO2 system: you must collect the empty cartridges and transport them to a proper scrap metal facility.
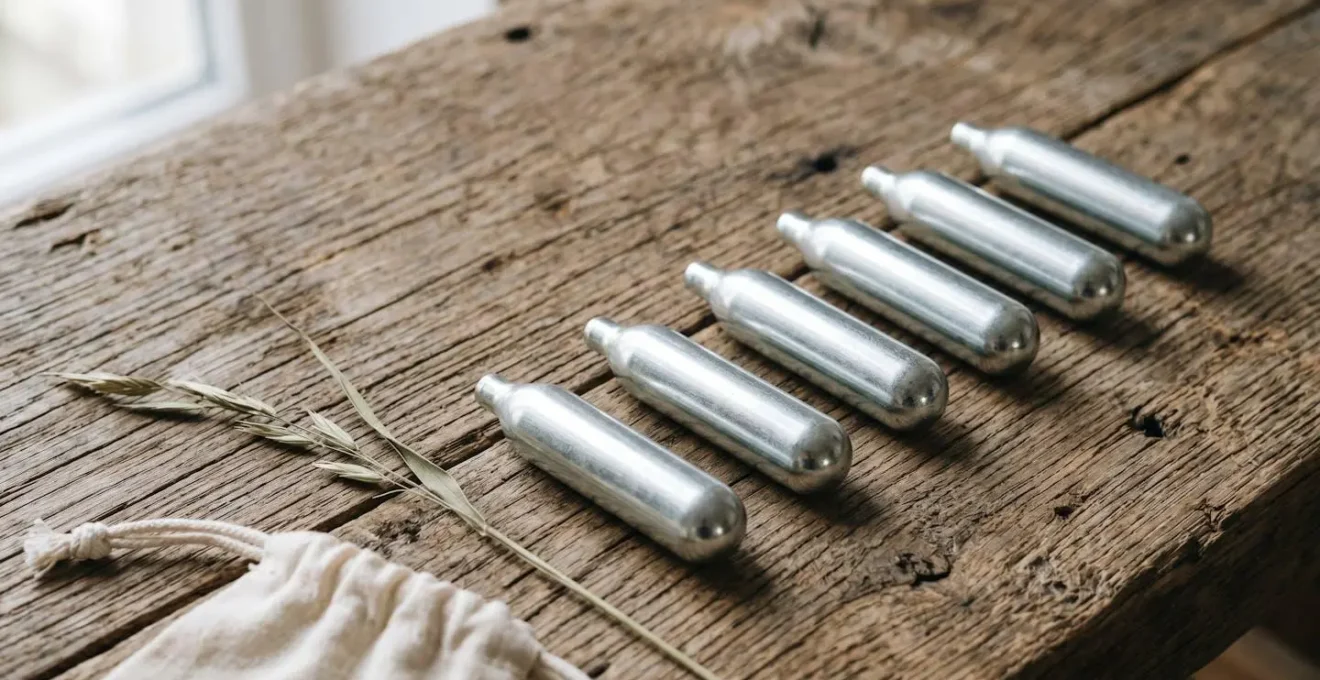
A responsible rider who relies on CO2 must have a system for managing this waste. This means carrying a small pouch or simply using an elastic band to bundle the empties and bring them home. Leaving them on the roadside is not an option. Many local bike shops act as collection points, which is a great community-based solution. The alternative—a mini-pump—produces no waste beyond the calories you burn to operate it. It runs on air and effort, both of which are infinitely renewable resources on a long ride.
To dispose of cartridges correctly, you must follow a clear procedure:
- Ensure Complete Emptiness: Before disposal, verify the cartridge is fully discharged by briefly opening the inflator valve, pointing it away from your body.
- Understand Curbside Rejection: Never put cartridges in your household recycling bin. They will be filtered out as potential hazards.
- Find a Scrap Metal Facility: The correct destination is a dedicated scrap metal recycling center that accepts small steel items.
- Use Bike Shop Hubs: Ask your local bike shop if they collect empty cartridges for bulk recycling.
- Carry Empties Home: Always pack out what you pack in. A simple bag or wrap prevents rattling and ensures you don’t litter.
The 5 Spares You Must Carry When You Are 20 Miles from a Bike Shop?
When you are alone and the temperature is dropping, your saddlebag is not a collection of tools; it is a life support system. The philosophy should not be « what is the minimum I can get away with? » but rather « what system gives me overlapping layers of protection? » This is the principle of system redundancy, and it is the absolute core of winter cycling survival. The debate is not CO2 vs. a pump. The answer is CO2 *and* a pump, integrated into a comprehensive repair kit.
Relying on a single inflation method is inviting failure. A CO2 cartridge can be a dud, you could botch the inflation, or you could have a second puncture. A pump can fail, a hose can crack, a seal can blow. By carrying both, you create a system that is resilient to a single point of failure. You use the CO2 for its speed and power (especially for seating a tubeless tyre), but you have the pump as the guaranteed, never-runs-out backup. It’s heavy, yes. But it is infinitely lighter than walking 20 miles in cycling cleats.
Your Winter Survival Kit: A Redundancy Checklist
- Dual Inflation System (The Redundancy Rule): Carry both CO2 cartridges (2-3 units) AND a reliable mini pump. Use CO2 for speed and seating tubeless beads; the pump is your unbreakable backup.
- The Tyre Repair Trinity: Pack a tubeless plug kit, one spare inner tube, and a tyre boot (or an emergency substitute like a folded gel wrapper). This addresses any level of tyre damage.
- Drivetrain Saviour: A multi-tool with a robust chain breaker and at least two quick-links compatible with your specific chain. A broken chain is a walk home, regardless of tyre pressure.
- Valve Core Tool: This tiny, sub-gram tool is non-negotiable for tubeless setups. It allows you to tighten a loose core or re-install one you’ve accidentally removed.
- The Knowledge Spare: Practice using every single tool in the warmth of your home. Muscle memory is the most important spare part you can carry. Equipment is useless if you can’t deploy it under stress.
Am I the only weirdo that carries both? I have my 2x CO2 canisters, one tube, glueless patches and a Silca mini pump in my jersey pocket. Holdover from MTB days and I do lots of solo centuries. Yes there are days I’m still scraping home on leaky tires/tubes. So worth the weight and effort in my opinion.
– Weight Weenies forum contributor, Community discussion on reliability vs. weight optimization
Chain Scrubbers vs Toothbrush: Is the Gadget Worth the Faff?
At first glance, a debate about chain cleaning methods seems out of place in a survivalist’s guide. But zoom out: the goal of maintenance is not just cleanliness; it’s reliability. A gritty, poorly-lubricated chain is an inefficient power-sapper at best. At worst, it is a catastrophic failure waiting to happen. The grit acts as a grinding paste, accelerating wear on your chain, cassette, and chainrings.
According to bicycle maintenance research emphasizing reliability, regular and thorough chain cleaning is one of the most effective ways to extend drivetrain component life. A worn chain is prone to stretching, which leads to poor shifting and an increased risk of snapping under load—exactly the kind of load you generate when climbing a steep hill in the cold. A snapped chain is one of the few roadside failures that is almost impossible to fix without the right, specific tools.
So, is a dedicated chain scrubber device worth the « faff » compared to a simple brush and degreaser? From a survivalist perspective, the answer is yes, if it leads to a more frequent and more thorough cleaning. A chain scrubber’s main advantage is speed and containment, making a messy job slightly less messy. This lower barrier to entry means you’re more likely to do it. A simple toothbrush and rag, used diligently, can achieve the same result, but it requires more discipline.
The choice of tool is less important than the outcome: a drivetrain free of the abrasive grit that causes premature wear. A clean drivetrain is a reliable drivetrain, and a reliable drivetrain is one that won’t leave you stranded. The « faff » of cleaning is a small price to pay to avoid the much greater « faff » of a 20-mile walk.
Key takeaways
- CO2 is a high-risk tool for winter use, with multiple cascading failure modes including freeze burns, unreliability, and potential sealant damage.
- A mini-pump is the foundation of winter reliability, providing a guaranteed, albeit slower, method of inflation that never runs out.
- The safest approach is not a choice but a system of redundancy: carry both a pump as your primary tool and CO2 as a situational backup, alongside a complete repair kit.
Saddlebag Aesthetics: How to Carry Spares Without Ruining Your Bike’s Lines?
We have established that a redundant, comprehensive repair kit is a non-negotiable for winter self-sufficiency. The immediate counter-argument for many riders is one of aesthetics and practicality: « How do I carry all that without turning my sleek road bike into a clunky touring machine? » This is a valid concern, but the solution lies in strategic, ride-specific loadouts, not in compromising on safety.
The « all or nothing » approach is a fallacy. You don’t need to carry a full bikepacking setup for a two-hour ride. The key is to scale your kit to the risk profile of your route. A short « coffee ride » within a populated area has a low risk profile and requires a minimal kit. A 100km solo ride through remote countryside demands a much more comprehensive system. The goal is to match your payload to the potential consequences of a failure.
Modern storage solutions offer a wide array of options beyond the traditional, bulky saddlebag. Tool rolls, frame bags, handlebar bags, and even strap-on systems allow you to distribute the load across the bike. This can improve handling and maintain a cleaner aesthetic. A mini-pump can be mounted to the frame, CO2 cartridges can be strapped to the seatpost, and a tool roll can fit neatly under the saddle. Your jersey pockets are also valuable real estate for tools and spares.
The following table provides a matrix for deciding what to carry based on the ride you’re planning. It’s a framework for thinking about redundancy, not a rigid set of rules.
| Ride Type | Primary Storage | Inflation System | Repair Kit | Weight Priority |
|---|---|---|---|---|
| Coffee Ride (20-30km) | Small saddle bag or jersey pocket | 1x CO2 (16g) + head | 1x tube, tire levers | Minimize – aesthetic focus |
| 100km Sportive | Medium saddle bag | 2x CO2 (16-20g) + mini pump backup | 1x tube, patch kit, multi-tool | Balanced – reliability matters |
| Gravel Epic (100+ km remote) | Frame bag + saddle bag or tool roll | 2-3x CO2 (20-25g) + robust mini pump | 2x tubes, tubeless plug kit, tire boot, multi-tool, quick links | Redundancy > weight – self-sufficiency critical |
| Bikepacking Multi-Day | Distributed: frame, fork, saddle, handlebar storage | Mini pump (primary) + 2x CO2 (emergency speed) | Full repair kit: tubes, patches, plugs, boots, spare spokes, chain tool, comprehensive multi-tool | Durability and unlimited use > single-use items |
Before your next winter ride, lay out your entire repair kit on the floor. Audit it not for what’s there, but for what’s missing. Do you have redundancy? Do you have a guaranteed way to inflate a tyre, even if your first method fails? Don’t just pack tools; pack a system that respects the cold and acknowledges that when you are alone, you are your only rescuer.