The ultimate solution to carrying spares is not finding the smallest bag, but mastering a system of stability, ergonomics, and compression that makes your storage solution an integrated part of the bike’s silhouette.
- Mounting is key: A secure, multi-point attachment system like a Boa dial or rail wing design eliminates rattle and preserves handling.
- Bag shape dictates comfort: A narrow, tapered profile is essential to avoid the dreaded inner-thigh friction that destroys expensive bib shorts.
- True weather protection is non-negotiable: Standard zippers are merely water-resistant; only a roll-top closure with welded seams offers genuine waterproofing.
Recommendation: Prioritise the mounting system and bag profile above all else. A stable, slim bag, even if slightly larger, is aesthetically and functionally superior to a small, rattling bag that ruins your shorts.
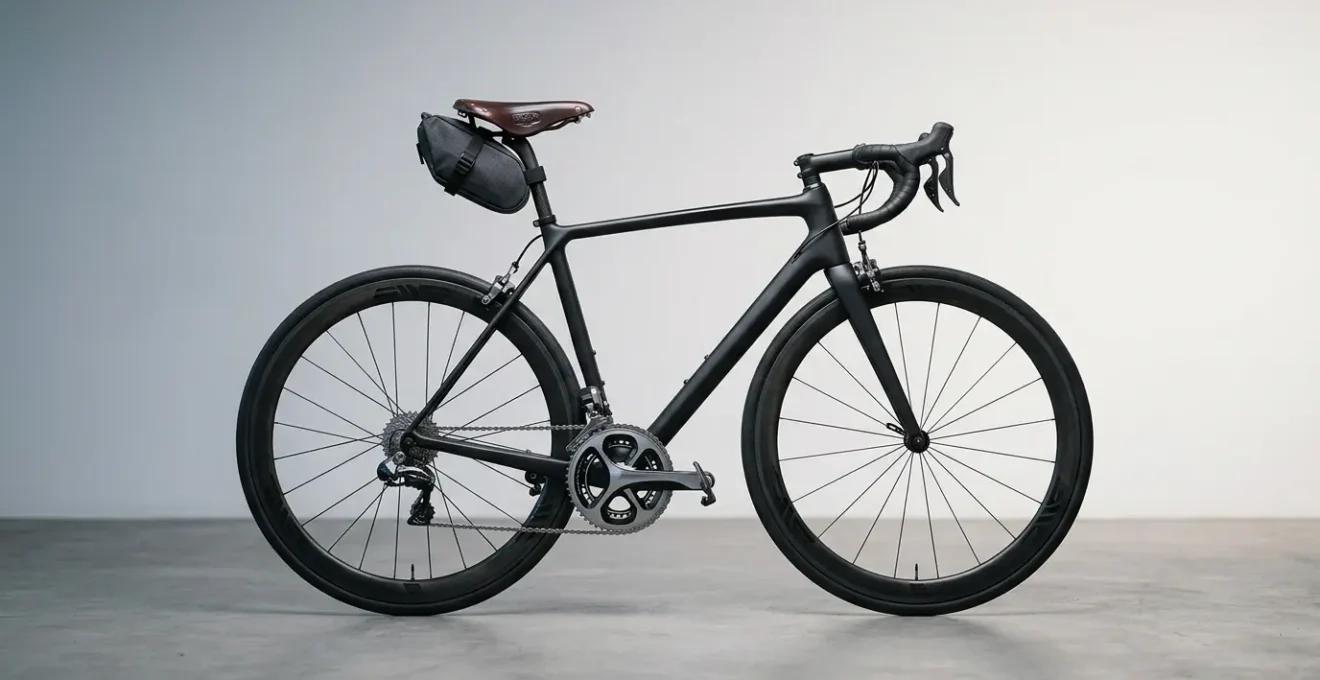
There is a unique, profound satisfaction in gazing upon a clean road bike. Every line is purposeful, every component selected for its contribution to speed and elegance. It’s a minimalist sculpture built for performance. Then, reality intrudes. You need to carry a spare tube, a multi-tool, and CO2 cartridges. The immediate solutions feel like a betrayal of that aesthetic purity: bulging jersey pockets that sag and ruin your profile, or worse, a cheap, rattling saddlebag that flops about like an afterthought.
Many cyclists resign themselves to this compromise, accepting that preparedness comes at the cost of style. They might opt for a tool bottle, sacrificing hydration, or resort to taping gear under the saddle, leaving it exposed to grime and moisture. This is a false choice, born from a misunderstanding of the problem. The goal should not be to simply tolerate carrying essentials, but to master the art of doing so with elegance and technical precision.
But what if the key wasn’t just finding a smaller bag, but understanding the physics that make a storage system truly disappear, both visually and dynamically? This guide reframes the problem. We will not just list products; we will deconstruct the principles of creating an integrated silhouette. It’s a discipline that blends the physics of stability, the ergonomics of clearance, and the artful science of compression.
By dissecting how a bag attaches, its shape, and how it’s packed, you can transform a necessary burden into a seamless extension of your machine. This is how you honour both the rules of the road and the unwritten laws of style, ensuring your bike looks just as sharp on a 100-mile ride as it does on a showroom floor.
This article provides a detailed roadmap to achieving that seamless integration. We will explore the technical details that separate an elegant solution from a clumsy accessory, ensuring you can carry what you need without a single compromise to your bike’s perfect lines.
Contents: The Art and Science of On-Bike Storage
- Velcro vs Boa Mounts: Which Stops the Bag Rattling on Rough Roads?
- Narrow vs Wide Bags: How to Avoid Destroying Your Shorts?
- The « Burrito » Roll: How to Wrap Tools to Save Space?
- Zip Seepage: Why Your Multi-Tool Rusts Inside « Waterproof » Bags?
- Jersey Pockets vs Saddlebag: Which Is Better for Centre of Gravity?
- Pocket Storage: How to Fold a Gilet to Fit in a Jersey Pocket?
- The « Stuff Sack » Method: How to Compress Clothes into Tiny Spaces?
- Panniers vs Bikepacking Bags: What Works Best for a Wet Weekend in Wales?
Velcro vs Boa Mounts: Which Stops the Bag Rattling on Rough Roads?
The single greatest aesthetic crime of a saddlebag is not its existence, but its movement. A bag that sways, rattles, or vibrates on anything but perfect tarmac is a constant, irritating reminder of its presence. This lack of dynamic stability disrupts the bike’s handling and, more importantly, its silent grace. The culprit is almost always the mounting system. A simple, single Velcro strap around the seatpost is a recipe for oscillation, as it creates a single pivot point.
Traditional Velcro straps, while ubiquitous, have inherent flaws. They can lose their grip when caked with mud, stretch over time, and offer limited clamping force. This allows for micro-movements that, amplified by road vibrations, become the dreaded rattle. Modern systems have evolved specifically to combat this. The BOA Fit System, using a micro-adjustable dial and steel lace, provides vastly superior and more evenly distributed tension. It clamps the bag firmly against the saddle rails, effectively making it a single unit with the saddle itself.
However, the attachment mechanism is just as important as the tensioning method. The most stable systems employ a multi-point connection strategy to eliminate independent movement.
Case Study: The Topeak Rail Wing System
The Topeak Rail Wing system uses two smaller Velcro loops to secure the bag directly to the saddle rails in addition to the seatpost strap. This creates a multi-point attachment that significantly reduces independent movement. Testing showed this system maintains stability even when the bag is fully loaded, with the dual-rail attachment preventing the oscillation common in single-strap designs. This demonstrates that the number and location of attachment points are more critical than the strap material alone.
Other high-end solutions use rigid mounts that bolt directly to the saddle rails, where practical testing shows near-zero sway or rattle under load. While Velcro is not inherently bad—especially in multi-strap configurations—a system that offers mechanical advantage like a BOA dial or a direct-mount bracket will always provide a more integrated and silent ride.
Narrow vs Wide Bags: How to Avoid Destroying Your Shorts?
After stability, the second-most critical factor in selecting a saddlebag is its profile. A poorly designed bag can commit an expensive and unforgivable sin: destroying your bib shorts. The inner thigh area is a high-motion, high-friction zone. If a bag is too wide or has a boxy shape, the material will inevitably rub against the delicate Lycra with every pedal stroke. Over the course of a long ride, this repetitive friction can cause pilling, abrasion, and eventually, a hole in a multi-hundred-dollar garment.
This critical interface is what we can call the « friction zone. » The key to avoiding damage is ensuring adequate clearance. A well-designed saddlebag will feature a distinct taper, narrowing significantly towards the seatpost. This ergonomic shape is intentional, designed to fit neatly within the space between the saddle rails and stay completely clear of your thighs. Look for bags that are visibly narrower than your saddle’s width.
The material and construction of the bag also play a role. Even with a good shape, exposed, rough Velcro straps can be a problem, as one manufacturer’s guide points out.
The rough side can sometimes catch on expensive cycling shorts and damage them.
– LeoGuar Bikes saddle bag guide, How to Choose the Right Bike Saddle Bag
This is why systems with clean, hardware-based attachments or straps that have a « Velcro garage » (a soft fabric flap to cover the exposed hook side) are superior. When assessing a bag, shape is paramount. It must not just fit your gear; it must first and foremost fit the negative space of the bike and rider in motion.
The image below highlights the tapered design of a bag that respects the friction zone, creating essential clearance.
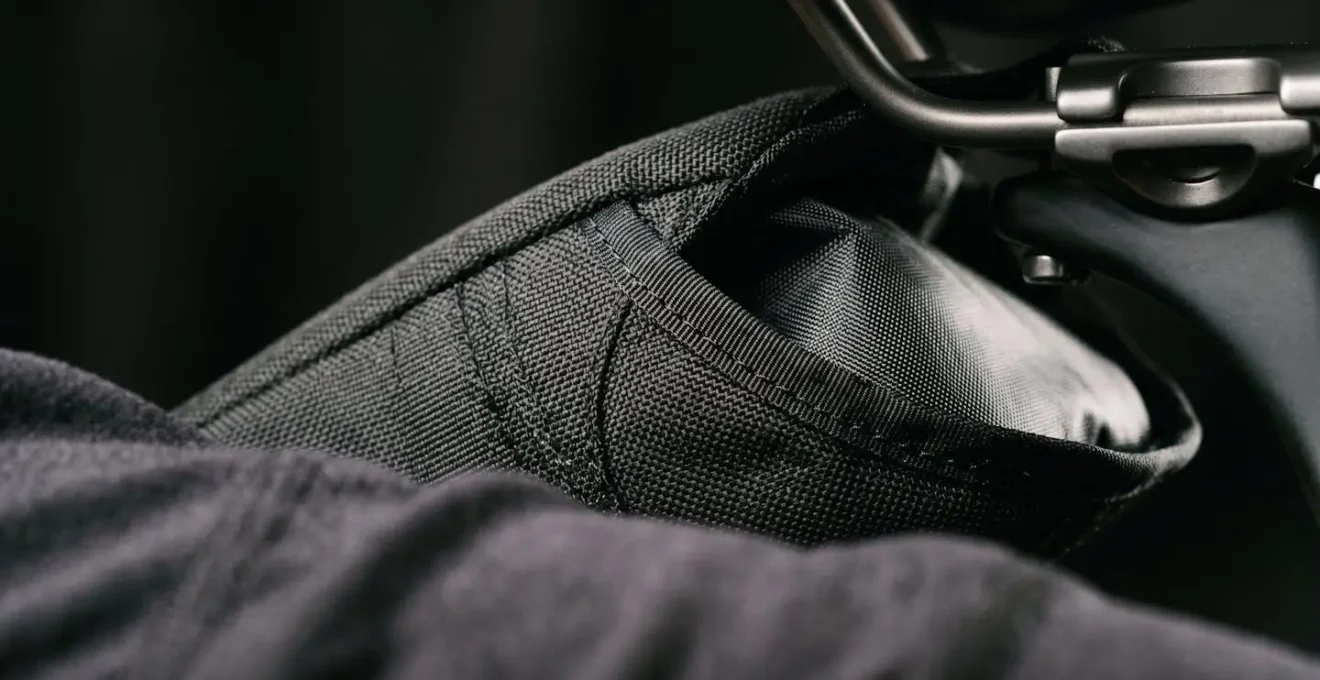
As you can see, the sculptural quality of the bag’s taper is a deliberate design choice. It is engineered to prevent any contact with the rider, preserving both comfort and expensive cycling kit. This is a non-negotiable feature for any style-conscious cyclist.
The « Burrito » Roll: How to Wrap Tools to Save Space?
Once you’ve selected a bag with the right mount and profile, the next discipline to master is load optimisation. Simply throwing your spares into a bag is a recipe for rattling and inefficient use of space. The « Burrito Roll » is a classic technique that transforms a loose collection of items into a dense, silent, and compact bundle. This method not only saves precious space in a small bag but also prevents tools from clanking against each other or puncturing your spare tube.
The principle is simple: use the spare tube as the « tortilla » to wrap the « fillings »—your other tools. This method requires a specific order of operations for maximum effectiveness and protection.
- Prepare the Tube: Lightly inflate the spare tube so it holds a round shape, then fold it. Start by folding it in half, then in thirds, pressing out all the air as you go. The goal is a compact rectangle with the valve stem tucked neatly inside a fold.
- Create the Core: Place your tyre levers on one side of the folded tube. On top of the levers, place your CO2 cartridge(s). This hard core will be the center of your roll.
- Protect from Punctures: Place your multi-tool on the opposite side of the folded tube. Crucially, ensure that no sharp edges from the tool are in direct contact with the tube’s rubber. You can wrap the multi-tool in a small piece of cloth (or a single rubber glove) for extra protection if needed.
- The Roll: Tightly roll the tube around the levers and CO2, creating a dense log. As you roll, the multi-tool on the other side will be incorporated into the bundle.
- Secure the Bundle: Use a strong rubber band, a Velcro strap, or an old toe strap to cinch the burrito tightly. The bundle should be firm to the touch with no loose parts.
This tightly packed burrito can now be inserted into your saddlebag. It will not rattle, and the tube is shielded from the sharp edges of the multi-tool. This systematic approach to packing is the difference between a noisy, disorganized mess and a silent, professionally prepared tool kit that integrates perfectly into a minimalist storage solution.
Zip Seepage: Why Your Multi-Tool Rusts Inside « Waterproof » Bags?
You’ve invested in a bag labelled « waterproof, » yet after a ride in the rain, you open it to find a pool of water and a rusting multi-tool. This common and frustrating experience highlights a critical misunderstanding in cycling storage: the difference between « water-resistant » and truly « waterproof. » The primary point of failure is almost always the zipper. Even so-called « waterproof » zippers are merely water-resistant and will eventually fail under sustained rain.
A standard zipper, by its very nature, is a series of interlocking teeth. Water can and will be forced through these tiny gaps by pressure and time. Coated or « aqua-guard » style zippers offer better protection against splashes and light showers, but even these are not infallible. Industry analysis shows that water will inevitably seep through after just 10-15 minutes in heavier, persistent rain. This is more than enough time for your precious steel tools to get soaked.
For a cyclist who rides in all conditions, understanding the formal ratings for weather integrity is essential. The Ingress Protection (IP) rating system provides a standardized measure of an enclosure’s ability to resist water. For cycling bags, this is the only language that matters.
| IPX Rating | Protection Level | Real-World Performance for Cyclists | Closure Type |
|---|---|---|---|
| IPX4 | Splash resistant | Light rain and splashes; water seeps through after 10-15 min in heavy rain | Zipper bags (typical max) |
| IPX5 | Water jets from any direction | Minimum for « waterproof » label; handles downpours but not submersion | Coated zippers or roll-top |
| IPX6 | Powerful water jets | Gold standard for cycling; protects in severe downpours from any angle | Seam-welded roll-top |
| IPX7 | Immersion up to 1m for 30 min | Best for outdoor/water sports combination use; total immersion protection | Welded seams + roll-top |
As the table shows, a truly waterproof solution for all-weather cycling demands an IPX6 rating or higher. This level of protection is virtually impossible to achieve with a zipper. The gold standard is a roll-top closure combined with welded seams. This system, borrowed from dry bags used in watersports, creates a continuous, impenetrable barrier against water ingress. If you are serious about keeping your tools dry, ignore the marketing claims and look for two things: an IPX6 rating and a roll-top closure.
Jersey Pockets vs Saddlebag: Which Is Better for Centre of Gravity?
The eternal debate for the minimalist roadie: carry spares in the jersey pockets or use a saddlebag? For many, the pockets seem like the default choice to preserve the bike’s clean lines. However, from a performance and handling perspective, this is often the inferior option. The decision hinges on a fundamental principle of physics: the centre of gravity (CG). For optimal handling, weight should be kept as low and as close to the bike’s centre as possible.
When you load your jersey pockets with a tube, multi-tool, and phone, you are placing that weight high up and on the rider’s body. This raises the combined CG of the rider-bike system, which can subtly but noticeably impact stability, especially during out-of-the-saddle efforts like climbing or sprinting. The weight is also « unsprung, » meaning it moves with your body, not with the bike. A compact, well-secured saddlebag, by contrast, places the same weight much lower and directly on the sprung mass of the bicycle frame, contributing to a more stable and planted feel.
Beyond handling, there is an aerodynamic consideration. While a sleek saddlebag is designed to be aero-neutral, items in a jersey pocket often are not. A phone creating a blocky shape or a poorly folded gilet can disrupt airflow. Wind tunnel testing has demonstrated this effect; in one telling experiment, a flapping rain jacket created 8% more wind resistance than a baseline setup, a significant penalty. A well-packed pocket is better, but a well-designed saddlebag is often best.
The conceptual illustration below shows the clear difference in weight placement and its effect on the bike’s dynamics.
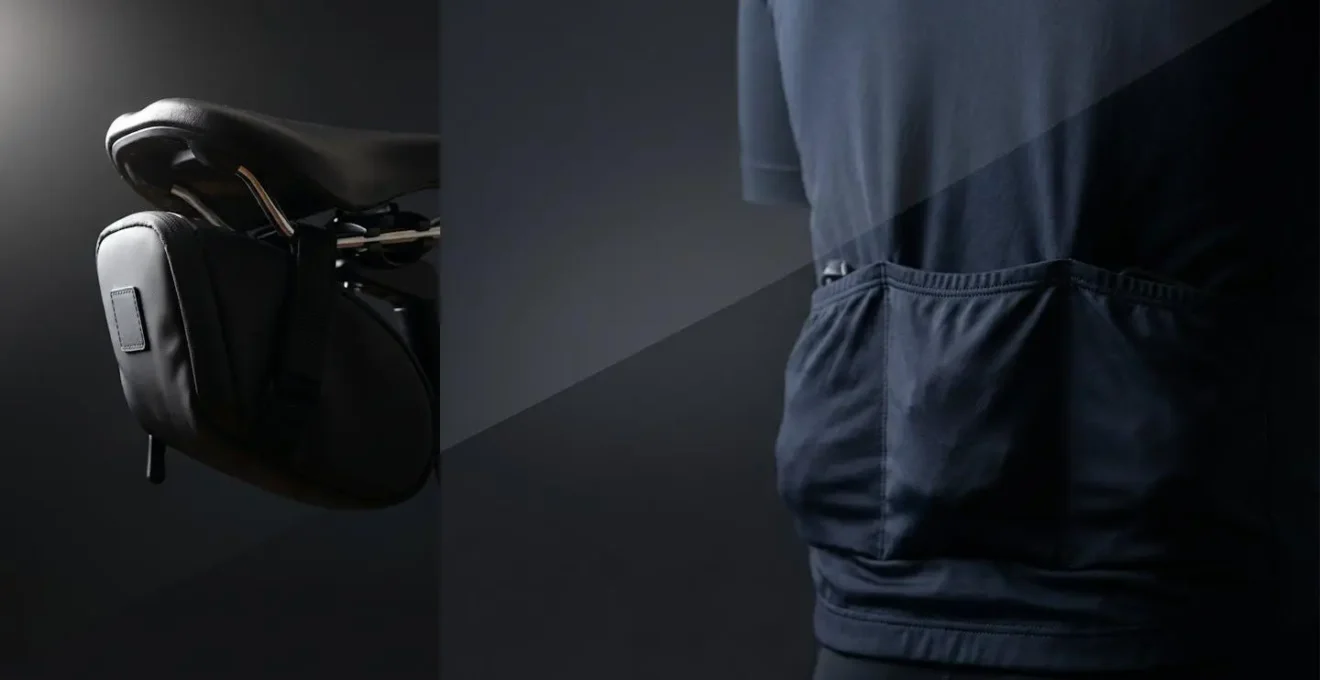
The image visualizes the core concept: the saddlebag anchors the weight low on the bike’s chassis, while pocket storage elevates it, creating a pendulum effect that can compromise handling. Therefore, from a pure performance standpoint, a secure, low-profile saddlebag is the superior choice. It optimizes the centre of gravity and can offer an aerodynamic advantage over bulky pockets.
Pocket Storage: How to Fold a Gilet to Fit in a Jersey Pocket?
Even with an optimized saddlebag for tools, some items, like a packable gilet or rain cape, will inevitably end up in a jersey pocket. The goal here is the same as with tool storage: compression and stability. A loosely stuffed gilet is bulky, uncomfortable, and can act like a small parachute. Mastering the art of the jersey pocket fold transforms a gilet into a dense, small packet that sits snugly at the base of the pocket without bouncing.
Almost all high-quality packable outer layers are designed to be folded this way, often using one of their own pockets as a built-in stuff sack. The method is consistent across most garments.
- Lay It Flat: Lay the gilet or jacket face down on a clean, flat surface. Smooth out any wrinkles.
- Fold the Sides: Fold the left and right sides of the gilet inward towards the center. The goal is to create a long, neat rectangle that is approximately the width of your center jersey pocket. Tuck the arms in neatly if it’s a jacket.
- The Roll/Fold: Starting from the collar, tightly roll or fold the gilet downwards towards the hem. The tighter the roll, the smaller the final package will be. Be methodical and apply even pressure.
- Use the Stuff Pocket: As you approach the bottom, you will encounter the pocket (usually the center rear pocket or an internal one). If it has a double-sided zipper, this is your stuff pocket. Once the gilet is fully rolled, invert this pocket around the bundle, effectively swallowing the entire rolled-up garment.
- Final Compression: Zip the pocket closed. You should be left with a dense, rectangular packet. Give it one final squeeze to expel any remaining air before placing it in your jersey pocket.
This technique prevents the gilet from unfurling mid-ride and keeps it from creating an unsightly bulge. A properly folded gilet takes up minimal space, leaving room for nutrition, and maintains the clean lines of your jersey, proving that even pocket storage can be approached with precision and style.
The « Stuff Sack » Method: How to Compress Clothes into Tiny Spaces?
For longer rides or bikepacking adventures where you need to carry more than just a gilet, mastering large-scale compression is essential. The principles are the same as with small items—eliminate air and create density—but the techniques are adapted for bulkier gear like insulated jackets or off-bike clothing. While the term comes from backpacking, the methods are directly applicable to optimizing space in any cycling bag.
The most counter-intuitive but effective technique is to sometimes ditch the stuff sack that came with your gear. Compressing items directly into your main bag can fill voids more efficiently. However, for true compression and organization, a systematic approach is required. The key is understanding that air is your enemy and leverage is your friend.
Applying these techniques ensures that you are using every cubic centimeter of available space, allowing you to carry more in a smaller, more stable bag. True load optimisation is about thinking of your bag not as a container, but as a mould that you fill with densified, airless essentials.
Your Action Plan: The Art of Compression
- Assess Your Needs: Only use waterproof stuff sacks for truly critical items (like down layers) if your main bag isn’t fully waterproof. For everything else, compress directly into the bag to save weight and space.
- Select the Right Gear: Recognize that down and modern synthetic insulation compress far more effectively than fleece or cotton. Choose your layers based on their packed volume-to-warmth ratio.
- Apply the ‘Body Weight Vacuum’: Place your soft goods in the bag, leaving the opening slightly ajar. Press down with your full body weight to force all trapped air out, then quickly seal the bag shut to create a vacuum-packed effect.
- Pack with a Plan: Place your most compressible items (clothing, jackets) into your largest bags (like a seat pack) where bulk is more acceptable, keeping heavier, denser items closer to the bike’s frame.
- Roll, Don’t Stuff: For individual clothing items, tightly rolling them into small logs before placing them in the bag is more space-efficient and reduces wrinkles compared to simply stuffing them in.
These methods, born from the demands of ultra-distance cycling, can be scaled down to perfect the packing of any saddlebag or frame bag, ensuring a tight, stable, and surprisingly capacious load.
Key Takeaways
- Stability is paramount: A multi-point attachment system using a Boa dial or a rail-wing design is aesthetically and functionally superior to a single, loose Velcro strap.
- Shape dictates comfort and cost: A narrow, tapered bag that avoids the « friction zone » of your inner thighs is the only way to prevent damage to expensive bib shorts.
- True waterproofing is a system, not a label: Zippers will eventually leak. For all-weather peace of mind, an IPX6-rated bag with a roll-top closure and welded seams is the only reliable solution.
Panniers vs Bikepacking Bags: What Works Best for a Wet Weekend in Wales?
While the style-conscious road cyclist would shudder at the thought of fitting panniers, examining the choice between traditional panniers and modern bikepacking bags offers a powerful lesson in aerodynamics and stability. It’s a macro-level view of the same principles we apply to a minimalist saddlebag. Understanding why the bikepacking world overwhelmingly chose soft bags over racks and panniers reinforces the core tenets of integrated storage.
Panniers, which hang off a rigid rack, are notoriously un-aerodynamic. They present a large, flat surface to the wind, acting like a pair of air brakes. Field testing confirms this intuition, revealing a 6.5% speed penalty for panniers compared to a bikepacking setup at a moderate speed. This is a massive loss, stemming from the same principles that make a flapping gilet slow you down: poor aerodynamic integration.
Bikepacking bags, in contrast, are designed to fit within the bike’s existing profile. A seat pack tucks in behind the rider, a frame bag sits in the main triangle, and a handlebar roll sits in the slipstream of the hands. This creates a far more streamlined and stable system that fundamentally respects the bike’s form and function.
Case Study: Bikepacking Bags vs. Panniers on Versatility and Weather Protection
Modern bikepacking setups using soft bags have proven advantages over traditional rack-and-pannier systems. As noted in gear analyses, bikepacking bags create a more streamlined and stable setup with significantly better aerodynamics. Because no rack mounts are required, they fit a far wider range of bikes, from road to gravel. For a wet weekend, the choice becomes nuanced. While panniers with full-coverage fenders historically offered superior protection from wheel spray, modern waterproof bikepacking bags with welded seams (IPX6+ rated) now provide equivalent or superior weather protection when properly sealed, without the aerodynamic or weight penalty of a rack.
The lesson for the roadie is clear. The industry’s shift towards bikepacking bags is a validation of the core principles: lighter weight, better aerodynamics, and improved handling through a lower, more central mass. Whether you’re packing for a weekend in Wales or carrying a single tube for a Sunday loop, the goal is the same: the load should conform to the bike, not the other way around.
You now possess the technical knowledge to solve the storage problem with elegance and precision. It is no longer a choice between preparedness and style. By focusing on a stable mount, an ergonomic profile, and meticulous packing, you can create a storage system that is both functionally flawless and aesthetically invisible. Now, apply these principles to your own setup and restore the clean, purposeful aesthetic your machine deserves.