Success on a wet UK tour isn’t about choosing panniers or bikepacking bags; it’s about building a complete system to prevent catastrophic failure from moisture and instability.
- Handling is paramount: a front-biased bikepacking load (approx. 37% front) improves stability on slippery gravel, unlike traditional rear-heavy pannier setups.
- Waterproofing is a system: roll-top closures offer superior rain defence for critical gear, while accessible ‘micro-airlock’ feed bags manage snacks and wet items separately.
Recommendation: Prioritise a modern bikepacking bag setup for its superior handling on rough terrain and adopt a system-based approach to waterproofing every component, from bag closures to frame protection.
The classic image of a touring cyclist often features a bike laden with four bulky panniers. It’s a time-tested setup, promising cavernous storage for epic journeys. But picture this: you’re on a steep, winding lane somewhere in the Cambrian Mountains, the tarmac is slick with persistent drizzle, and a crosswind is doing its best to push you into the hedge. In this moment, the debate between traditional racks and modern bikepacking bags becomes intensely practical. The question is no longer just « which holds more? » but « which system will keep my gear dry and my bike upright? ».
Many guides will offer a simple trade-off: panniers for volume, bikepacking bags for aerodynamics and off-road agility. While true, this advice barely scratches the surface when facing the realities of a self-supported tour in a place like Wales, where the weather is a character in its own right. True weather protection is not just about a bag’s fabric; it’s about its closure system, its placement on the bike, and how you, the rider, interact with it. The real key to a successful, dry, and enjoyable trip is to stop thinking in terms of individual items and start thinking about a holistic ‘failure-proofing’ system.
This guide moves beyond the generic pros and cons. We will dissect the critical components of a wet-weather touring setup, treating your entire loadout as an integrated system designed to combat two primary enemies: moisture ingress and dynamic instability. We’ll explore how load placement dictates handling on treacherous surfaces, which closure systems are truly dependable in a downpour, and the small but vital details that prevent your trip from being ruined by a soaked sleeping bag or a rubbed-through frame.
To navigate these critical decisions, we have broken down the essential elements of a truly waterproof and stable touring setup. This detailed analysis will guide you through each component of your packing strategy, ensuring you are prepared for whatever the Welsh weather throws at you.
Summary: Panniers vs Bikepacking Bags: What Works Best for a Wet Weekend in Wales?
- Handlebar Roll vs Rear Seat Pack: How Does Load Affect Handling?
- Roll-Top vs Zips: Which Closure System Actually Keeps Sleeping Bags Dry?
- The « Stuff Sack » Method: How to Compress Clothes into Tiny Spaces?
- Helicopter Tape: How to Stop Straps from Rubbing Paint off Your Frame?
- Feed Bags: Why You Need Cockpit Storage for Snacks and Electronics?
- Gore-Tex vs Proprietary Membranes: Is the Brand Name Worth the Extra Cost?
- Clip-on vs Bolt-on Mudguards: Can You Keep Dry on a Race Gravel Bike?
- Wild Camping Rules in England vs Scotland: Where Can You Legally Sleep?
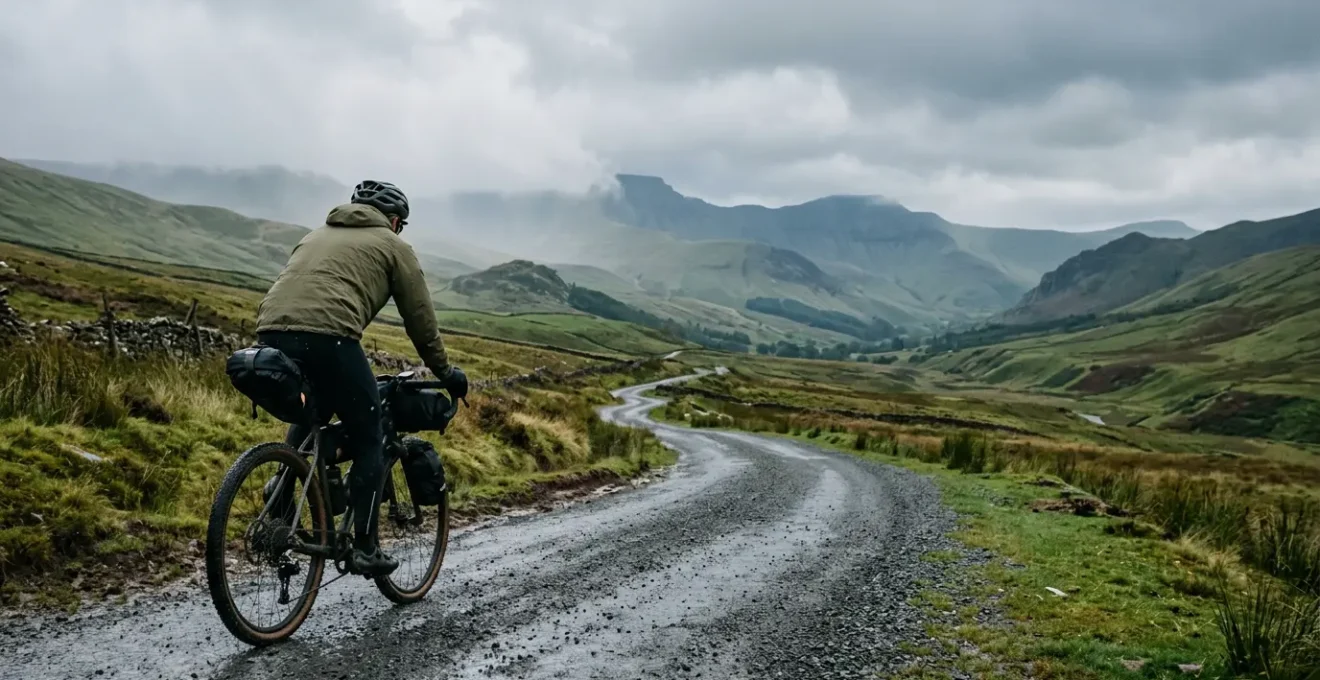
Handlebar Roll vs Rear Seat Pack: How Does Load Affect Handling?
The most immediate difference you’ll feel between panniers and bikepacking bags is not weight, but the effect of its placement on handling. Traditional touring setups, with large rear panniers, create a high and rearward centre of gravity. This is generally stable on smooth roads but can lead to a ‘tail wags the dog’ effect on rough or slippery descents. Bikepacking setups, by contrast, distribute the load more centrally and offer the crucial option of significant front loading via a handlebar roll.
For the mixed terrain of a Welsh tour—gravel tracks, broken tarmac, steep climbs—a front-biased load is a significant advantage. A detailed analysis of different setups on mountain terrain revealed that front-heavy configurations, with 4-6kg in a handlebar roll, markedly improve performance and stability on gravel and dirt. The weight over the front wheel helps it track more predictably and reduces understeer on loose corners. However, this comes with a caveat: overloading the front can induce dynamic instability, or ‘shimmy’, at speeds above 30km/h. For optimal balance, experienced guides recommend a distribution that places a significant, but not excessive, portion of the weight up front; a recent analysis suggests a balanced distribution of roughly 37% front, 15% mid-frame, and 48% rear is ideal for stability.
As the image illustrates, the goal is to lower and centralise the bike’s centre of gravity. A handlebar roll and a frame bag achieve this far more effectively than high-mounted panniers. A large rear seat pack, while common, should still carry lighter, bulkier items (like a sleeping bag or insulated jacket) to avoid the same rear-heavy instability that plagues pannier systems. On a wet Welsh road, this balanced handling can be the difference between a controlled turn and a sudden loss of traction.
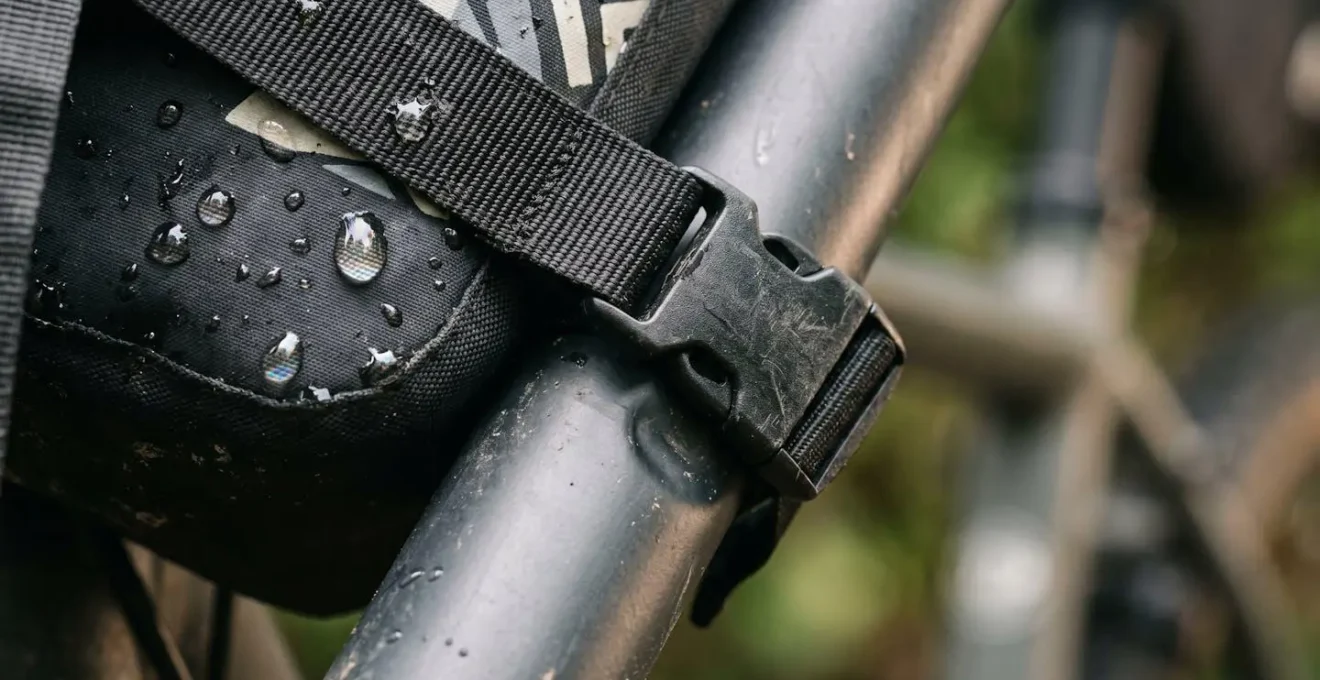
Roll-Top vs Zips: Which Closure System Actually Keeps Sleeping Bags Dry?
Once your gear is correctly positioned, the next line of defence is the bag’s closure. This is a point of critical failure. A bag made from the most advanced waterproof fabric is useless if its opening allows moisture ingress. The two dominant systems are the classic roll-top and the modern waterproof zip. While zips offer convenience, for dependability in a persistent downpour, the roll-top is mechanically superior.
As the Backpackies Equipment Review Team explains, the simple physics of a roll-top closure are its greatest strength:
The folding down of the fabric creates a natural waterproof barrier, and when paired with waterproof fabric, you get a waterproof seal with no way for moisture to sneak in.
– Backpackies Equipment Review Team, Roll Top vs Zipper Backpack Visual Guide
This system has no mechanical parts to fail. Waterproof zips, while highly effective when new and properly maintained, introduce vulnerabilities: they can jam with grit, the teeth can misalign, and their waterproof coating can degrade. For the primary compartments holding your non-negotiable dry gear—your sleeping bag and spare clothes—a roll-top design provides the highest degree of certainty against rain. Zippers are better suited for pockets or bags where quick access is more important than absolute, submersible-level protection.
This table from Rugid Gear provides a clear breakdown of the trade-offs, which become even more pronounced when considering use with cold, wet hands.
| Feature | Roll-Top Bags | Zippered Bags |
|---|---|---|
| Waterproofing Reliability | Superior rain protection; prone to leaking when submerged | Modern waterproof zippers provide high submersible protection |
| Durability | No zipper = less chance of failure; no maintenance required | Zippers may jam or break; require maintenance for longevity |
| Access Speed | Slower – must unroll entire top each time | Faster – unzip for quick access to specific items |
| Wet-Gloved Usability | Difficult with cold, wet hands and gloves | Easier operation with gloves |
The « Stuff Sack » Method: How to Compress Clothes into Tiny Spaces?
With a stable load and waterproof bags, the next challenge is space. Bikepacking bags are notoriously less voluminous than panniers, making efficient packing essential. The key is not to fold, but to stuff. Rolling clothes tightly is a common tip, but for bulky, compressible items like down jackets, sleeping bags, and merino layers, the « stuff sack » method is far more effective. This involves aggressively cramming items into a compression sack to eliminate every pocket of dead air.
The process is simple but requires commitment. Start by shoving handfuls of your sleeping bag or jacket into the very bottom of the sack. Don’t pre-roll it, as this traps air. As you stuff, use your body weight by kneeling on the sack to force air out. The goal is to create a dense, uniformly packed cylinder. The right sack is also important: use a sack with external compression straps for high-loft items like down, and a simpler air-purge sack (where you roll it to squeeze air out a one-way valve) for denser items like clothing. Packing experts have found that by using this technique, especially with dedicated compression cubes, up to 30% more clothing can fit into the same space.
This method has a secondary benefit for wet-weather touring. A properly compressed stuff sack acts as an additional layer of water resistance. Even if some moisture gets past your main bag’s closure, it has a much harder time penetrating a densely packed, water-resistant nylon stuff sack. A crucial final step: never store your gear compressed long-term. As soon as you get to your stop for the night, unpack your sleeping bag and jacket to allow the insulation to loft. Storing them compressed permanently damages their insulating properties.
Helicopter Tape: How to Stop Straps from Rubbing Paint off Your Frame?
A modern bikepacking setup has one major drawback that panniers avoid: frame abrasion. The constant, micromovement of gritty, wet straps against your bike’s paintwork can rub through the clear coat and even the paint in a single weekend. The solution is simple and used across the cycling industry: protective frame tape, often called « helicopter tape » for its original use on rotor blades.
This isn’t just any tape. It’s a thick, durable, and clear urethane film that acts as a sacrificial layer. A comprehensive field test of seven protective tapes found that an 8 mil (0.2mm) thickness provides sufficient protection for most bikepacking contact points, while thicker 14 mil (0.36mm) versions are better for high-impact areas like the down tube or chainstays. The most critical finding from this testing, however, was in the application. For a bubble-free finish that adheres perfectly to curved tubes, you must use a ‘wet application’ method. Misting the frame and the adhesive side of the tape with a solution of soapy water allows you to slide the tape into the perfect position before squeegeeing out the water and bubbles.
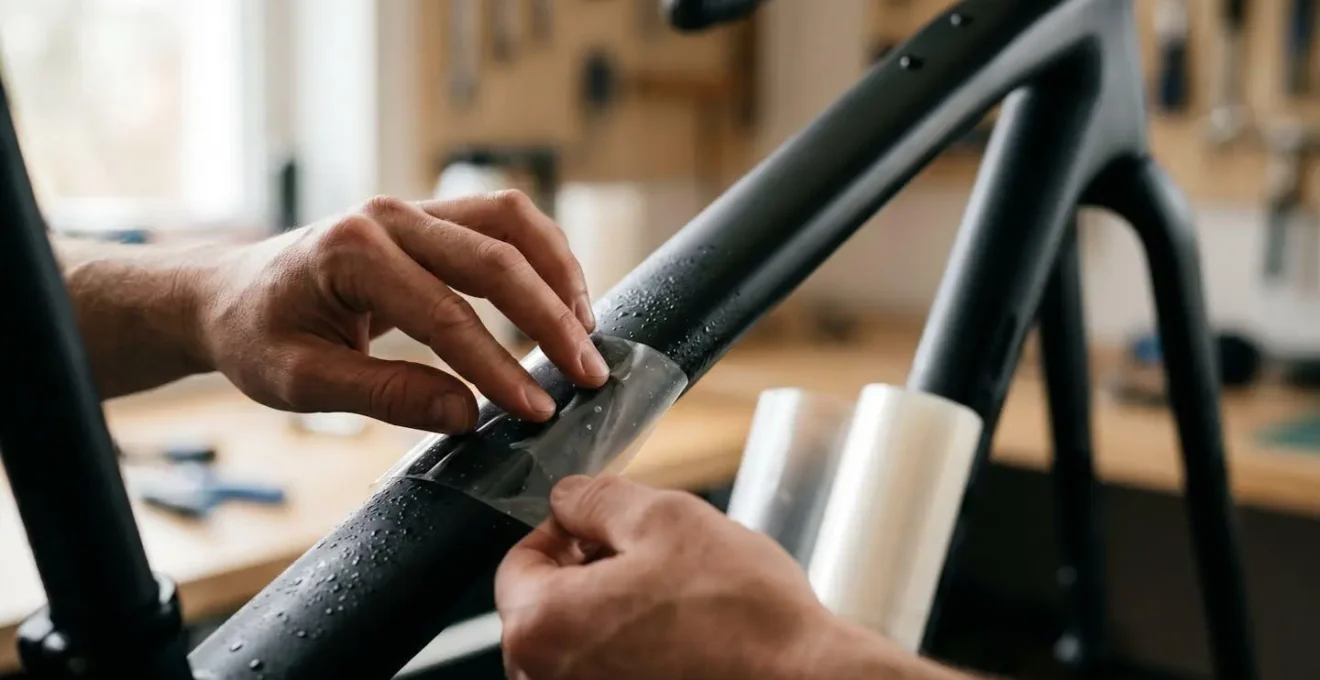
Before you even think about mounting your bags, you need to perform a thorough audit of your frame to identify all potential friction points. This goes beyond the obvious strap locations and is a non-negotiable step in preparing your bike for a trip.
Your Pre-Trip Frame Protection Checklist
- Identify Strap Contact Points: Check every spot on the top tube, down tube, head tube, and seat stays where bag straps will cinch down.
- Trace Cable Housing Paths: Note where brake and shifter cables will be pushed against the frame by bags, especially around the head tube.
- Protect Component Contact Points: Apply tape to the seatpost (for a seat pack) and handlebars (for a handlebar roll and feed bags) to prevent abrasion.
- Guard High-Wear Areas: Apply tape to the exterior of chain and seat stays to prevent chips from transport or leaning the bike against walls.
- Consider Knee-Rub Zones: Identify areas on the top tube where shorts, often covered in grit, will rub against the frame during climbs.
Feed Bags: Why You Need Cockpit Storage for Snacks and Electronics?
On a cold, wet day, stopping to rummage through a large seat pack for a snack is the fastest way to lose body heat and morale. This is where dedicated cockpit storage—small bags that mount to your handlebars and stem, often called « feed bags »—becomes an essential part of your wet-weather system. Their primary purpose is to keep fuel and essential electronics immediately accessible without compromising your main waterproof storage.
This isn’t just about convenience; it’s about performance. A case study in an REI guide on bikepacking packing strategies highlighted a key finding: riders using cockpit storage maintained far more consistent energy levels. The accessibility of food directly prevents « bonking » (a severe energy crash) on long climbs. By keeping a few hundred calories within arm’s reach, you can fuel continuously rather than waiting until you’re already feeling depleted.
In the context of a Welsh tour, these small bags serve another, more subtle purpose. They act as ‘micro-airlocks’ for your entire system. When you need to grab your phone for a quick photo, you’re not exposing your dry sleeping bag to the rain. When you finish a snack, the wrapper goes into the feed bag, not back into a clean pack. This discipline of separating the ‘frequently accessed’ and ‘potentially wet’ items from your critical ‘must stay dry’ gear is fundamental to successful wet-weather touring. A feed bag can be the designated zone for your phone, a small battery pack, and the day’s supply of snacks, sealed away from the elements but accessible in seconds.
Gore-Tex vs Proprietary Membranes: Is the Brand Name Worth the Extra Cost?
Your bag system is only one half of the waterproof equation; the other is the gear you’re wearing. When it comes to waterproof jackets and trousers, the market is dominated by Gore-Tex and a host of brands’ own proprietary membranes (like Patagonia’s H2No or Rab’s Proflex). The question for a tourer on a budget is whether the Gore-Tex brand name justifies its premium price. The answer lies not in the brand, but in the measurable performance metrics.
To be considered truly waterproof, a fabric must have a minimum Hydrostatic Head (HH) rating, which measures how much water pressure it can withstand before leaking. A basic waterproof jacket might have a rating of 10,000mm. However, for the kind of sustained, wind-driven rain you can expect in Wales, you should be looking for a rating of over 20,000mm. The second critical metric is breathability, or Moisture Vapour Transmission Rate (MVTR), measured in g/m²/24h. Cycling is a high-output activity; if your jacket doesn’t let your sweat escape, you’ll get soaked from the inside. A basic rating is 10,000 g/m², but for active use, you need over 15,000 g/m².
Gore-Tex has built its reputation on consistently delivering high performance on these metrics, but many proprietary fabrics now meet or exceed these standards, often at a lower cost. Instead of shopping by brand, shop by the numbers. A jacket’s spec sheet is your best friend. The following table breaks down the key metrics you need to look for when choosing gear for a truly wet environment.
This comparative data, adapted from an analysis of waterproof material performance, shows what to look for when your gear’s performance is non-negotiable.
| Performance Metric | Benchmark Standard | Welsh Deluge Requirement |
|---|---|---|
| Hydrostatic Head (HH) | 10,000mm minimum waterproof | >20,000mm for sustained heavy rain |
| Moisture Vapour Transmission Rate (MVTR) | 10,000 g/m²/24h basic breathability | >15,000 g/m²/24h for active cycling |
| DWR Coating Longevity | 20-30 washes typical | Requires reapplication every 15-20 uses in wet conditions |
| Seam Construction | Taped seams standard | Fully taped + welded seams critical |
| Critical Features | Basic waterproofing | Helmet-compatible hood, waterproof zips, stiffened peak |
Clip-on vs Bolt-on Mudguards: Can You Keep Dry on a Race Gravel Bike?
One of the most miserable aspects of riding in the wet isn’t the rain from above, but the constant, gritty spray from your own wheels. Mudguards (or fenders) are the only effective solution. For a traditional touring bike with dedicated eyelets, full-length, bolt-on mudguards are the gold standard, offering maximum protection. But many modern gravel and all-road bikes, designed with a « race » or minimalist ethos, lack these mounting points. Can you still stay dry?
The answer is yes, but with compromises. For bikes without eyelets, your only option is a set of clip-on mudguards. These typically attach to the seatpost at the rear and the down tube or fork legs at the front using rubber straps or clips. Their main advantage is versatility; you can fit them to almost any bike in minutes. However, their coverage is inherently less complete than their bolt-on counterparts. They are often shorter and sit further from the tyre, allowing more spray to escape around the sides.
For a wet weekend, a good set of clip-on mudguards is far better than nothing. They will stop the worst of the spray from soaking your backside and blasting your feet. Look for models that offer the longest possible coverage, especially at the rear. Some advanced clip-on systems, like the SKS Speedrocker, are specifically designed for gravel bikes with wider tyres and offer coverage that rivals bolt-on options. The trade-off is often a more complex installation and higher cost. Ultimately, while bolt-on mudguards remain superior, a well-chosen set of clip-ons is an essential, non-negotiable piece of equipment for keeping morale high during a Welsh deluge.
Key Takeaways
- A bikepacking bag setup with a front-biased load offers superior handling and stability on the slippery, varied terrain typical of the UK.
- For critical gear like sleeping bags, a roll-top closure provides a more mechanically reliable waterproof seal than a zipper in persistent rain.
- Frame protection tape is not optional; it’s essential to prevent strap abrasion from damaging your bike’s paint on even a short tour.
Wild Camping Rules in England vs Scotland: Where Can You Legally Sleep?
After a long day battling headwinds and rain, finding a place to sleep is the final piece of the self-supported puzzle. The UK has a patchwork of laws regarding « wild camping » (camping outside of a designated campsite), and understanding the differences between the home nations is critical to staying on the right side of the law. The most important distinction is between Scotland and the rest of the UK.
In Scotland, the Land Reform (Scotland) Act 2003 establishes a right to roam, which includes the right to wild camp. This means you can camp on most unenclosed land, provided you do so responsibly. This involves following the Scottish Outdoor Access Code: stay away from buildings, roads, and historic structures; leave no trace; and do not light open fires. There are some local exceptions, particularly in the Loch Lomond & The Trossachs National Park, where camping is restricted to designated permit areas during peak season.
The situation in England and Wales is the complete opposite. Here, all land is privately owned, and there is no legal right to camp without the landowner’s explicit permission. Camping without permission is a form of civil trespass. While it is often tolerated in remote, upland areas (like Snowdonia in Wales or the Lake District in England) if campers are discreet and respectful (« arrive late, leave early, leave no trace »), you are technically breaking the law. The only place in England with a de-facto right to wild camp was Dartmoor National Park, though recent legal challenges have complicated this. For a tour in Wales, the official rule is clear: you must seek the permission of the landowner before pitching your tent.
Now that your bike is packed, protected, and you know the rules of the road (and the field), you have a complete system for a successful tour. The final step is to put this knowledge into practice by meticulously planning your route and gear based on these principles.