The key difference between wild camping in Scotland (legal) and England (illegal without permission) is less a barrier and more a guide to adopting a better ethos: responsible invisibility.
- In Scotland, the right to camp comes with strict responsibilities under the Outdoor Access Code.
- In England, while technically requiring permission, a culture of tolerated camping exists in upland areas if you are discreet and leave no trace.
Recommendation: Focus not on what is strictly legal, but on mastering the craft of low-impact, ethical camping. This approach keeps you right with the law, landowners, and nature, wherever you ride in the UK.
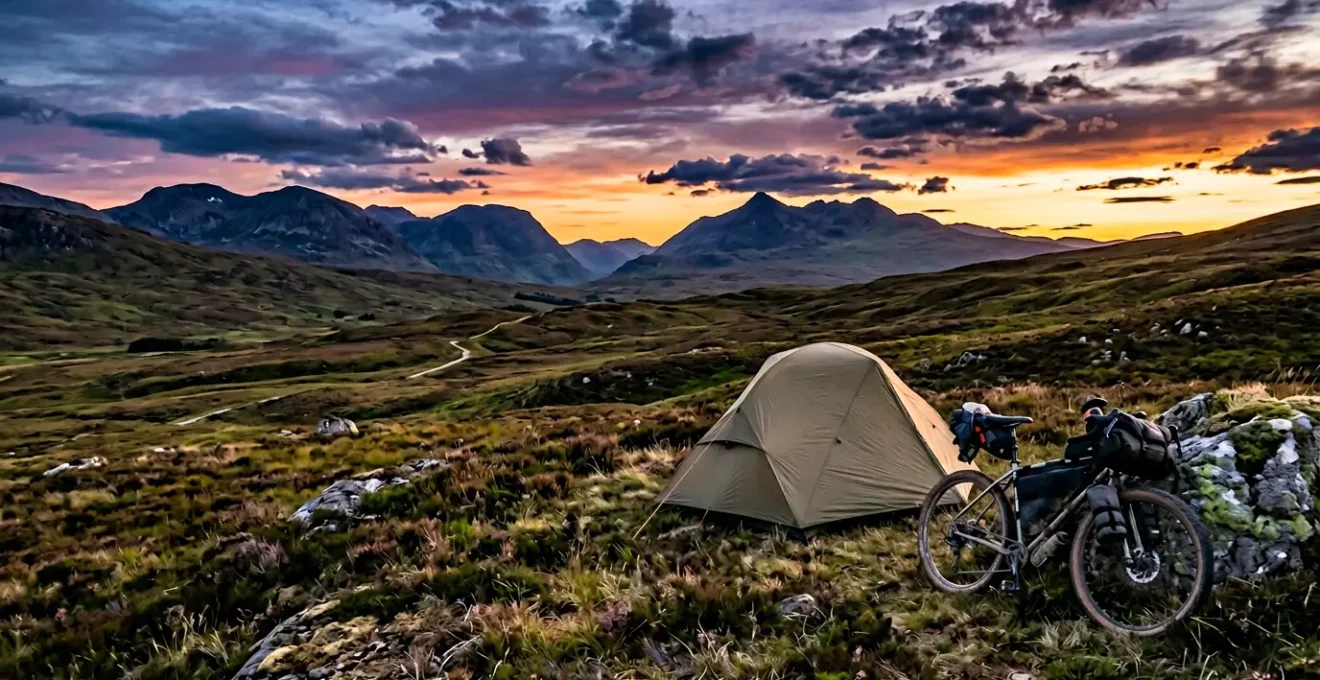
The dream for many bikepackers is simple: ride all day through stunning landscapes and, as dusk settles, find a quiet spot to unroll a sleeping bag under the stars. Yet, for an aspiring adventurer in the UK, this dream quickly collides with a confusing patchwork of laws. You hear that wild camping is a celebrated right in Scotland but a form of trespass in England and Wales. The common advice— »just get the landowner’s permission »—sounds simple but feels impractical when you’re self-supported and on the move.
This confusion often leads to a cycle of uncertainty and missed opportunities. Many guides simply state the black-and-white rules or offer generic « Leave No Trace » advice. They tell you *what* the law is, but not *how* to navigate its grey areas as a cyclist. They fail to address the practical skills and, just as importantly, the mindset required to camp respectfully and without causing issues, regardless of which side of the border you find yourself on.
But what if the legal distinction isn’t a wall, but a signpost pointing towards a better way of travelling? This guide adopts a different perspective. The true key to successful wild camping in the UK isn’t just knowing the law; it’s mastering the craft of responsible invisibility. It’s about understanding the philosophy of land access and developing the on-the-ground skills to become a temporary, unnoticed guest in the landscape. This approach transforms legal constraints into a framework for a deeper, more respectful adventure.
We will explore the crucial differences in land access rights, but more importantly, we will delve into the practical tactics that make a good wild camper. From dealing with waste and choosing gear to scouting hidden spots and overcoming the fear of your first solo night, you will learn how to operate ethically and confidently, turning that dream of a perfect bikepacking overnight into a repeatable reality.
Summary: A Bikepacker’s Guide to Legal and Ethical Wild Camping in the UK
- Cat Holes and Fire Rings: How to Camp Without Angering Landowners?
- The « Arrive Late Leave Early » Rule: How to Stealth Camp Unnoticed?
- Bivy Bag or Ultralight Tent: Which Is Better for Wet UK Nights?
- Google Earth Scouting: How to Find Hidden Camp Spots Before You Ride?
- Fear of the Dark: How to Overcome the Anxiety of Your First Solo Wild Camp?
- Church Taps and Graveyards: Where to Find Water in Remote UK Villages?
- Green Exercise: Why Riding in Woods lowers Cortisol More Than Roads?
- Planning a Self-Supported Coast to Coast: Logistics and Supplies for 3 Days?
Cat Holes and Fire Rings: How to Camp Without Angering Landowners?
The foundation of ethical wild camping isn’t just about not being seen; it’s about leaving no evidence you were ever there. This principle is paramount everywhere, but it carries legal weight in England where your presence is conditional on the landowner’s goodwill. The reason for this strictness is simple: most land in England is privately owned, and a landowner’s primary concerns are damage to their property, disturbance to livestock, and the risk of fire. Showing you understand and mitigate these risks is the first step in being a responsible visitor.
The two biggest signifiers of an irresponsible camper are poorly managed human waste and the scars left by campfires. A « cat hole » for solid human waste is non-negotiable. This must be dug 15-20cm deep and, crucially, be located at least 30 metres away from any water source to prevent contamination. Toilet paper should be packed out, not buried. As for fires, the advice is even simpler: don’t have one. The risk of peat fires in moorland or woodland fires is too high. A modern, lightweight stove is far more efficient, safer, and leaves absolutely no trace on the ground.
This ethos of « leave it better than you found it » extends to your pitch. Avoid digging drainage channels or moving rocks and logs to create a flat spot. Instead, use your scouting skills to find a naturally suitable location. By adhering to a strict code of conduct, you are not just being a tidy camper; you are actively acting as an ambassador for the entire outdoor community, ensuring that tolerated access in sensitive areas continues.
Action Plan: Leave No Trace for UK Bikepackers
- Plan Ahead & Prepare: Research land ownership and access rights for your specific route before you leave.
- Travel & Camp on Durable Surfaces: Choose rock, gravel, dry grasses, or established trails. Avoid trampling delicate vegetation.
- Dispose of Waste Properly: Dig cat holes 15-20cm deep and at least 30m from water sources. Pack out all litter, including food scraps and toilet paper.
- Leave What You Find: Do not alter the landscape by moving rocks or logs. Leave natural and cultural artifacts as they are.
- Minimize Campfire Impacts: Use a lightweight stove for cooking. Open fires are a significant risk and leave permanent scars.
- Respect Wildlife: Keep noise to a minimum, especially at dawn and dusk. Observe animals from a distance and never feed them.
- Be Considerate of Others: Pitch late (dusk), leave early (dawn), keep group sizes small, and camp well away from buildings and roads.
The « Arrive Late, Leave Early » Rule: How to Stealth Camp Unnoticed?
The mantra « arrive late, leave early » is the golden rule of responsible invisibility, particularly in England and Wales where your aim is to be a fleeting, unnoticed presence. This isn’t about being sneaky or deceptive; it’s a profound act of respect for the landowner and other users of the landscape. The goal is to exist within the quiet margins of the day, causing zero impact or disturbance. For a bikepacker, this means timing your final miles to coincide with dusk, allowing you to find a spot and set up as the light fades.
Stealth is a craft. It begins with your gear: choose muted, earthy colours for your tent, bivy, and bags that blend with the natural environment. When you stop, look for natural cover. A small patch of woodland, a dip in the terrain, or the lee side of a stone wall can make you virtually invisible from a short distance away. Think in three dimensions: you need cover from view from paths, roads, and any nearby farm buildings. Once pitched, keep light and noise to an absolute minimum. Use a headtorch with a red light setting, as it preserves your night vision and is far less conspicuous than a bright white beam.
The « leave early » part is just as critical. Be packed up and ready to ride as the sun rises. This ensures that early morning dog walkers, farmers, or fell runners will pass by without ever knowing you were there. This practice of responsible invisibility is what allows the tradition of tolerated wild camping to persist in areas like the Lake District. By moving like a ghost, you honour the unspoken agreement between the outdoor community and the custodians of the land.
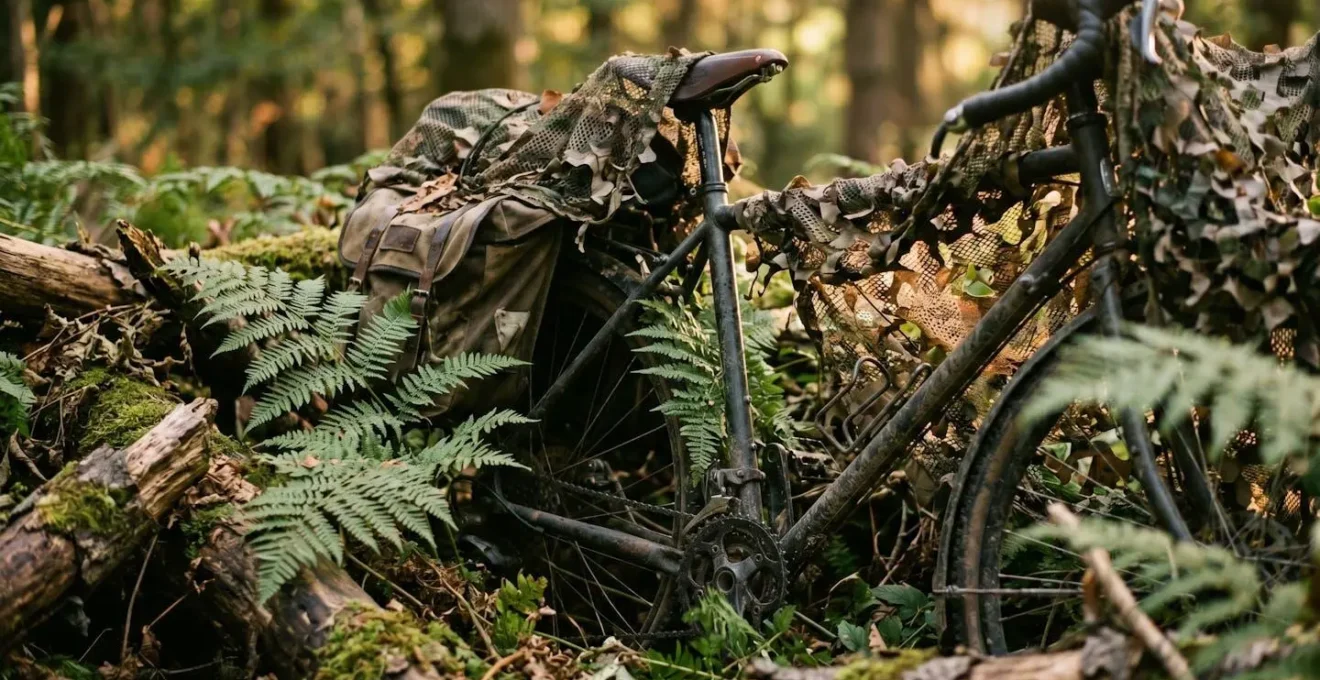
As this image demonstrates, effective concealment uses natural features to break up the bicycle’s silhouette. By tucking your bike and gear behind ferns, logs, or in long grass, you significantly reduce your visual footprint, blending seamlessly into the evening undergrowth. It is a simple but powerful technique in the art of stealth camping.
Bivy Bag or Ultralight Tent: Which Is Better for Wet UK Nights?
Choosing your shelter is one of the most critical decisions for a UK bikepacker. The debate often boils down to the ultimate stealth and minimalism of a bivy bag versus the comfort and protection of an ultralight tent. While a bivy bag seems like the obvious choice for a stealth camper—it’s lighter, smaller, and has almost no visual impact—its performance in the UK’s damp, humid climate can be surprisingly poor.
The primary enemy of a bivy bag user is condensation. Even the most expensive, breathable models will struggle when it’s wet, still, and humid—exactly the conditions when you need protection most. Being sealed in a damp bag with all your gear is not only uncomfortable but can also compromise the insulation of your sleeping bag. An ultralight, one-person tent, especially a double-wall design, provides far superior ventilation, keeping you and your gear dry. It also offers a crucial psychological benefit: a « safe space » to sit up, organise your kit, and escape from the rain and the midges, which are a notorious problem in places like Scotland.
As one experienced user on a UK forum noted, the paradox of the bivy bag is its biggest flaw:
I have found that weather dictates their usefulness, and unfortunately they are at their most useless when you need them most, when it is wet and still and humid they suffer condensation sometimes considerable, when it is dry and breezy you suffer less so.
– Experienced UK bivvy user, BushcraftUK Community Forum
The following table, based on extensive user experience in UK conditions, breaks down the key trade-offs.
| Factor | Bivy Bag | Ultralight Tent |
|---|---|---|
| Condensation Risk | High in wet/humid conditions; all bivy bags suffer condensation regardless of price | Lower with proper ventilation; double-wall tents perform best |
| UK Weather Suitability | Works in reverse: unreliable when wet/humid (when most needed), performs when dry | Consistent performance across conditions; mesh inners can be cold in winter |
| Weight | Lighter (190-500g typical) | Heavier (800-1500g for quality ultralight models) |
| Stealth Factor | Maximum stealth; minimal visual signature | Larger footprint; more visible |
| Setup Speed | Very fast (1-2 minutes) | Fast but slower than bivy (3-5 minutes) |
| Psychological Comfort | Claustrophobic in prolonged rain; limited space | Mental safe space; room to sit up and organize gear |
| Midge Protection | Limited even with bug net; Scottish midges penetrate | Full mesh inner provides complete protection |
Google Earth Scouting: How to Find Hidden Camp Spots Before You Ride?
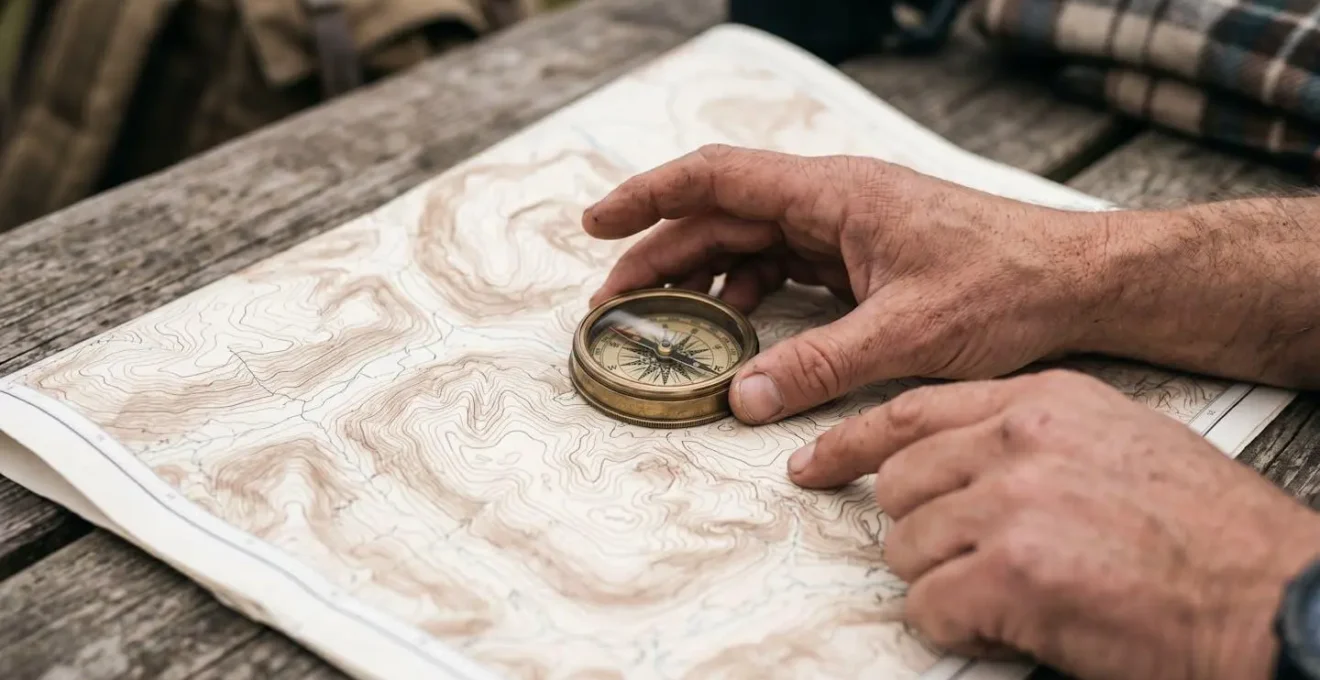
The craft of finding the perfect wild camp spot begins long before you get on your bike. In the digital age, « map reading » has evolved into a multi-layered process of digital scouting. Using a combination of traditional maps and modern satellite imagery, you can identify promising locations with a high degree of confidence, saving you the stress of a frantic search at the end of a long day’s ride. This preparation is a cornerstone of responsible, low-impact camping.
Start with an Ordnance Survey (OS) map, either physical or digital. Look for key features: tightly packed contour lines indicate steep, unsuitable ground, whereas widely spaced contours suggest flat areas. Identify potential water sources marked as ‘Spr’ (springs) or blue lines (streams), and note their position relative to your potential pitch. Most importantly, look for areas of « dead ground »—small dips or hollows—and patches of woodland that are well away from footpaths (marked as green dashes) and buildings.
Next, switch to satellite imagery like Google Earth. This layer allows you to verify what the map suggests. Does that patch of woodland offer good tree cover? Is that flat area actually a boggy marsh? You can check for proximity to roads and dwellings and look for signs of recent human activity. For the ultimate in finding seclusion, use a tool like Strava’s Global Heatmap. By looking for the « cold » or dark areas where few people travel, you can identify zones that are truly off the beaten path, greatly increasing your chances of an undisturbed night.
This combination of traditional map skills and digital verification is a powerful tool. It allows you to build a shortlist of potential spots for each night of your trip, complete with backup options. It turns the uncertainty of finding a spot into a predictable and enjoyable part of the planning process.
Checklist: Multi-Layered Digital Scouting for Bikepackers
- Layer 1 – Ordnance Survey Maps: Identify contours for flat ground, springs (‘Spr’), rights of way, and terrain features like woods or depressions.
- Layer 2 – Satellite Imagery (Google Earth): Check for tree cover, proximity to roads/dwellings, recent landscape changes, and signs of human activity.
- Layer 3 – Access Rights Maps: Verify Forestry Commission land, National Trust areas, Common Land, and Crown Estate boundaries to understand specific access rules.
- Layer 4 – Strava Heatmaps: Identify where people *don’t* go (dark areas) to find secluded spots away from popular routes.
- Spot Quality Check: Cross-reference your potential spots against key criteria: water source, cover from view, flatness, and distance from roads (200m+).
- Digital Ethics: Never share specific wild camp coordinates publicly. Use private settings on route-sharing apps to protect sensitive locations.
Fear of the Dark: How to Overcome the Anxiety of Your First Solo Wild Camp?
For many aspiring wild campers, the biggest hurdle isn’t the law or the gear—it’s the psychological challenge of spending a night alone in the wild. The fear of the dark, of strange noises, and of an unexpected knock on the tent is real and can be intense. However, it’s crucial to separate perceived fears from real dangers. The most significant risks in UK wild camping are objective and manageable: hypothermia, getting lost, or being caught in severe weather. The fear of strangers or wildlife is, by comparison, almost entirely unfounded.
As Sam Jones, a campaigns officer for Cycling UK, reassuringly puts it, the UK landscape is safer than our imagination often suggests:
Until rewilding takes off in the UK, there aren’t any beasties to worry about. However, by the time you set up camp most folk are at home, and are not inclined to leave it. You might be woken by the inquisitive damp nose of a dog, but usually you will find you’re up early and on your way home before you encounter anyone.
– Sam Jones, Cycling UK Campaigns Officer, Why you should try wild camping – Cycling UK
The key to overcoming this anxiety is not to ignore it, but to build confidence progressively. Instead of jumping in at the deep end with a multi-day solo trip in a remote area, use a « stair-step » method to gradually expand your comfort zone. Each step builds familiarity and self-reliance in a controlled way, proving to yourself that you are capable and that your fears are manageable. Another powerful technique is sensory acclimatisation. When you first settle in for the night, close your eyes for 15-20 minutes and just listen. Consciously identify every sound—the wind in the trees, a distant sheep, the rustle of a small animal. By naming and demystifying the sounds of the night, you transform a scary, unknown environment into a familiar, living landscape.
Your Plan: The Stair-Step Method to Solo Confidence
- Step 1 – Garden Practice: Camp in your own garden to master your gear setup and sleep in your system in a completely safe environment.
- Step 2 – Quiet Campsite Solo: Spend a night alone at a formal, quiet campsite. This gets you used to being solo but with the safety net of facilities and other people nearby.
- Step 3 – Known Spot with a Friend: Go wild camping with a trusted companion to a well-researched, safe location to build positive associations.
- Step 4 – Same Spot Solo: Return to that exact same location by yourself. The familiar terrain will provide a huge confidence boost.
- Step 5 – New Location Solo: Now you are ready to venture to a new, well-scouted wild camping spot, equipped with proven skills and hard-won confidence.
Church Taps and Graveyards: Where to Find Water in Remote UK Villages?
For a self-supported bikepacker, water is life—and weight. Carrying enough for a full day or more is impractical, so the ability to find reliable water sources is a crucial skill. While you can filter from streams and rivers in upland areas (always a good backup), navigating the rural lowlands requires a different strategy. Remote UK villages, which may lack shops, often have a surprising number of publicly accessible taps if you know where to look. This knowledge of the « unconventional water map » can be the key to a successful multi-day trip.
Your first and most reliable port of call is often the village church. Many churches have an outside tap, usually for watering plants in the graveyard. These are almost always potable water. Approach respectfully—avoid filling up during a service—and consider leaving a small donation in the church collection box if you can. Village halls, community centres, and even public toilets are other likely sources. Pubs are another great option; the correct etiquette is to go in and buy something small (a packet of crisps or a soft drink) before politely asking the staff if they would mind refilling your bottles. This small act of goodwill almost always results in a positive response.
When you are sourcing water from natural features like streams or springs (marked ‘Spr’ on an OS map), it’s vital to do so responsibly. Always collect water upstream from any farmland or human settlements. To protect the ecosystem, it’s also important to camp and manage waste well away from water. The Scottish Outdoor Access Code offers a clear guideline, recommending you stay 30+ metres from water where possible. Regardless of your source, carrying water purification tablets or a filter is a lightweight, non-negotiable piece of backup equipment.
Action Plan: The Unconventional Water Map of Rural UK
- Churches & Graveyards: Look for outside taps used for groundskeeping. Be respectful and quiet.
- Village Pubs: Establish goodwill by buying a small item first, then politely ask for a water refill.
- Village Halls & Community Centres: Check for outside taps near entrances or kitchen areas.
- Public Toilets: Many rural facilities have external taps, but always check cleanliness before using.
- Livestock Farmers: If you see a farmer, ask permission to use a farm tap. They are often helpful to respectful cyclists.
- OS Map Springs: Look for ‘Spr’ markings on your map, indicating natural springs, ideally located above any farmland.
- Emergency Protocol: Always carry water purification tablets as a non-bulky backup for any situation.
Green Exercise: Why Riding in Woods Lowers Cortisol More Than Roads?
The physical benefits of cycling are well-documented, but the true magic of bikepacking lies in its profound psychological impact. The simple act of moving through a natural landscape—what scientists call « green exercise »—has a measurable effect on our mental state. Research has shown that exercising in nature, compared to urban environments, leads to greater reductions in stress, anger, and depression. For a cyclist, this translates to a simple truth: an hour spent riding through woodland will lower your stress hormone, cortisol, far more effectively than an hour on a busy road.
This effect is amplified by practices that encourage sensory immersion. The Japanese practice of *Shinrin-yoku*, or « forest bathing, » can be adapted for the bike to turn a ride from mere exercise into a meditative practice. It’s about slowing down and consciously engaging all your senses. Stop for five minutes in a quiet wood. Close your eyes and listen to the birdsong and the wind. Pay attention to the scent of damp earth and pine needles. Observe the way sunlight filters through the canopy, creating shifting patterns on the trail ahead. This deliberate, mindful approach deepens the connection between you and the environment.
Case Study: Forest Bathing (Shinrin-yoku) for Bikepackers
The practice of Japanese forest bathing, adapted for bikepackers, demonstrates that slowing one’s pace and engaging all five senses while riding through woodland creates measurable stress reduction. The method involves stopping for 5-minute listening sessions, focusing on earth scents, and observing light filtering through leaves. This reframes the ride from simple exercise to a powerful meditative practice. UK cyclists who adopt this sensory immersion approach report sustained psychological benefits and a feeling of calm that lasts long after the ride has ended.
Wild camping is the ultimate extension of this principle. By immersing yourself in nature for a full 24-hour cycle, from dusk through the night to dawn, you compound these mental health benefits. As Cycling UK aptly puts it, « It’s well known cycling helps you unwind – add some wild camping and you’ll stay that way for much longer. » It’s not just a night outdoors; it’s a reset for the mind.
Key Takeaways
- UK wild camping legality is split: permissible in Scotland under the Outdoor Access Code, but requires landowner permission in England/Wales.
- The best approach everywhere is « responsible invisibility »: arrive late, leave early, use muted gear, and leave absolutely no trace.
- Practical skills like digital scouting for spots, finding rural water sources, and managing anxiety are more important than the gear you carry.
Planning a Self-Supported Coast to Coast: Logistics and Supplies for 3 Days?
Putting all these skills together for a multi-day, self-supported trip like a Coast to Coast requires one final layer: robust logistical planning. A successful three-day adventure isn’t just about having the right gear; it’s about having a plan for when things go wrong. The UK’s famously fickle weather and the remoteness of its best routes mean you must plan for self-sufficiency while also building a « bail-out » safety net.
This safety net involves identifying key exit points and resources along your planned route for each day. Before you set off, map the nearest train station or bike-friendly bus route for each leg of the journey. Note alternative accommodation options like pubs with rooms or youth hostels in case severe weather makes camping untenable. Critically, check the opening times of village shops and pubs, as many in rural areas have limited hours, especially on Sundays or mid-week. Share this bail-out plan with an emergency contact so someone knows where you’re supposed to be and what your backup options are.
Your packing should reflect this modular approach. Organise your gear into systems: a sleep system (shelter, mat, bag), a cooking system (stove, fuel, pot), a layering system for all weather (base layer, waterproofs, windproofs), and a bike repair kit. This ensures you can quickly access what you need. As Outdoor Girl’s guide to UK wild camping mentions, even where it’s tolerated, there’s a specific etiquette: « It’s usually above the highest fell wall, out on the open hills. » This type of terrain demands you pack for « four seasons in one day, » with merino wool and reliable waterproofs being essential. Your energy plan should be just as structured: high-energy snacks for riding, a proper meal for recovery in the evening, and enough calories to fuel the next day’s effort.
Action Plan: The Bail-Out Route Safety Net Strategy
- Day 1 Planning: Identify the nearest train station or bike-friendly bus route within 10km of your planned route.
- Day 2 Planning: Map alternative accommodation (pubs with rooms, hostels) as backup options if weather deteriorates.
- Day 3 Planning: Note village shop and pub opening times, being aware of early closing days and limited Sunday service in rural UK.
- Communication Plan: Share your daily route and bail-out points with an emergency contact. Check for mobile signal blackspots.
- Modular Packing: Organize gear into ‘Sleep System’, ‘Cooking System’, ‘Layering System’, and ‘Bike Repair Kit’ modules for efficiency.
- UK Weather Strategy: Pack for the ‘4 seasons in one day’ reality. Merino base layers, waterproofs, and wind protection are essential.
- Energy Plan: Plan for high-energy snacks while riding, a substantial lunch, and a calorie-dense evening meal for recovery.
By combining legal awareness, ethical principles, and practical skills, you can move beyond the confusion and confidently plan your own wild camping adventures. The next logical step is to start scouting a route for your first solo overnight trip, putting these strategies into practice.