
Choosing between a gravel and a cyclocross bike for a British winter comes down to a single principle: how each is designed to either shed or survive mud.
- Gravel bikes prioritize generous clearance, stability, and cargo versatility for long, gritty days on unpredictable terrain.
- Cyclocross bikes prioritize aggressive, nimble handling and lightweight efficiency for short, intense, hour-long races on prescribed courses.
Recommendation: For all-day epics, multi-day bikepacking, and surviving the variable filth of UK bridleways, the gravel bike’s superior clearance and stability is the clear winner. For pure, unadulterated, hour-of-power mud-plugging speed, the CX bike retains its specialist edge.
There’s a specific, soul-crushing sound every British off-road cyclist knows: the grinding scrape of clay-laden tyre against frame. It’s the moment your forward momentum is stolen by the very ground you’re trying to conquer. When faced with this gritty reality, the debate between a gravel bike and a cyclocross bike becomes intensely practical. The internet is full of advice, often boiling down to simple platitudes: « gravel bikes are more versatile, » or « CX bikes have more aggressive geometry. » While true, this advice often misses the crucial point for a UK rider.
The real difference isn’t just found in a geometry chart; it’s revealed in the physical interaction between the machine and the uniquely cloying, abrasive mud of a British winter. It’s about the « grinding paste » that eats components for breakfast and the « mud shelves » that build up, adding kilograms to your bike. The question isn’t just which bike is « better, » but which is fundamentally better engineered to handle the specific challenges of our wet, gritty island.
This article moves beyond the spec sheet to dissect the small engineering choices that have massive practical consequences when the trail turns to slop. We will analyse how tyre patterns interact with mixed terrain, why a few millimetres of chainstay clearance is the difference between riding and walking, and how drivetrain choices affect not just your speed, but your sanity. By understanding these deeper mechanical truths, you can finally decide which drop-bar machine is the right tool for your winter battles.
To navigate this muddy debate, we will break down the crucial differences component by component and concept by concept. The following summary provides a direct path to the sections that matter most to you, from the contact patch on the ground to the logistics of a multi-day adventure.
Summary: Gravel vs Cyclocross for British Winter
- File Tread vs Mud Spikes: What Tyre Pattern Works for Mixed Terrain?
- Chainstay Clearance: Why It Matters When Riding in Clay Soil?
- 1x vs 2x Drivetrains: Is a Single Ring Enough for Road Sections?
- Bottom Bracket Height: Why CX Bikes Feel Twitchier Than Gravel Bikes?
- Clip-on vs Bolt-on Mudguards: Can You Keep Dry on a Race Gravel Bike?
- Helicopter Tape: How to Stop Straps from Rubbing Paint off Your Frame?
- The 1mm Rule: How to Check Pad Thickness Without Removing the Wheel?
- Planning a Self-Supported Coast to Coast: Logistics and Supplies for 3 Days?
File Tread vs Mud Spikes: What Tyre Pattern Works for Mixed Terrain?
The first point of contact with the mud is your tyre, but the « best » tread is a trap. A British winter ride rarely stays on one surface; you’ll transition from tarmac lane to muddy bridleway, grassy field, and rocky double-track. Aggressive, spiky mud tyres, essential for deep cyclocross mud, create significant drag on harder surfaces. As the Schwalbe Tire Technology Team notes, « Tall lugs and wide gaps usually have a detrimental effect on rolling resistance. » This is where the gravel bike’s philosophy begins to show its strength.
Many gravel riders opt for a semi-slick or file tread pattern in the centre for speed on roads and hardpack, with more aggressive shoulder knobs that only engage when you lean into a muddy corner. This compromise is key. Furthermore, the ability to run wider tyres (40-45mm is common on gravel bikes vs the 33mm UCI limit for CX) allows for lower pressures. It’s a common misconception that higher pressure is always faster. Off-road, lower inflation pressure reduces rolling resistance on rough surfaces by allowing the tyre to deform over obstacles rather than being deflected by them. This creates a smoother, faster, and more comfortable ride.
For a typical UK winter route, a fast-rolling centre tread with grippy shoulders offers the best blend of performance. The CX-specific mud spike is a specialist tool, best saved for the race course it was designed for, not a three-hour tour of the chilly, mixed-terrain countryside.
Chainstay Clearance: Why It Matters When Riding in Clay Soil?
If there is one single metric that defines a bike’s ability to handle British winter mud, it is clearance. Not just tyre clearance, but system clearance: the space around the tyre at the fork, the seat stays, and most critically, the chainstays. Clay soil, common across the UK, has a unique talent for packing into a solid, wheel-stopping mass. This is where the design philosophies of gravel and cyclocross diverge most dramatically.
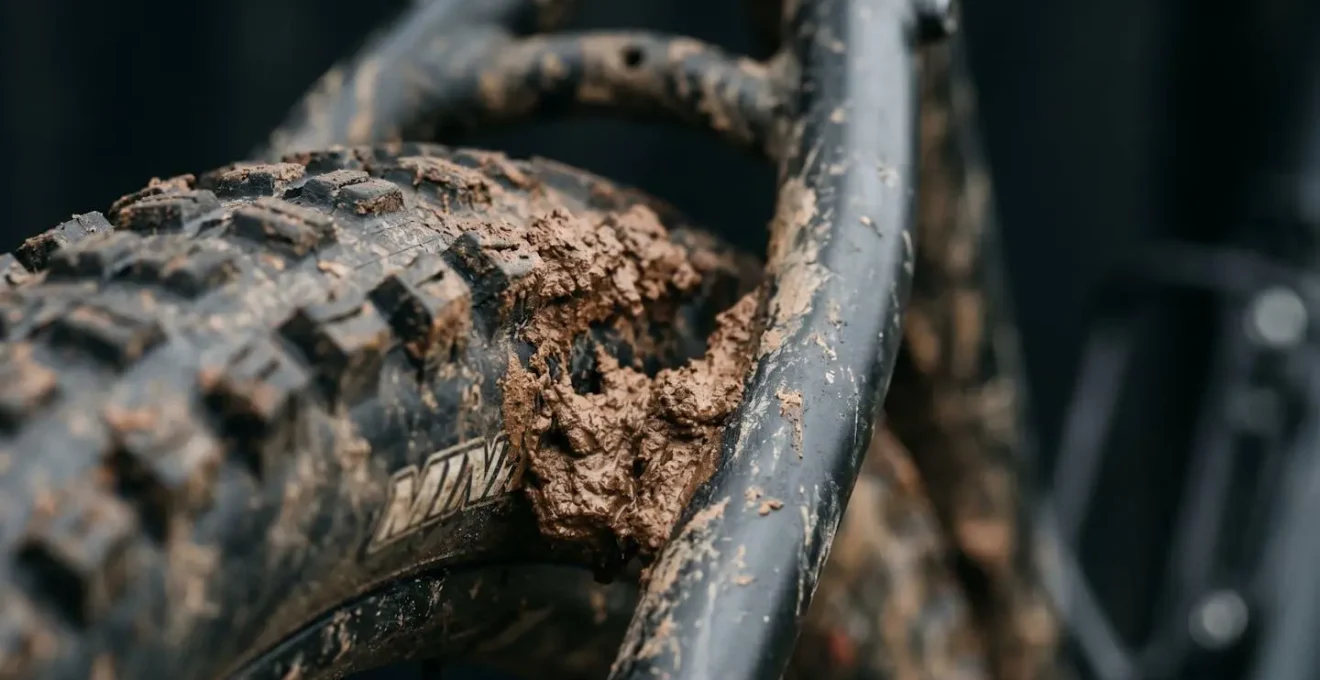
A cyclocross bike is designed for a 60-minute race. Its clearances are built to accommodate a 33mm tyre and just enough mud to finish that hour. A modern gravel bike, however, is designed for all-day self-sufficiency. Its chainstays are often longer and shaped to create a vast cavern around a 45mm tyre or larger. This extra space isn’t just for wider tyres; it’s a dedicated mud-shedding zone. When sticky mud and trail debris get picked up by the tyre, a gravel bike gives it a place to go and be flung off. On a tight-clearance CX frame, that same mud gets compacted between the tyre and frame, grinding your progress to a halt.
While no official standard exists, industry standards recommend 8-10mm of clearance around the tyre for muddy conditions. Most gravel bikes achieve or exceed this, while many older CX bikes fall short. When you’re miles from home and your rear wheel refuses to turn, you’ll understand that those few extra millimetres are the most important feature on your bike.
1x vs 2x Drivetrains: Is a Single Ring Enough for Road Sections?
The debate between a single front chainring (1x) and a double (2x) is fierce, but in winter conditions, practical reliability often trumps marginal gains. The primary advantage of a 1x system in the mud is simple: no front derailleur. This single change eliminates a major « mud shelf » — a prime location for mud and grass to collect, jam the mechanism, and add weight. The simplicity of never having to worry about a front shift, especially with cold, gloved hands, is a significant practical benefit.
However, this simplicity comes at a cost to range and efficiency. On a typical undulating UK ride with road links, you may find the single ring setup lacking. You might spin out on fast road descents or find the jumps between gears on the wide-range cassette too large to maintain a perfect cadence. Furthermore, lab data shows a clear efficiency cost. The VeloNews research team found, « The 2X drivetrain proved to be more efficient in every gear. » This is due to the less extreme chain angles and larger cog sizes used in a 2x system.
The following data from an analysis on CyclingAbout.com illustrates the trade-offs: while a 2x system is heavier and more complex, it offers lower frictional losses and a wider, more versatile gear range. For riders who value reliability and simplicity in the filth, the 1x is a winter warrior. For those tackling long road sections and wanting to optimize every watt, the 2x system remains mechanically superior, provided you can keep it clean.
| Factor | 1x Drivetrain | 2x Drivetrain |
|---|---|---|
| Average Frictional Loss | 12.24 watts (across 11 gears) | 9.45 watts (across 15 gears) |
| Efficiency Range | 92.4% – 96.0% (avg 95.1%) | 94.8% – 96.8% (avg 96.2%) |
| Weight Savings | 200-400g lighter | Heavier due to front derailleur |
| Mud Reliability | No front derailleur to clog | Front derailleur acts as ‘mud shelf’ |
| Gear Range | Limited high-speed gears | Wider range for varied terrain |
| Replacement Cost | Wide-range cassettes more expensive | Tighter-range cassettes less expensive |
This detailed comparison, sourced from a comprehensive analysis of drivetrain efficiency, shows that the choice is not about which is « better, » but which set of compromises aligns with your riding priorities.
Bottom Bracket Height: Why CX Bikes Feel Twitchier Than Gravel Bikes?
One of the most noticeable, yet least understood, differences in feel between a gravel bike and a cyclocross bike is the sense of stability. A gravel bike often feels « planted » and confidence-inspiring on fast, loose descents, while a CX bike can feel « twitchy » or « agile. » Much of this comes down to the bottom bracket (BB) height.
Cyclocross bikes are designed for a very specific need: to be pedalled through corners at speed and to clear obstacles like barriers or deep ruts. To achieve this, they have a relatively high bottom bracket. This provides more ground clearance, reducing the chance of striking a pedal on the ground when pedalling through a turn. However, a higher BB also raises the rider’s center of gravity. This makes the bike quicker to change direction and more nimble, but also less stable, particularly at speed. It’s what gives a CX bike its famously sharp and responsive handling.
Gravel bikes, designed for long-distance comfort and stability, take the opposite approach. They feature a lower bottom bracket, creating more « BB drop » (the vertical distance between the wheel axles and the BB). A lower BB drops the rider’s center of gravity, placing them ‘in’ the bike rather than ‘on top’ of it. This dynamic stability is a huge asset on long, fatiguing rides over rough surfaces. While a higher bottom bracket on cyclocross bikes improves ground clearance for racing, the lower BB of a gravel bike is a deliberate choice for all-day confidence and control in the real world.
Clip-on vs Bolt-on Mudguards: Can You Keep Dry on a Race Gravel Bike?
The humble mudguard is the unsung hero of British winter cycling. The benefits go far beyond just keeping your backside dry; they protect your drivetrain from the abrasive « grinding paste » of road grit, keep spray out of the eyes of the person riding behind you, and ultimately make riding in the wet more comfortable, meaning you’ll do it more often. The ability to fit proper, full-coverage mudguards is a key differentiator between bike frames.
Case Study: Mudguards and Component Lifespan
MuckyNutz, a specialist mudguard manufacturer, emphasizes that well-designed mudguards reduce spray and protect bike components from mud and grit, which extends component lifespan and maintains performance in wet conditions. Their testing on muddy mountain bike trails and wet gravel tracks demonstrates that mudguards help keep filth and spray under control, directly addressing the functional benefits beyond simply keeping the rider dry.
Most gravel bikes, designed with utility in mind, come with dedicated eyelets on the frame and fork to bolt on full-coverage mudguards. This is the gold standard for wet weather protection. Cyclocross bikes, bred for racing, almost never have these mounts. The same applies to many « race » oriented gravel bikes. For these bikes, your only option is a variety of clip-on or strap-on guards. While better than nothing, these are often less effective, more prone to rattling, and can rub against your frame’s paintwork.
Interestingly, the argument that mudguards slow you down has been challenged. Contrary to popular belief, they can even make you faster. A 2019 SAE Mobilus engineering journal study found a 4.6% reduction in drag with optimally configured mudguards, as they help smooth the airflow around the rotating wheel and tyre. So, choosing a gravel bike with proper mudguard mounts not only keeps you cleaner and protects your components, it might just make your winter base miles more efficient.
Helicopter Tape: How to Stop Straps from Rubbing Paint off Your Frame?
Whether you choose a gravel or a CX bike, if you plan on any self-supported rides, you’ll be using frame bags. The constant, micromovement of straps, especially when coated with gritty winter mud, acts like sandpaper on your frame’s paint job. A brand-new bike can look years old after a single wet, three-day bikepacking trip. The solution is simple, cheap, and essential: frame protection tape, often called « helicopter tape. »
This thick, durable, self-adhesive polyurethane tape was originally designed to protect the leading edges of helicopter rotor blades from erosion. Applying it to your bike frame in high-contact areas is a non-negotiable step before you even think about attaching bags. The key is to be proactive, not reactive. Identify where the top tube bag, frame bag, and seat pack straps will sit and apply generous patches of tape before the first ride. The beauty of this solution is its near-invisibility, especially if you use a matte-finish tape on a matte frame.
Protecting your investment is a crucial part of bike ownership, especially for a machine destined for harsh conditions. Taking 30 minutes to properly apply frame tape will save you from the long-term heartache of a damaged finish and preserve your bike’s resale value.
Action Plan: Pre-emptive Frame Protection
- Identify contact points: Methodically trace where every strap and buckle from your frame bags, lights, and GPS mounts will touch the frame. Pay special attention to the top tube, head tube (cable rub), and seatpost.
- Thoroughly clean the surface: Use isopropyl alcohol and a clean cloth on all identified contact points to remove grease and dirt, ensuring maximum tape adhesion.
- Apply the tape: Cut pieces of helicopter tape larger than the contact area. Apply carefully, starting from one end and smoothing out air bubbles as you go to ensure a clean, secure bond.
- Audit for heel and pannier rub: Specifically on gravel bikes intended for adventure, check the inner surface of the chainstays and seatstays for potential heel rub or contact from pannier bags. Apply tape here as well.
- Create field-serviceable backups: For multi-day winter trips where conditions are extreme, wrap old inner tube sections around the frame under the straps as a cheap, sacrificial, and easily replaceable barrier on top of your tape.
The 1mm Rule: How to Check Pad Thickness Without Removing the Wheel?
Winter’s gritty « grinding paste » of mud and water massively accelerates the wear on your disc brake pads. As experienced riders report, the abrasive slurry requires far more frequent inspection than in dry conditions. Waiting until you hear the tell-tale screech of metal on metal is too late; you’ve already damaged your expensive rotor. The key is regular, quick inspection, and you don’t need to remove your wheel to do it.
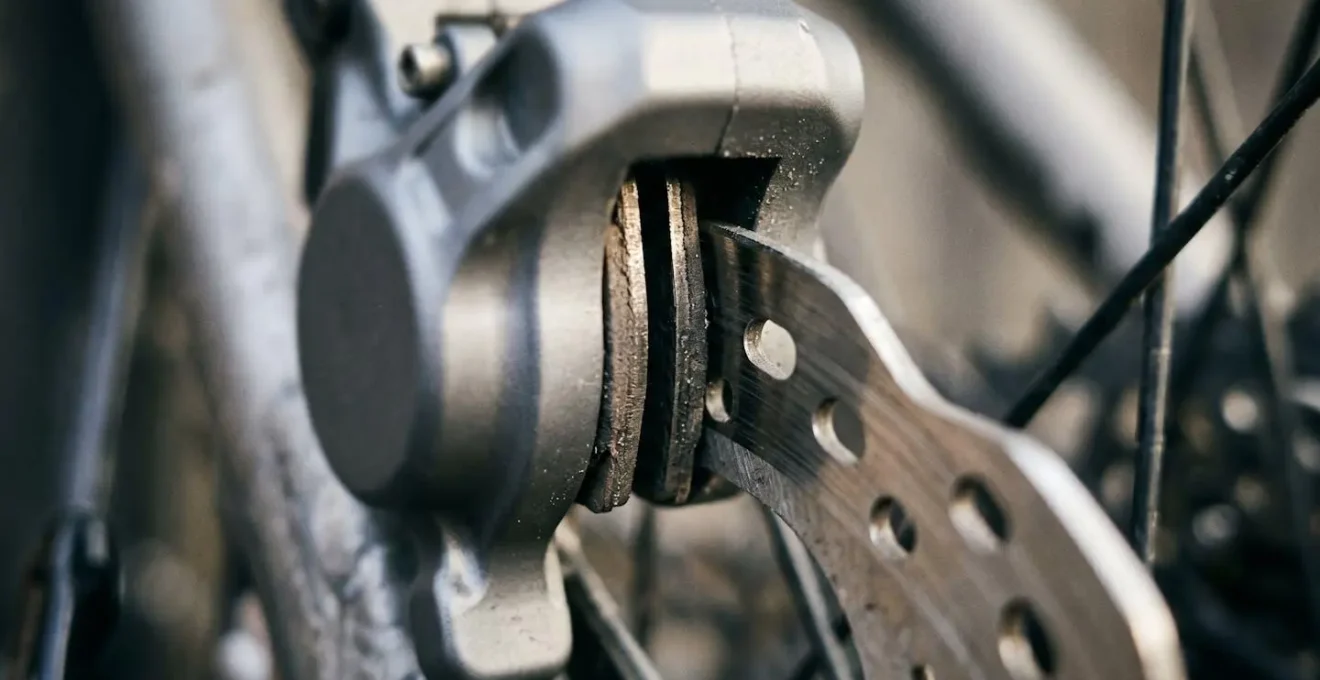
This is where the « 1mm Rule » comes in. Most brake pads start with about 2-3mm of braking material. The absolute minimum safe thickness is around 1mm of total material (pad + spring/backing plate). A simpler and safer rule of thumb is to replace the pads when the braking material itself is down to about the thickness of a credit card (approx 0.76mm). You can check this visually. Get down at eye level with your brake caliper, shine a light from your phone behind it, and look into the gap where the rotor sits. You should be able to see the remaining pad material on either side of the rotor.
Experienced gravel and cyclocross riders consistently report that winter mud creates a grinding paste effect that significantly accelerates brake pad wear compared to dry conditions. The gritty, abrasive mud characteristic of British winter trails acts as an aggressive compound between pad and rotor, requiring more frequent inspection and earlier replacement, particularly when using organic pads rather than sintered metal pads designed for harsh conditions.
– BikeRadar, Gravel bike vs cyclocross bike
If the pad material looks visibly thin, or less than 1mm, it’s time to replace them. Making this quick check a part of your pre-ride routine in winter will save you money and ensure your most critical safety component is always ready to perform.
Key Takeaways
- In sticky British clay, generous frame clearance is a more critical survival feature than any specific tyre tread pattern.
- 1x drivetrains offer game-changing simplicity and reliability in mud, but at a measurable cost to gear range and efficiency compared to 2x systems.
- The « planted » feel of a gravel bike and the « agile » feel of a CX bike are direct results of their different bottom bracket heights, a key design choice for stability vs. nimbleness.
Planning a Self-Supported Coast to Coast: Logistics and Supplies for 3 Days?
When the ambition grows from a single-day loop to a multi-day, self-supported epic like a coast-to-coast ride, the choice between a gravel and CX bike becomes crystal clear. A cyclocross bike, stripped down for lightweight racing, is simply the wrong tool for the job. A gravel bike, on the other hand, is born for this. It’s in the design DNA, from cargo capacity to component choice.
Planning a three-day winter trip requires a focus on robust logistics and redundancy. Your bike is your lifeline, and its ability to carry supplies is paramount. As the EF Education-TIBCO-SVB pro team points out, « Gravel bikes come with mounts for everything—racks, fenders, multiple water bottles, and even bags… Planning a multi-day adventure…Gravel bikes have you covered. » This means you can carry more food, more water, more tools, and more warm layers—all essential when daylight is short and temperatures are low.
Your preparation must account for the unique demands of a UK winter. Reduced daylight means meticulous route planning and powerful lights are non-negotiable. Cold temperatures mean higher calorie burn, so you need to carry more food than you would in summer. Most importantly, you need a robust bail-out plan. Your route should be mapped with train stations and bike-friendly accommodation marked as escape points, and you must have the tools and spares to fix common mechanicals in the field.
- Calculate winter-specific calorie requirements; increase standard intake by 25-30%.
- Plan your route around reduced daylight hours, with powerful lighting and strict daily schedule milestones.
- Build a robust winter toolkit including a spare derailleur hanger, emergency zip ties, and extensive puncture repair supplies.
- Pre-identify bail-out points along the route, marking train stations and bike-friendly accommodations on offline maps.
- Create a laminated emergency contact card with key locations and phone numbers.
- Verify your gravel bike’s cargo capacity: multiple bottle cage mounts, frame bag points, and rack compatibility are essential.
- Test all frame bag and strap configurations before departure to ensure frame protection is adequate.
- Pack winter-specific clothing layers and waterproofs, accounting for the notorious variability of British weather.
Now that you understand the deep-seated design differences, the next step is to honestly assess your own riding. Be realistic about the percentage of time you’ll spend on tarmac versus deep mud, and whether your ambition leans towards hour-long blasts or all-day epics. Choose the tool that best fits the job you’ll actually be doing.