The secret to year-round UK cycling isn’t enduring misery; it’s mastering the active management of your gear and the environment.
- Overheating is a bigger enemy than the cold. Proactive venting is more critical than total waterproofing.
- Anticipating hazards like black ice and crosswinds by ‘reading the road’ is a skill you can learn.
- Your choice of base layer (Merino vs. Synthetic) dictates your comfort during the inevitable café stop.
Recommendation: Shift your mindset from ‘surviving the cold’ to ‘dynamically regulating your temperature’ for a genuinely enjoyable winter season on the bike.
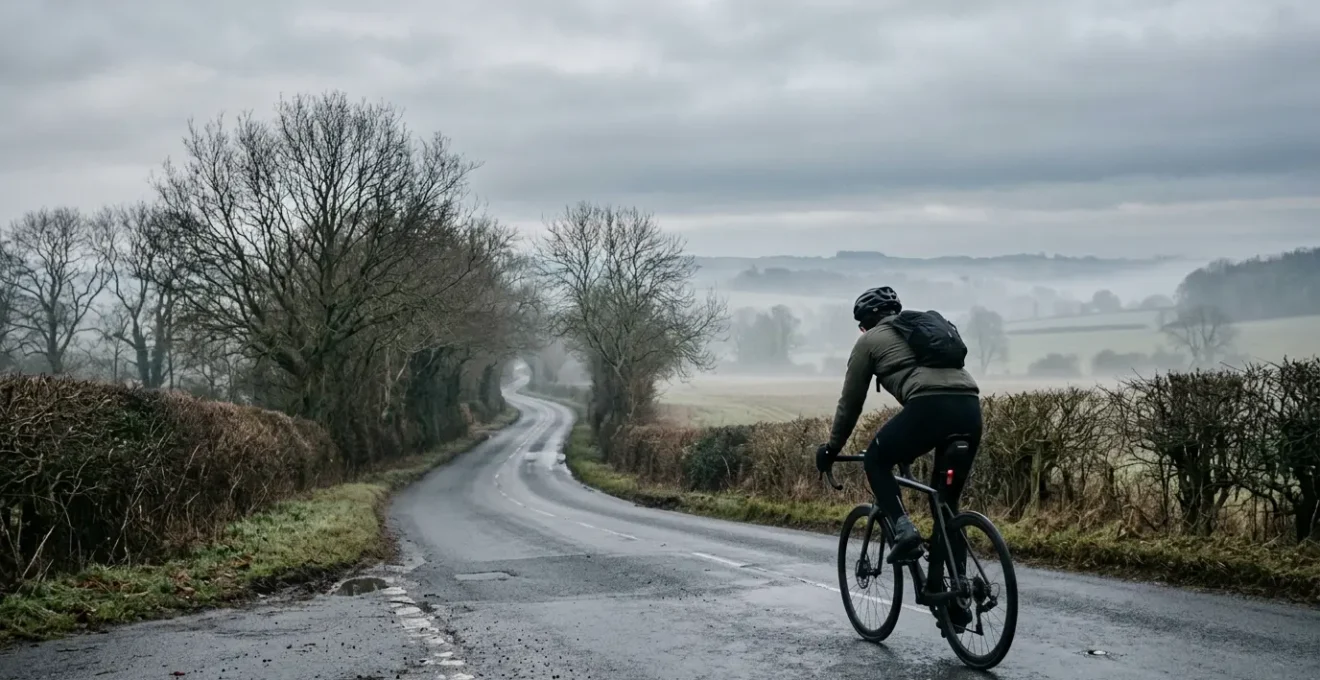
The first crisp autumn morning arrives, and for many fair-weather cyclists, it signals the end. The bike is hung up, the Strava account goes dormant, and a long, gloomy wait for spring begins. The common wisdom for winter riding often feels like a list of chores: « layer up, » « get mudguards, » « use lights. » While true, these tips miss the fundamental challenge of cycling in the UK: the sheer, unpredictable variability of it all. One minute you’re battling a freezing headwind, the next you’re sweating up a climb in a sudden patch of sun.
Most guides focus on a passive approach – buying kit to endure the elements. They tell you to get a waterproof jacket but don’t warn you about the « boil in the bag » effect on a mild, drizzly day. They tell you to be wary of ice but don’t teach you the visual cues that scream « danger ahead » on a dark country lane. This approach is why so many people try winter riding once, have a miserable time, and never do it again.
But what if the key wasn’t passive endurance, but active management? The secret that year-round commuters and hardy club riders know is that winter cycling is a game of constant, small adjustments. It’s about understanding the *principles* behind the gear, not just owning it. It’s about learning to read the environment like a map and tricking your own brain into getting out the door when the window is rattling.
This guide abandons the platitudes. We will dive into the specific, practical hacks that transform winter riding from a miserable slog into a rewarding challenge. We’ll explore how to manage your core temperature, how to handle your bike in treacherous conditions, and how to choose the right tools for the uniquely British combination of damp, cold, and wind.
This article provides a detailed breakdown of the strategies that make a real difference. Below, you will find a summary of the key areas we will cover, from managing body heat to essential bike maintenance for salty roads.
Summary: How to Ride Through a British Winter Without Misery?
- The « Boil in the Bag » Effect: How to Avoid Overheating in Rain Jackets?
- Neoprene Overshoes: Do They Actually Keep Feet Dry or Just Warm?
- Echelon Riding: How to Draft Safely in a Group on Windy Days?
- Black Ice Detection: How to Spot Danger Zones Before You Crash?
- The 10-Minute Rule: How to Trick Your Brain into Riding in the Rain?
- The 3-Layer System: How to Adjust for Wind Chill Without Overheating?
- Wet vs Dry Lube: Which Stops Your Chain Turning Black in Summer?
- Merino vs Synthetic: Which Base Layer Handles 10°C Temperature Swings Best?
The « Boil in the Bag » Effect: How to Avoid Overheating in Rain Jackets?
The single biggest mistake in British winter cycling isn’t getting cold; it’s getting wet from the inside out. You invest in a top-tier waterproof jacket, head out into the drizzle, and within 20 minutes of effort, you’re soaked in sweat. This is the dreaded « boil in the bag » effect, where your own perspiration negates the jacket’s protection, leaving you clammy, cold, and miserable the moment you stop. The cause is simple: your body is generating more heat and moisture than the jacket’s fabric can expel.
The solution lies not in finding a « perfectly » breathable jacket, but in dynamic venting. For high-exertion activities like cycling, even the most advanced materials have their limits. Technical tests show that jackets rated 20,000g/m² or higher are considered very breathable, but this rating is achieved in a lab, not halfway up a 15% gradient. The real skill is to manage airflow proactively. This means anticipating heat build-up. Are you approaching a climb? Unzip your jacket and open your pit zips *before* you start working hard, not when you’re already overheating.
Furthermore, reconsider the need for full-blown waterproofing. For the classic British drizzle, a highly breathable, water-resistant softshell often provides more comfort than a rigid hardshell. It blocks the wind and sheds most of the rain, but its primary function is to let sweat escape, keeping your microclimate stable and comfortable. The jacket is just one part of the system; if your base layer is cotton, it will saturate with moisture and block any breathability the jacket offers, rendering it useless.
Action Plan: Mastering Dynamic Venting
- Pre-emptive Action: Open pit zips, chest vents, and cuff adjustments before starting a climb, not during peak exertion. Think of them as thermostats to be adjusted in anticipation of temperature change.
- Assess the Conditions: In light drizzle or intermittent showers, prioritise breathability. A high-quality, DWR-coated softshell or gilet will often serve you better than a full hardshell.
- Audit Your Base Layer: Ensure your first layer is a moisture-wicking fabric like merino wool or a technical synthetic. Cotton is your enemy; it holds sweat against your skin.
- Use the Double Zip: If your jacket has a two-way zip, use it. Unzipping from the bottom creates a significant channel of airflow to cool your core while keeping your chest and neck protected from wind and rain.
- Check the Ratings: When buying new gear, look for a breathability rating. Anything above 10,000g/m² is a good starting point to prevent the worst of the « boil in the bag » effect for most riders.
Neoprene Overshoes: Do They Actually Keep Feet Dry or Just Warm?
Frozen feet can end a ride faster than almost any other discomfort. The go-to solution for many is a thick pair of neoprene overshoes. However, a common complaint is that after an hour in proper rain, your feet are still wet. This leads many to believe the overshoes have failed. But this misunderstands how they work. The goal of neoprene isn’t to keep your feet dry; it’s to keep them warm while wet.
Neoprene overshoes operate on the wetsuit principle. They are not designed to be a perfect barrier. Instead, they allow a small amount of water to enter, which is then trapped between the fabric and your shoe. Your body heat quickly warms this thin layer of water, creating an insulating barrier against the cold outside. Your feet will be damp, but they will remain surprisingly warm. The real point of failure isn’t the material itself, but water ingress from the top cuff or through the cleat holes at the bottom.

As you can see, the material itself repels water, but the system’s integrity depends on its seals. A pro-level hack often missed in guides is to seal the top. Always pull your bib tight’s leg grippers or leg warmers *over* the top cuff of the overshoe. This creates a much more effective seal, preventing rain from running down your legs and straight into your shoes, which is the primary way the system gets overwhelmed. Understand that this system has limits; in prolonged, freezing rain over several hours, your body may not be able to produce enough heat to keep that trapped water warm.
Echelon Riding: How to Draft Safely in a Group on Windy Days?
A biting crosswind is a defining feature of a British winter ride, capable of turning a flat road into a relentless uphill battle. Riding alone in these conditions is demoralising and exhausting. However, in a group, you can use the wind to your advantage through a formation called an echelon. By staggering yourselves across the road, riders create a moving shield, and studies show that cyclists can save up to 30% of their energy in an echelon formation compared to riding in a single file line.
While highly effective, riding in an echelon is a skill that demands communication, trust, and a clear understanding of safety protocols. It’s not simply about hiding behind the rider in front. You must position yourself diagonally behind and to the side of them, in the pocket of air sheltered from the wind. If the wind comes from the left, the echelon will fan out to the right side of the road, and vice-versa.
Safety is paramount. The formation must be fluid and react to traffic. Here are the core rules for safe echelon riding:
- Read the Wind: Before the crosswind hits, use environmental cues like swaying trees or ripples on puddles to anticipate which way the group will need to form.
- Communicate Rotations: The rider at the front takes the brunt of the wind. They should only pull for a short period (30-60 seconds) before rotating to the back. A ‘flick of the elbow’ is the universal signal to the rider behind that it’s their turn to pull through.
- Signal Hazards: Constant communication is vital. Use hand signals to point out potholes, gravel, or other road hazards. The lead rider should shout « Car back! » when traffic is approaching from behind, at which point the echelon must collapse back into a single or double file to allow the vehicle to pass safely.
- Never Half-Wheel: The most dangerous mistake is overlapping your front wheel with the rear wheel of the rider in front. A sudden movement from them will cause an immediate crash. Always maintain a safe gap, keeping your front wheel behind theirs.
Black Ice Detection: How to Spot Danger Zones Before You Crash?
Of all the winter hazards, black ice is the most insidious. It’s a nearly invisible layer of frozen moisture on the road surface that offers virtually zero traction. A patch of it on a corner or descent can cause a crash before you even have time to react. While your phone’s weather app might say it’s 3°C, the road surface temperature can be significantly lower, especially in specific locations. The key to survival is not superior bike handling, but learning to read the environment and anticipate where black ice is most likely to form.
Think of it as creating a mental risk heatmap of your route. Certain topographical and environmental features are natural breeding grounds for ice. Your job is to identify and treat these zones with extreme caution, reducing your speed and avoiding any sudden inputs to the brakes or handlebars. These are the places that freeze first and thaw last.
Beyond visual cues, use your other senses. A classic sign of riding onto an ice sheet is the sudden silence as your tyre noise disappears. You may also feel an unnerving lightness in the steering. If you find yourself on ice, the survival response is counter-intuitive: do not brake and do not swerve. Keep your bars straight, unclip a foot if you can for balance, and try to coast across it. Your focus should be on damage control, not a desperate attempt at correction.
Checklist: Your Black Ice Risk Heatmap
- Bridges and Overpasses: Cold air circulates above and below, causing the surface to freeze much faster than the surrounding roads which are insulated by the ground.
- Valley Bottoms and Dips: Cold, dense air pools in low-lying areas, creating persistent frost and ice patches long after the rest of the road is clear.
- Shaded Sections: Pay close attention to areas under trees or on the north side of hills and high hedgerows. These spots don’t see the sun and remain frozen for longer.
- Farm Gates and Entrances: Runoff from fields often carries mud and moisture onto the road. This thin, dirty layer of water freezes into a treacherous, hard-to-see film.
- Areas of Water Seepage: Identify spots where water constantly weeps from banks or verges. This provides a continuous source for ice formation.
The 10-Minute Rule: How to Trick Your Brain into Riding in the Rain?
Sometimes the biggest hill to climb is the one in your own head. It’s dark, it’s raining, and the sofa is calling your name. On days like these, motivation is fickle. Discipline is what gets you out, but even that can be hard to muster. The secret isn’t to force yourself into a 3-hour epic; it’s to lower the mental barrier to entry through a process of friction removal.
Your brain is looking for any excuse to stay inside. Your job is to systematically remove those excuses the night before. Lay out all your kit in one place. Inflate your tyres and lube your chain. Charge your lights and GPS. When you wake up, the bike is ready to go, a silent invitation rather than a list of chores. This simple ritual dramatically reduces the activation energy required to get out the door.
Then, apply the 10-Minute Rule. This is a powerful psychological hack. Don’t commit to a long ride. Just commit to riding for 10 minutes. Anyone can do 10 minutes. Tell yourself that if you’re still miserable after 10 minutes, you can turn around and go home, no questions asked. What almost always happens is that after 10 minutes, your body’s thermoregulation has kicked in, the endorphins start to flow, and you realise it’s not so bad after all. You’ve overcome the initial thermal and mental shock, and you’ll probably finish your planned ride.
Here is a simple ritual to make getting out the door almost automatic:
- Create a ‘Bail-Out Plan’: Mentally (or on your GPS) map a short 30-minute loop from your house. Knowing you have an easy, pre-planned escape route reduces the anxiety of committing to a long ride in uncertain weather.
- Gear Staging Area: Designate one box or corner for all your winter gear. Jacket, gloves, overshoes, warmers, hat – everything together. No more hunting for a missing glove in the morning.
- Set Realistic Goals: The goal for the day might just be ‘get out for 45 minutes’. That’s a win. Don’t compare your winter mileage to your summer peaks.
- Warm From the Inside: Have a hot coffee or tea before you head out. It helps to pre-warm your core and makes the initial blast of cold air less of a shock to the system.
The 3-Layer System: How to Adjust for Wind Chill Without Overheating?
The classic advice to « dress in layers » is sound, but incomplete. The real art is in how you manage those layers on the fly. A typical British winter ride can see the « Feels Like » temperature swing by 10°C due to changes in wind, sun, and altitude. Your layering system needs to be a flexible thermostat, not a static suit of armour. The core of this system consists of three parts: a wicking base layer, an insulating mid-layer, and a protective outer shell.
However, the most versatile and crucial piece of kit for on-the-fly temperature regulation is often a fourth, optional item: the gilet (or vest). It protects your core—where your vital organs are—from wind chill, which is the primary cause of heat loss. Yet, by leaving your arms exposed, it allows for massive heat dissipation. A packable gilet that can be stowed in a jersey pocket is your single best tool for managing temperature swings. Start the ride with it on, then take it off as you warm up or before a long climb.
You need to think about which items can be adjusted while riding and which require a stop. Arm warmers and gilets are designed for on-bike removal and stowage. A full jacket, however, is much harder to take off safely while moving. Therefore, you should anticipate changes. Before a long climb, stop briefly to remove your jacket and stuff it in a pocket. Before a long, windy descent, stop at the top to put it back on. Always dress for the second mile of your ride, not the first; you will warm up.
And most importantly, always pay attention to the « Feels Like » temperature, which accounts for wind chill, rather than the absolute temperature on your weather app. A 5°C day with a 20mph wind feels significantly colder than a still 0°C day.
Wet vs Dry Lube: Which Stops Your Chain Turning Black in Summer?
While the title mentions summer, the principles of chain lubrication become a matter of mechanical survival in winter. The black, gunky chain you might get from using a wet lube in dusty summer conditions is an annoyance. In winter, using the wrong lube or, worse, no lube, can destroy your entire drivetrain in a matter of weeks. The combination of rain, road grit, and corrosive road salt creates a potent abrasive grinding paste.
A cautionary tale from commuters illustrates this perfectly: riding just a few times on gritted, slushy roads without cleaning and re-lubing can seize a chain solid, turning it into a single, rusted, immovable piece of metal. In winter, there is no debate: you must use a wet lube. Dry lubes, which are wax-based, are washed off almost instantly in wet conditions, leaving your chain completely unprotected.
However, the application of wet lube is critical. The goal is to get the lubricant *inside* the chain rollers, where the metal-on-metal contact happens, while keeping the *outside* of the chain as clean as possible. A greasy outer chain is what attracts grit and creates that destructive grinding paste. The expert method is meticulous but effective: apply one small drop of wet lube to the top of each individual chain roller. Let it sit for 5-10 minutes to penetrate deep into the links. Then, take a clean, dry rag and aggressively wipe the outside of the chain until it looks almost dry. The lubrication is now where it needs to be—on the inside—and the outside is clean and less likely to attract contaminants.
In winter, the old « clean and lube every 100 miles » rule goes out the window. After every single wet or salty ride, your chain needs attention. A quick wipe-down and re-lube is the minimum. This small bit of maintenance is the difference between a smooth-running bike and a very expensive repair bill for a new chain, cassette, and chainrings.
Key Takeaways
- Active management over passive endurance is the key to enjoying winter cycling in the UK.
- Avoid the « boil-in-the-bag » effect by using zips and vents proactively, before you start to overheat.
- Learn to read the road for high-risk zones like shaded corners and bridges to anticipate black ice.
- Use a wet lube in winter, but wipe the outside of the chain clean to prevent creating a ‘grinding paste’ with road grit.
Merino vs Synthetic: Which Base Layer Handles 10°C Temperature Swings Best?
The foundation of your entire layering system is the piece of clothing directly against your skin: the base layer. Its job is to wick sweat away from your body to keep you dry, and to provide a foundational layer of insulation. The two dominant materials for this job are Merino wool and man-made synthetics (like polyester or polypropylene). Choosing between them is not a matter of which is « better, » but which is better for a specific type of ride—a choice that becomes critical during the famous British « café stop ».
Synthetic base layers are champions of wicking. During high-intensity effort, they move moisture away from your skin incredibly fast, making you feel dry and comfortable while you’re working hard. Their major downside, however, is that they offer very poor insulation once they are damp. The moment you stop riding, that damp fabric against your skin will make you feel intensely cold. This is the « café stop freeze » – you feel fine while riding, but start shivering uncontrollably as soon as you stop for coffee.
Merino wool, on the other hand, is a marvel of natural engineering. It wicks moisture well (though often slightly slower than top-end synthetics) but its superpower is its ability to insulate while wet. The structure of the wool fibre can absorb a significant amount of moisture vapour without feeling damp to the touch, and it retains its thermal properties. This means that when you stop, you remain warm and comfortable, even if you’ve been sweating. Its other major benefit is that it’s naturally antimicrobial, meaning it resists odour far better than synthetics. A modern hybrid fabric often provides the best of both worlds, pairing a synthetic inner face for wicking with a merino outer face for warmth.
The following table, based on data and analysis from publications like expert cycling guides, breaks down the performance characteristics for a typical UK winter ride.
| Performance Factor | Synthetic (Polyester/Polypropylene) | Merino Wool | Hybrid (Polartec Power Wool) |
|---|---|---|---|
| Wicking Speed (High-Intensity) | Excellent – fast moisture transfer | Good – slower but consistent | Excellent – combines best of both |
| Insulation When Wet | Poor – feels cold when damp | Excellent – retains warmth when wet | Very Good – warm even when damp |
| Café Stop Test (Stopped Riding) | Fail – you’ll freeze if damp | Pass – keeps you warm during stops | Pass – comfortable during stops |
| Odor Resistance | Poor – develops smell quickly | Excellent – natural antimicrobial | Very Good – merino properties dominate |
| Durability | Excellent – maintains shape | Good – can stretch/pill over time | Very Good – reinforced structure |
| Best Use Case | Solo rides, high-intensity, no stops | Social rides, variable pace, café stops | All-round winter riding, UK conditions |
Now that you’re armed with the strategies to manage your gear, your body, and your bike, the only thing left is to do it. Start small, use the 10-minute rule, and discover the quiet satisfaction of riding through the seasons. Your summer self will thank you for it.