Using fabric softener on a waterproof jacket feels like a death sentence for its DWR coating, but it’s often a reversible chemical problem.
- The core issue is a hydrophilic (water-attracting) residue that must be stripped with a targeted technical wash, not just covered up.
- Restoration is a two-part process: a precise wash to clean the fabric, followed by controlled heat to reactivate the remaining DWR polymers.
Recommendation: Stop guessing with temperatures and detergents; follow a precise, science-backed protocol to recover your gear’s performance.
There is a specific, sinking feeling every cyclist with technical gear dreads. It’s the moment you pull a prized waterproof jacket from the wash, catch the faint, sweet smell of fabric softener, and know you’ve made a terrible mistake. The next time it rains, instead of seeing water bead up and roll off, you watch in horror as the fabric darkens, soaks through, and clings to you like a cold, wet plastic bag. Your expensive, breathable, waterproof jacket now performs worse than a bin liner. The common advice— »just use a technical wash »—is useless now; the damage is done.
Most guides focus on prevention, but what happens after the foul? This is where many cyclists give up, either relegating the jacket to dry days only or replacing it altogether. However, the problem is often not permanent destruction but chemical contamination. Fabric softeners and conventional detergents leave behind a hydrophilic (water-attracting) residue that masks the factory-applied Durable Water Repellent (DWR) coating. The key isn’t just to wash it again, but to execute a chemical reset, stripping the contaminants to reveal and reactivate the original DWR underneath.
This guide moves beyond simple laundry tips and into laundry science. We will dissect the chemical reasons your gear fails and provide a step-by-step protocol for its resurrection. We will explore the critical difference between wash-in and spray-on proofers, the thermal dynamics of DWR reactivation, the enzymatic warfare needed to defeat « perma-stink » in synthetics, and the physics of why taped seams fail. This is your path to restoring your gear’s performance and your confidence in the face of a downpour.
This article provides a comprehensive, science-backed approach to technical apparel care. To navigate this detailed guide, the table of contents below outlines the key stages of restoration and maintenance we will cover.
Table of Contents: A Scientific Guide to Restoring Cycling Kit
- Spray-on vs Wash-in Re-proofers: Which Is Better for Breathability?
- 30 Degrees or 40:The « Flow State »: How Solo Riding Reduces Anxiety Better Than Meditation?
- Tumble Drying: The Secret to Reactivating DWR or a Risk of Shrinkage?
- Merino Wool Wash: How to Prevent Moth Holes and Shrinkage?
- Enzyme Detergents: Do They Really Remove the « Perma-Stink » from Synthetics?
- Taped Seams: Why They Are the First Thing to Fail on Cheap Jackets?
- Eco-Friendly Disposal: Where to Pour Dirty Degreaser Legally?
- Waterproof vs Water-Resistant Jackets: What Actually Works in a Downpour?
Spray-on vs Wash-in Re-proofers: Which Is Better for Breathability?
Once your garment is chemically clean, you may need to re-apply a DWR treatment. The choice between a spray-on and a wash-in formula is not a matter of preference but of fabric science, specifically concerning the garment’s internal construction. The primary goal is to make the outside hydrophobic while keeping the inside hydrophilic, allowing sweat to be wicked away from your body. Applying the wrong proofer can compromise this system entirely, leaving you clammy and wet from the inside out.
The deciding factor is often the presence of a wicking liner. As a Nikwax representative explained to Cycling Weekly, the choice is critical for maintaining breathability. They state:
We also recommend using a Nikwax TX.Direct Wash-In rather than the spray on, unless you have a wicking lining in the jacket
– Hewitt, Nikwax representative, Cycling Weekly – How to re-waterproof your cycling gear
The logic is simple: a wash-in proofer coats every surface, including the inner liner. If that liner is designed to wick moisture, waterproofing it will prevent it from doing its job. In this case, a spray-on proofer is superior because it allows for targeted application only to the exterior face fabric, preserving the liner’s wicking properties. For single-layer shells or garments without a dedicated wicking liner, a wash-in treatment provides thorough and even coverage.
30 Degrees or 40:The « Flow State »: How Solo Riding Reduces Anxiety Better Than Meditation?
The temperature dial on your washing machine is a critical control panel in the battle for gear longevity. The common wisdom is to wash technical kit at 30°C to be safe, but this can be an oversimplification. The choice between a 30°C and 40°C wash is a calculated trade-off between cleaning efficacy and material preservation. Sweat, body oils, and road grime are the primary enemies of breathability, and higher temperatures are more effective at dissolving these organic compounds.

A comprehensive test by BikeRadar on rejuvenating waterproof gear provides crucial insight. Their findings suggest that while a 30°C cycle is gentler on bonded elements like taped seams, a 40°C wash is significantly more effective at removing the dirt and sweat that clog the pores of a waterproof membrane and compromise the DWR coating. The build-up of this grime is often the real reason a jacket « stops working, » as it prevents sweat vapor from escaping. Therefore, for a heavily soiled garment or one suffering from the dreaded « perma-stink, » a 40°C wash with a technical detergent may be necessary to perform a deep clean.
However, this increased cleaning power comes with a risk. The adhesives used for taped seams and bonded logos can be sensitive to heat. Repeated washing at 40°C can accelerate their degradation. The optimal strategy is to use 30°C for regular, lightly soiled washes and reserve the 40°C cycle for periodic « reset » washes when performance noticeably declines or when tackling deep-set odours. Always check the manufacturer’s care label first, as this will define the absolute maximum temperature the garment can withstand.
Tumble Drying: The Secret to Reactivating DWR or a Risk of Shrinkage?
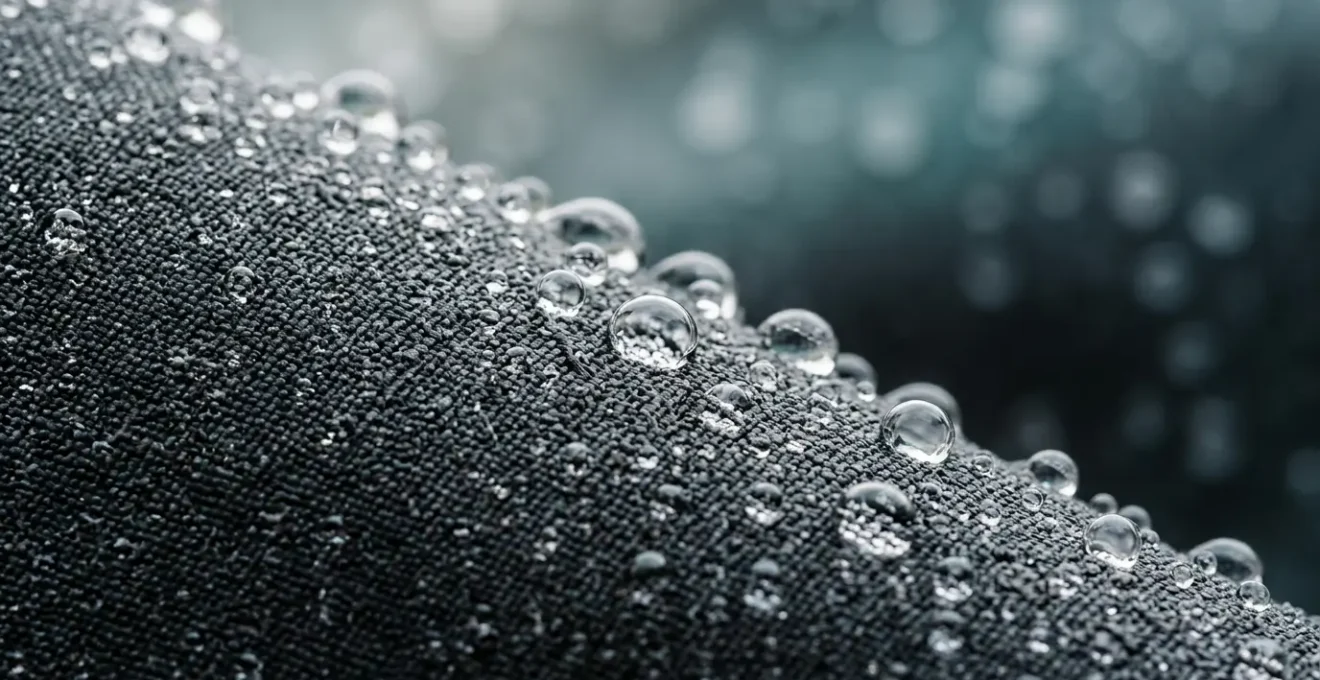
The tumble dryer is often viewed with suspicion by owners of expensive technical kit, seen as a machine of shrinkage and destruction. However, when used correctly, it is one of the most powerful tools for restoring waterproof performance. The process is not about « drying » in the conventional sense, but about thermal reactivation. DWR coatings are made of fluorocarbon polymers which, when new, are aligned to stand up like microscopic spikes on the fabric’s surface. This creates high surface tension, causing water to bead and roll off. Over time, through abrasion and washing, these polymers get flattened and disorganized. Controlled heat coaxes them to stand up and realign, restoring their water-repellent structure.
Major manufacturers like Patagonia endorse this process. According to their official care guidelines, the key is a low and slow application of heat. They recommend you dry on low heat for at least 30 minutes or until the garment is fully dry and warm to the touch. This low-temperature, extended-duration approach ensures the polymers are activated without exposing the delicate fabrics and seams to damagingly high heat. The goal is to warm the fabric, not to bake it.
To mitigate any risk of overheating or damage, a « damp-to-dry » method is the safest protocol. This involves air-drying the garment until it is just damp, then using the dryer for a short, controlled burst of heat to perform the activation. This minimizes the garment’s time in the machine and reduces the risk of shrinkage. If a tumble dryer is unavailable, a similar effect can be achieved with a hairdryer on medium heat or an iron on a low synthetic setting, always with a protective towel between the iron and the jacket.
Your Action Plan: The Damp-to-Dry Tumble Method for Safe DWR Reactivation
- Step 1: After washing, air-dry the garment until it reaches approximately 90% dryness (damp to touch but not wet).
- Step 2: Place the damp garment in the tumble dryer, ensuring it’s the only item or with similar technical fabrics.
- Step 3: Set dryer to low heat setting (not exceeding 40°C/104°F) for 15-20 minutes.
- Step 4: Check garment periodically – it should feel warm and completely dry with water beading restored on the surface.
- Step 5: If no dryer available, use a hairdryer on medium heat held 20cm away, or iron on low/synthetic setting with a protective towel between iron and fabric.
Merino Wool Wash: How to Prevent Moth Holes and Shrinkage?
Merino wool is a cyclist’s miracle fiber: breathable, insulating, and naturally odor-resistant. However, it is vulnerable to two primary enemies in the laundry and storage process: shrinkage from heat and friction, and destruction by clothes moths. Protecting your investment requires a specific care strategy that addresses both threats. Moths aren’t attracted to the wool itself, but to the microscopic traces of skin, sweat, and food particles left on a worn garment. Therefore, the first rule of moth prevention is to never store dirty merino.
For deep cleaning or if you suspect an infestation, temperature is a powerful weapon. Research on moth prevention methods shows that lethal temperatures for moth eggs and larvae are either high or very low, with studies indicating that exposure to 50-60°C for 1-2 hours or -18°C for at least 1 week is effective. While the heat method is too high for wool, placing a clean, dry garment in a sealed bag in the freezer for a week is a viable, non-chemical way to ensure it’s free of pests before long-term storage.
Proper storage is the most effective long-term strategy. Plastic bags are a mistake, as they trap moisture and can lead to mildew. Breathable containers are key. For active use, merino’s natural antibacterial properties mean it doesn’t need to be washed after every single ride; hanging it to air out is often sufficient. When it comes to washing, always use a wool-specific, pH-neutral detergent on a cold, gentle cycle, and always air-dry flat to prevent stretching and shrinkage.
Your Action Plan: Proactive Storage Strategy for a Cyclist’s Merino Wardrobe
- Prevention Rule 1: Never store worn merino garments – always wash thoroughly before long-term storage to remove sweat salts and body oils that attract moths.
- Prevention Rule 2: For seasonal storage (over 2 months), loosely fold clean merino items and place in breathable cotton or linen pillowcase with lavender sachets or cedar blocks.
- Prevention Rule 3: Use cedar blocks as natural moth repellent – refresh scent every 3-6 months by sanding surface lightly with sandpaper.
- Prevention Rule 4: Store in cool, dark, dry location with good air circulation – avoid plastic bags for long-term storage as they trap moisture.
- Prevention Rule 5: For cycling jerseys in active rotation, hang to air out between rides rather than washing after every single use, as merino has natural antibacterial properties.
Enzyme Detergents: Do They Really Remove the « Perma-Stink » from Synthetics?
The infamous « perma-stink » that plagues synthetic cycling kits is a complex chemical problem. It’s not just lingering sweat; it’s the result of a biofilm formed from body oils (sebum) that gets trapped in the tight weave of synthetic fibers. Bacteria colonize this biofilm, feeding on the oils and producing the persistent, foul odor that regular detergents can’t seem to touch. This is because conventional detergents are good at removing water-soluble dirt but struggle to break down these tough, oily biofilms. This is where enzyme detergents enter the battle.
Enzymatic detergents are biological cleaning agents containing specific enzymes designed to break down specific types of stains. For cycling kit, the most important are protease (which breaks down protein-based stains like sweat) and lipase (which breaks down fat- and oil-based stains like sebum). Lipase is the key weapon against perma-stink. These enzymes are incredibly efficient catalysts; enzyme innovation research on lipase detergent performance shows that one enzyme molecule can catalyze approximately 10,000 reactions per second, actively dismantling the oily biofilm at a molecular level.
To be effective, these enzymes need two things: time and the right temperature (typically 30-40°C). Simply running a quick wash isn’t enough. A pre-soak is the most effective technique to give the enzymes sufficient time to work their magic, breaking down the biofilm before the main wash cycle flushes it all away. By choosing a detergent with a multi-enzyme blend, you are deploying a specialized team of biological cleaners, each tackling a different component of the grime on your kit.
| Enzyme Type | Target Substrate | Cycling-Specific Application | Optimal Temperature |
|---|---|---|---|
| Protease | Protein chains (sweat, blood) | Breaks down dried sweat proteins embedded in chamois and base layers | 30-40°C |
| Lipase | Fats and oils (body oils, sebum) | Removes body oil biofilm that causes ‘perma-stink’ in synthetic fibers | 30-40°C |
| Amylase | Starches and carbohydrates | Removes energy gel and food residues from jersey pockets | 30-40°C |
| Cellulase | Cellulose microfibers | Brightens colors and prevents pilling in cotton-blend cycling wear | 20-40°C |
Your Laundry Process Audit: 5-Point Checklist for Peak Performance
- Detergent Check: Are you using a technical wash or a sports-specific enzyme detergent? Verify the ingredients for key enzymes like ‘lipase’ and ‘protease’ for fighting synthetic odors.
- Temperature Log: Review your last five technical washes. Have you been using a consistent 30°C, or have you strategically used a 40°C « reset » wash for deep-seated grime and odors?
- Pre-Treatment Protocol: Do you pre-treat heavily soiled areas (like chamois or mud-caked shorts) before the main wash? Inventory your pre-soak buckets and stain removers.
- Drying Method Consistency: How are you drying your waterproofs? Audit whether you’re consistently using a low-heat tumble dry or an alternative heat source to reactivate DWR after washing.
- Storage Inspection: Examine your long-term storage solution for merino wool. Are you using breathable, sealed containers with natural moth repellents like cedar, and are they stored in a cool, dark, dry place?
Taped Seams: Why They Are the First Thing to Fail on Cheap Jackets?
The peeling, fluttering tape on the inside of a waterproof jacket is a tell-tale sign of its mortality. These taped seams are the critical element that turns a water-resistant, stitched fabric panel into a truly waterproof garment. They cover the thousands of tiny holes made by the sewing needle during construction. Their failure is often the first point of catastrophic water ingress. While it’s easy to blame « cheap jackets, » the failure is a matter of physics and chemistry, not just price. The core issue is delamination stress.
A waterproof jacket is a system of materials with different properties. The face fabric needs to be flexible, while the seam tape is often more rigid. As a cyclist moves, the flexible fabric stretches and twists, but the rigid tape does not. This creates a constant shearing force at the adhesive boundary. Over thousands of flexion cycles, this stress causes the adhesive to break down and the tape to peel away—a process called delamination. This is accelerated by factors like the centrifugal force of high-spin cycles in the wash and chemical degradation from salt, both from sweat and road spray.
A case study by Cyclescheme on repairing failed seams highlights this mechanism and proves that a jacket with peeling seams is not necessarily ruined. By cleaning the old adhesive and applying a new sealant like McNett Seam Grip or an iron-on patch, a jacket’s waterproof integrity can be restored. This proves that preventative care is paramount. Avoiding high-spin cycles, rinsing salt off after a winter or coastal ride, and folding the jacket carefully for storage (rather than stuffing it) all reduce the stresses that lead to seam tape failure and dramatically extend the functional life of the garment.
Your Action Plan: Preventative Seam Care Protocol for Technical Cycling Jackets
- Storage technique: Fold jackets loosely along natural body contours rather than sharp creases – avoid repeatedly folding along the same seam lines which accelerates tape delamination.
- Post-ride rinse: After rides in coastal areas or winter road salt conditions, rinse jacket with clean water to prevent salt crystal accumulation that degrades seam adhesives.
- Spin cycle adjustment: Use gentle or low-spin settings (maximum 600-800 RPM) when washing to reduce centrifugal force stress on bonded seams.
- Drying position: Hang jackets on wide padded hangers rather than thin wire hangers to distribute weight evenly and prevent seam stress points.
- Regular inspection: Check seams every 10-15 washes for early signs of peeling or separation – early intervention with seam sealer prevents total failure.
Eco-Friendly Disposal: Where to Pour Dirty Degreaser Legally?
Caring for your technical kit extends beyond the garments themselves and into the byproducts of the cleaning process. While a greasy chain or muddy shorts are part of cycling, how we dispose of the resulting grime has an environmental impact. Pouring a bucket of concentrated, muddy, and potentially greasy water directly down the drain can introduce sediment and petrochemicals into the water system. A responsible cyclist adopts a multi-stage approach to minimize this impact, especially after a particularly dirty ride.
The principle is to separate solids from liquids before disposal. The bulk of the mud and grit on your kit is inert sediment. By pre-rinsing your garments in a bucket, you can capture the vast majority of this solid waste. Allowing this bucket to sit for an hour lets the sediment settle at the bottom, a simple process of gravity-based separation. The resulting sludge can then be disposed of as solid waste in your regular trash, while the remaining, much cleaner water can be poured down the drain with minimal impact, especially if you’ve used a biodegradable cleaner.
This two-stage process not only protects the environment but also protects your washing machine. Introducing large amounts of grit and mud directly into your machine can clog filters, abrade the drum, and damage the pump over time. Taking five extra minutes to perform a manual pre-rinse and sediment separation is a hallmark of a cyclist who understands their gear and their environmental responsibility.
Your Action Plan: Two-Stage Cleaning Process for Muddy Cycling Kit
- Stage 1 – Pre-Rinse in Bucket: Fill bucket with cold water and perform initial rinse of muddy, greasy kit to remove bulk sediment before machine wash.
- Stage 2 – Sediment Settling: Allow sediment to settle at bottom of bucket for 30-60 minutes – this separates mud particles from water.
- Stage 3 – Proper Disposal: Dispose of settled sediment in regular trash bin (small amounts) or let dry completely and dispose as solid waste.
- Stage 4 – Water Disposal: Highly diluted pre-rinse water from Stage 1 can be poured down drain if using biodegradable detergent, but check local regulations.
- Stage 5 – Machine Wash: Transfer pre-rinsed garments to washing machine for proper cleaning cycle without contaminating machine or drain with excessive mud.
Key Takeaways
- DWR failure is often not permanent damage but reversible chemical contamination that can be stripped with a technical wash.
- Heat from a tumble dryer is a critical tool for DWR *reactivation* by realigning fluorocarbon polymers, not just for drying.
- Enzyme detergents, particularly those with lipase, are the only true solution for eliminating the « perma-stink » biofilm from synthetic fabrics.
Waterproof vs Water-Resistant Jackets: What Actually Works in a Downpour?
The terms « water-resistant » and « waterproof » are often used interchangeably, but in the world of technical apparel, they represent vastly different levels of performance, backed by objective metrics. A water-resistant jacket, typically treated with a simple DWR coating, can handle light showers or road spray for a short period. A truly waterproof jacket, however, is engineered with a membrane (like Gore-Tex) and taped seams, designed to withstand sustained downpours. The difference is quantifiable through two key ratings: the waterproof rating (measured in millimeters, mm) and the breathability rating (measured in g/m²/24hrs).
For serious cycling, the numbers matter. According to comprehensive rain jacket testing for bikepacking applications, a jacket needs a rating of over 15,000mm to be considered effective in heavy, sustained rain, with high-performance gear exceeding 20,000mm. Equally important is breathability; a rating of 20,000g/m² or higher is essential for high-output activities like cycling to allow sweat vapor to escape, preventing you from getting soaked from the inside.
| Waterproof Rating (mm) | Breathability Rating (g/m²/24hrs) | Cycling Context | Recommended Use Case |
|---|---|---|---|
| 5,000-10,000mm | Under 10,000g/m² | Light rain, short commutes | City cycling in changeable weather, emergency backup jacket |
| 10,000-15,000mm | 10,000-15,000g/m² | Moderate rain, everyday riding | Regular commuting, recreational rides, touring in mild conditions |
| Over 15,000mm | 15,000-20,000g/m² | Heavy rain, climbs with sweat | All-day epics, mountain riding, multi-day bikepacking |
| Over 20,000mm | Over 20,000g/m² | Extreme conditions, sustained downpours | Alpine cycling, winter riding, professional racing in wet conditions |
However, the most crucial lesson for any cyclist is that these impressive ratings are entirely dependent on the performance of the DWR coating on the outer fabric. A case study by BikeRadar revealed the critical phenomenon of « wetting out. » When the DWR fails due to dirt or damage (like from fabric softener), the outer fabric becomes saturated. This liquid water layer completely blocks the pores of even the most advanced breathable membrane. As a waterproofing specialist confirmed in the study, « This isn’t the membrane letting water in, it’s your sweat not getting out. » A wetted-out $500 jacket performs no better than a cheap plastic poncho. This single fact elevates DWR care from a minor maintenance task to the absolute key that unlocks a jacket’s entire performance potential.
Armed with this chemical and physical knowledge, you’re no longer just washing clothes; you are performing a technical restoration. Apply this protocol to your next wash and witness the return of water-beading performance, transforming a « ruined » garment back into a piece of high-performance equipment.